Homemade Cinnamon Rolls
Never search for another homemade cinnamon rolls recipe again!This is the one and only recipe you’ll need! My unique, but easy-to-find, ingredients make them bake up super fluffy and stay soft for days! Top these cinnamon rolls with cream cheese icing – they will melt in your mouth with every indulgent bite! You’ll also love that you can double the recipe and use half the roll dough for cinnamon rolls, and the other half for Homemade Crescent Roll Dough! Be sure to watch my video for step by step help, and make these the best cinnamon rolls you’ve ever had!

These are the very homemade cinnamon rolls that I used to bake for my home bakery customers. Thousands of happy customers enjoyed these for the 10 years I ran my bakery! (More about my bakery here.) They’re always a hit for delicious baked breakfast recipes , a Christmas or Easter brunch menu, cozy fall desserts like my Biscoff Cinnamon Rolls version, or anytime you want something sweet and delicious!
One reader says: “Oh my! Love this recipe so much! Made the dough and after splitting, I did half of the recipe as crescent rolls for Christmas Eve dinner and the other half mad the most delicious cinnamon rolls for Christmas morning. Thank you so much for share with easy tips and great pictures for even a beginner to feel successful!” ⭐️⭐️⭐️⭐️⭐️
Why you should Never make any other Homemade Cinnamon Rolls
- Soft & fluffy – Special ingredients make these bake up perfectly.
- Stays fresh for days – No more cinnamon rolls that dry out the next day. My unique ingredients keep these cinnamon rolls soft for several days!
- One dough, TWO recipes – You can double this recipe and make two recipes – it can be used for both crescent roll dough or homemade cinnamon rolls. Use my best roll dough for other things too like this Christmas Cinnamon Roll Wreath or a Giant Cinnamon Roll for a special occasion like Father’s day.
- Cream Cheese Icing – The slight tang from the cream cheese balances perfectly with all the sweetness. I also have a brown butter cream cheese icing that I like to pair with regular cinnamon rolls or my Pumpkin Cinnamon Rolls.
- Overnight Cinnamon Rolls – Find make-ahead options at the end of this post. It’s a great way to make your baking timeline more flexible.
Table of contents
- Why you should Never make any other Homemade Cinnamon Rolls
- Ingredients for the best Homemade Cinnamon Rolls
- Ingredient Substitutions and Variations
- How to make Homemade Cinnamon Rolls
- Storing options
- How to make Overnight Cinnamon Rolls
- Frequently Asked Questions
- More Homemade Cinnamon Roll recipes to try
- Homemade Cinnamon Rolls Recipe
Ingredients for the best Homemade Cinnamon Rolls
- Bread flour – This higher protein (higher gluten forming) flour works well in this dough enriched with butter, shortening, and eggs. The more protein in the flour, the better structure it gives the dough – making this soft dough easier to handle and roll out your homemade cinnamon rolls.
- Instant yeast – This is a type of commercial yeast I almost always opt for. You can add it directly to your recipe without having to “bloom” the yeast first. Instant yeast is already activated and will rise the dough quickly – which means, you get to enjoy yummy homemade cinnamon rolls even sooner!
- Butter flavored shortening – This additional fat (besides butter) add an extra soft texture and buttery flavor to these homemade cinnamon rolls. Trust me – it makes a big difference!
- Potato flakes – Also called, instant mashed potatoes, these dehydrated potatoes introduce more starchiness to the bread dough. When hydrated, the starches are excellent at holding onto moisture. This is a key ingredient that yields gooey homemade cinnamon rolls that stay soft for days.
- See the recipe card for a full list of ingredients and measurements.
Ingredient Substitutions and Variations
While this recipe has some unique ingredients that really set these homemade cinnamon rolls apart from other recipes, there are some substitutions and variations you can use if you don’t have access to one or more ingredient.
- Bread flour – You can use all-purpose flour instead. Since the protein content is a little lower, you may notice that you’ll need to use a little extra flour to get the dough less sticky. It also may be a more difficult to work with when rolling out – dust with more flour as needed when rolling out.
- Instant yeast – You can use active dry yeast instead. If you do, you’ll need to “bloom” the yeast first. Add the active dry yeast to 1/2 cup of the warm water with a pinch of sugar added. Let it sit for 15 minutes. If the yeast becomes bubbly and foamy, it’s good to use. If not, you’ll need to replace it with a new packet of yeast. You can read more about Active Dry Yeast vs. Instant Yeast here.
- Butter flavored shortening – I understand this is not available world wide, or you may not like to bake with shortening. In that case, you can swap out the shortening for additional butter. You’ll use the 1/4 cup of butter already called for in the recipe, plus 1/2 cup more butter (to replace the shortening). The results will still be delicious, just maybe not quite as fluffy.
- Potato Flakes (aka Instant Mashed Potatoes) – If potato flakes aren’t available where you live, you can swap these out with real potatoes. Bake one potato until tender. Remove the skin and mash. Use 1/3 cup of real, mashed potatoes for every 1/2 cup of potato flakes. That way, you’ll still get the benefits from adding the starch to the dough.
How to make Homemade Cinnamon Rolls
Mixing the dough
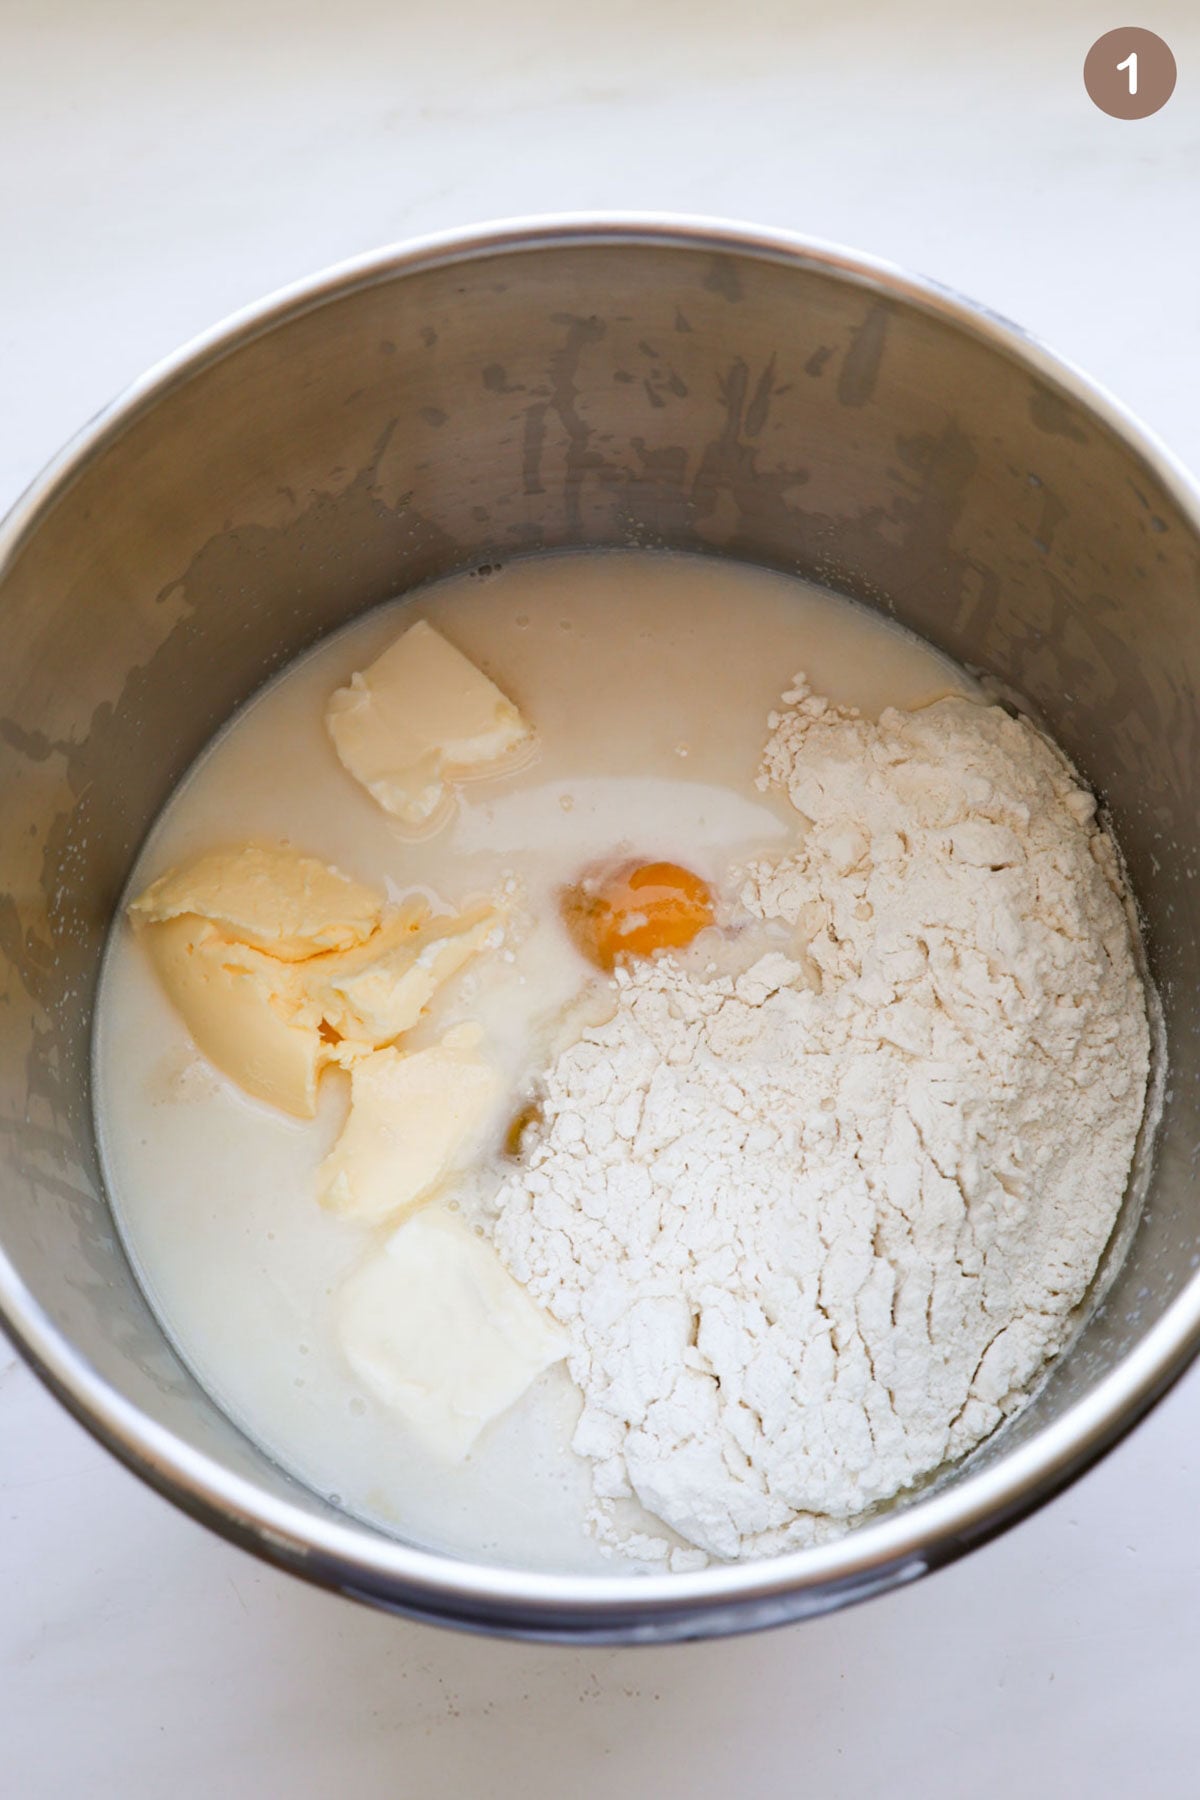
Step 1: To the bowl of a stand mixer, combine all the ingredients but only half the flour. Mix until smooth.
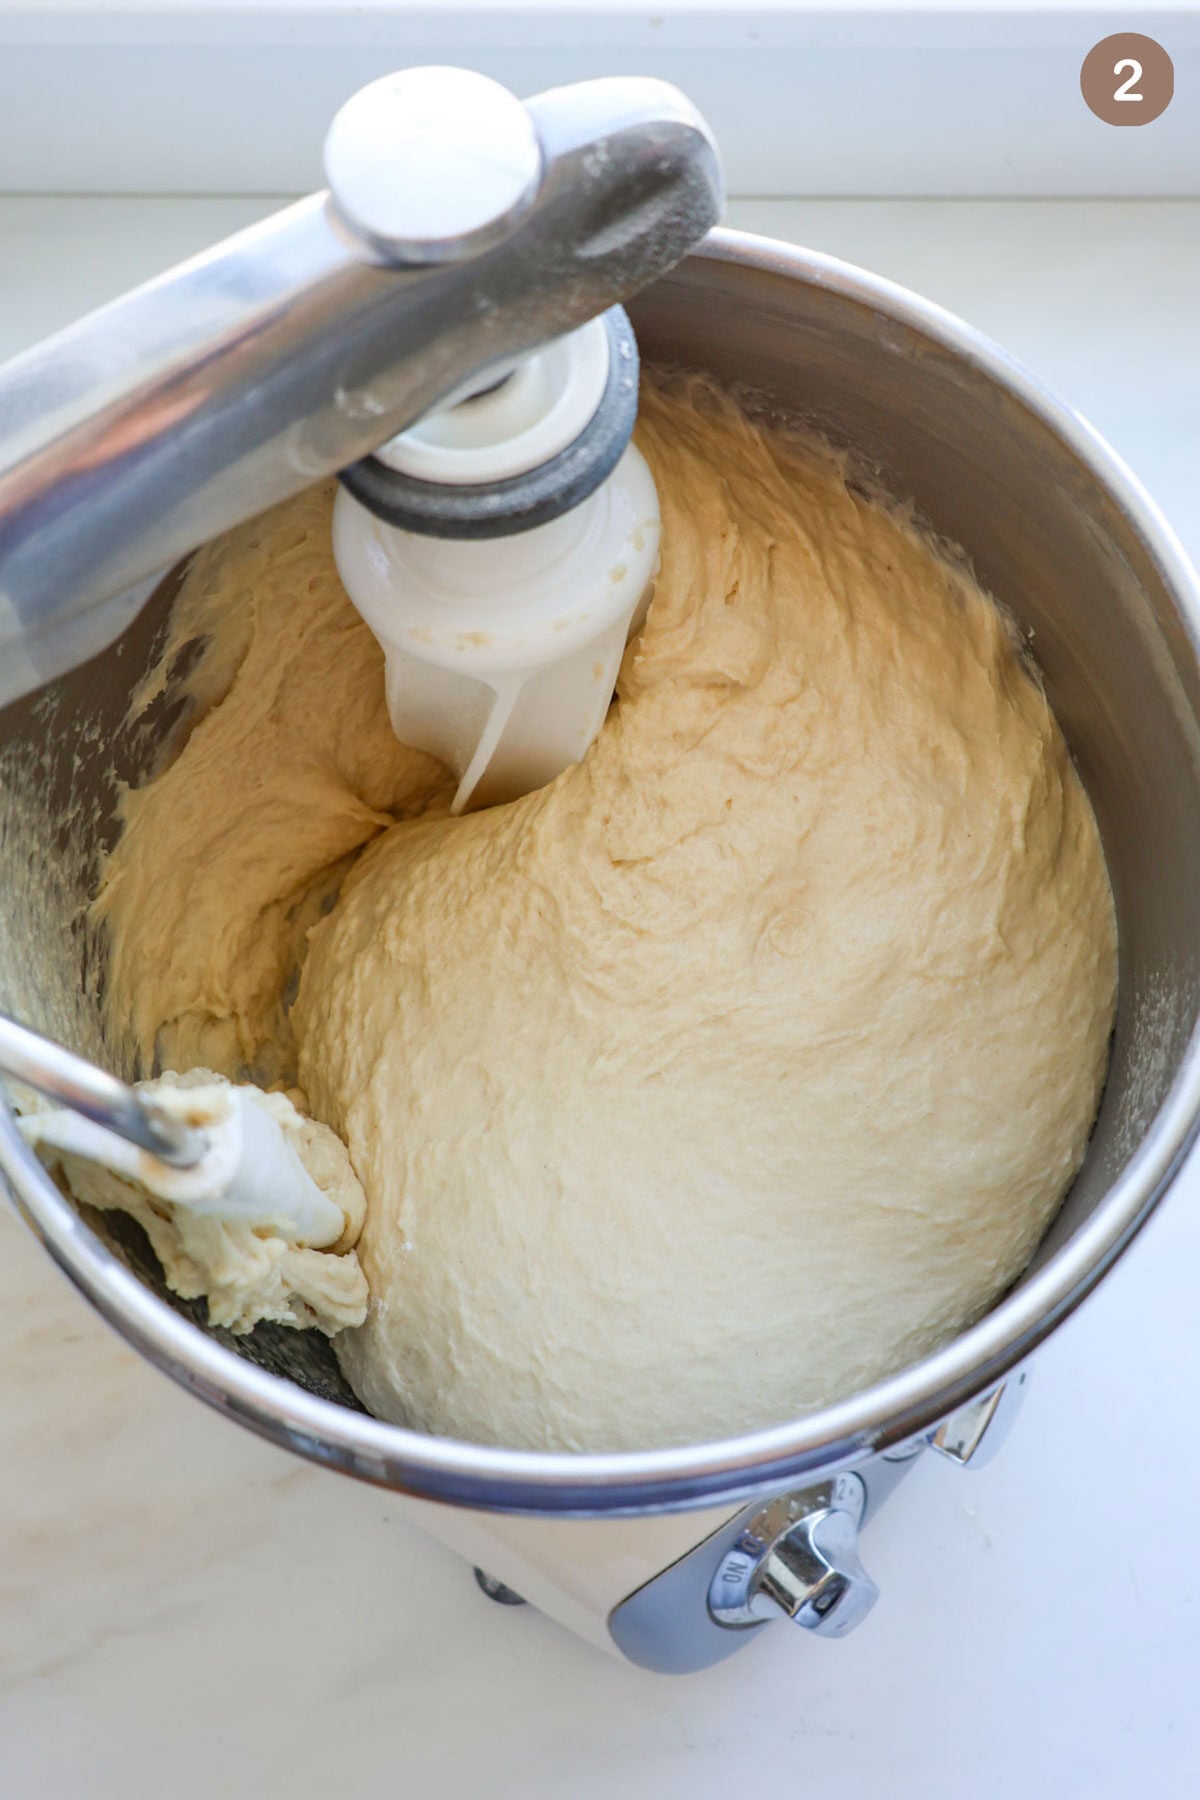
Step 2: Gradually add the rest of the flour. Knead on low for 10-15 minutes, until the dough is smooth and cohesive.
A note about cinnamon roll dough – It should be soft but cohesive. After you’ve kneaded the dough, you may feel the need to add more flour. But before you do, look for these signs first:
- The dough should feel “tacky” – Homemade cinnamon rolls are made with a soft, tacky dough. This means it slightly sticks to your finger when you tap it on the dough. It’s okay if it’s a bit sticky. It will become much easier to handle after the first rise. However, the dough should not feel wet. If it does, add 2 more Tablespoons of flour and fully incorporate it. Then see how the dough feels. Add more flour if needed.
- Hugging the hook – The dough should be mostly cleaning the sides of the mixer bowl and collecting around the dough hook attachment.
- Texture – After kneading, you should be able to pull the dough 2-3 inches apart without it immediately tearing. If the dough tears easily and has a shaggy texture, knead it for a few more minutes and then check it.
Bulk Fermentation (1st Rise)
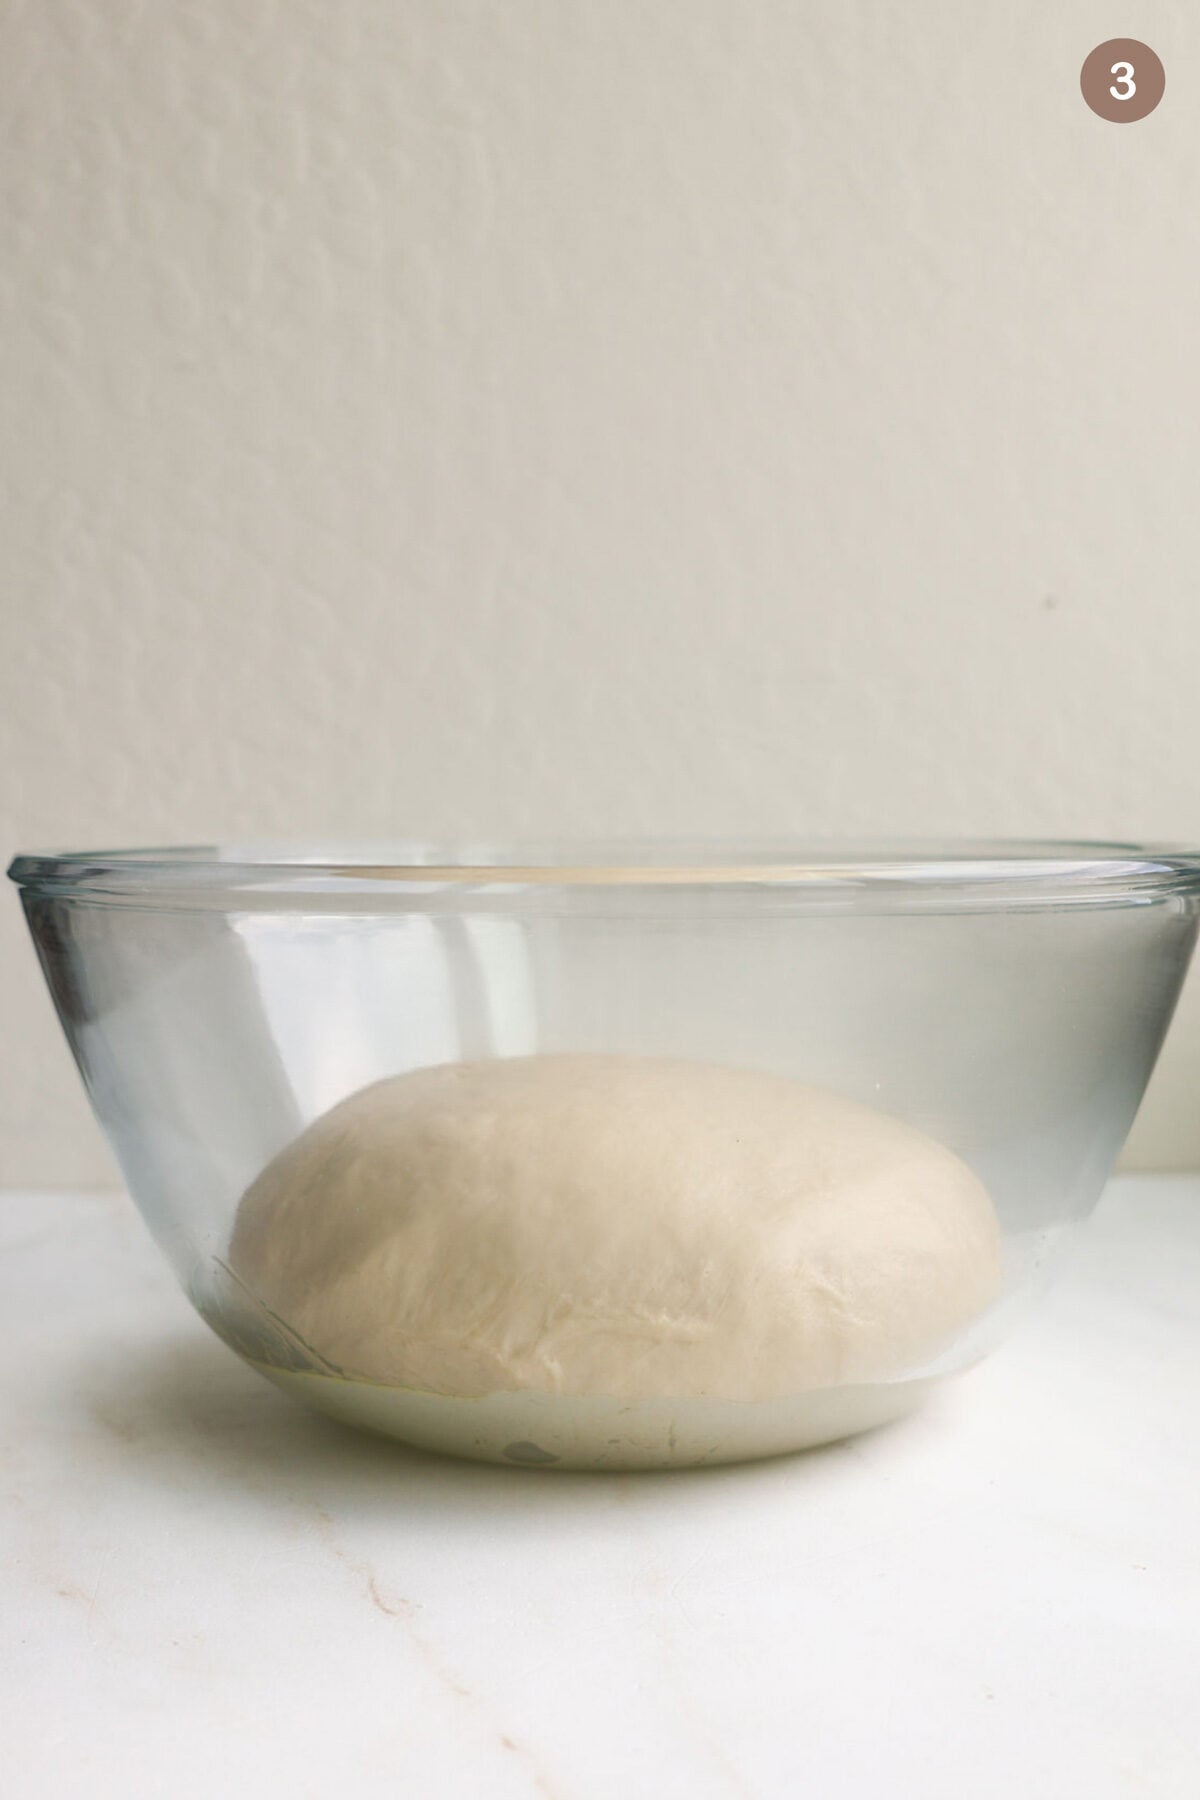
Step 3: Place the dough in a large bowl, coated with nonstick baking spray. I like to make sure all sides of the dough get coated in the oil and that the dough is rounded out to a smooth ball.
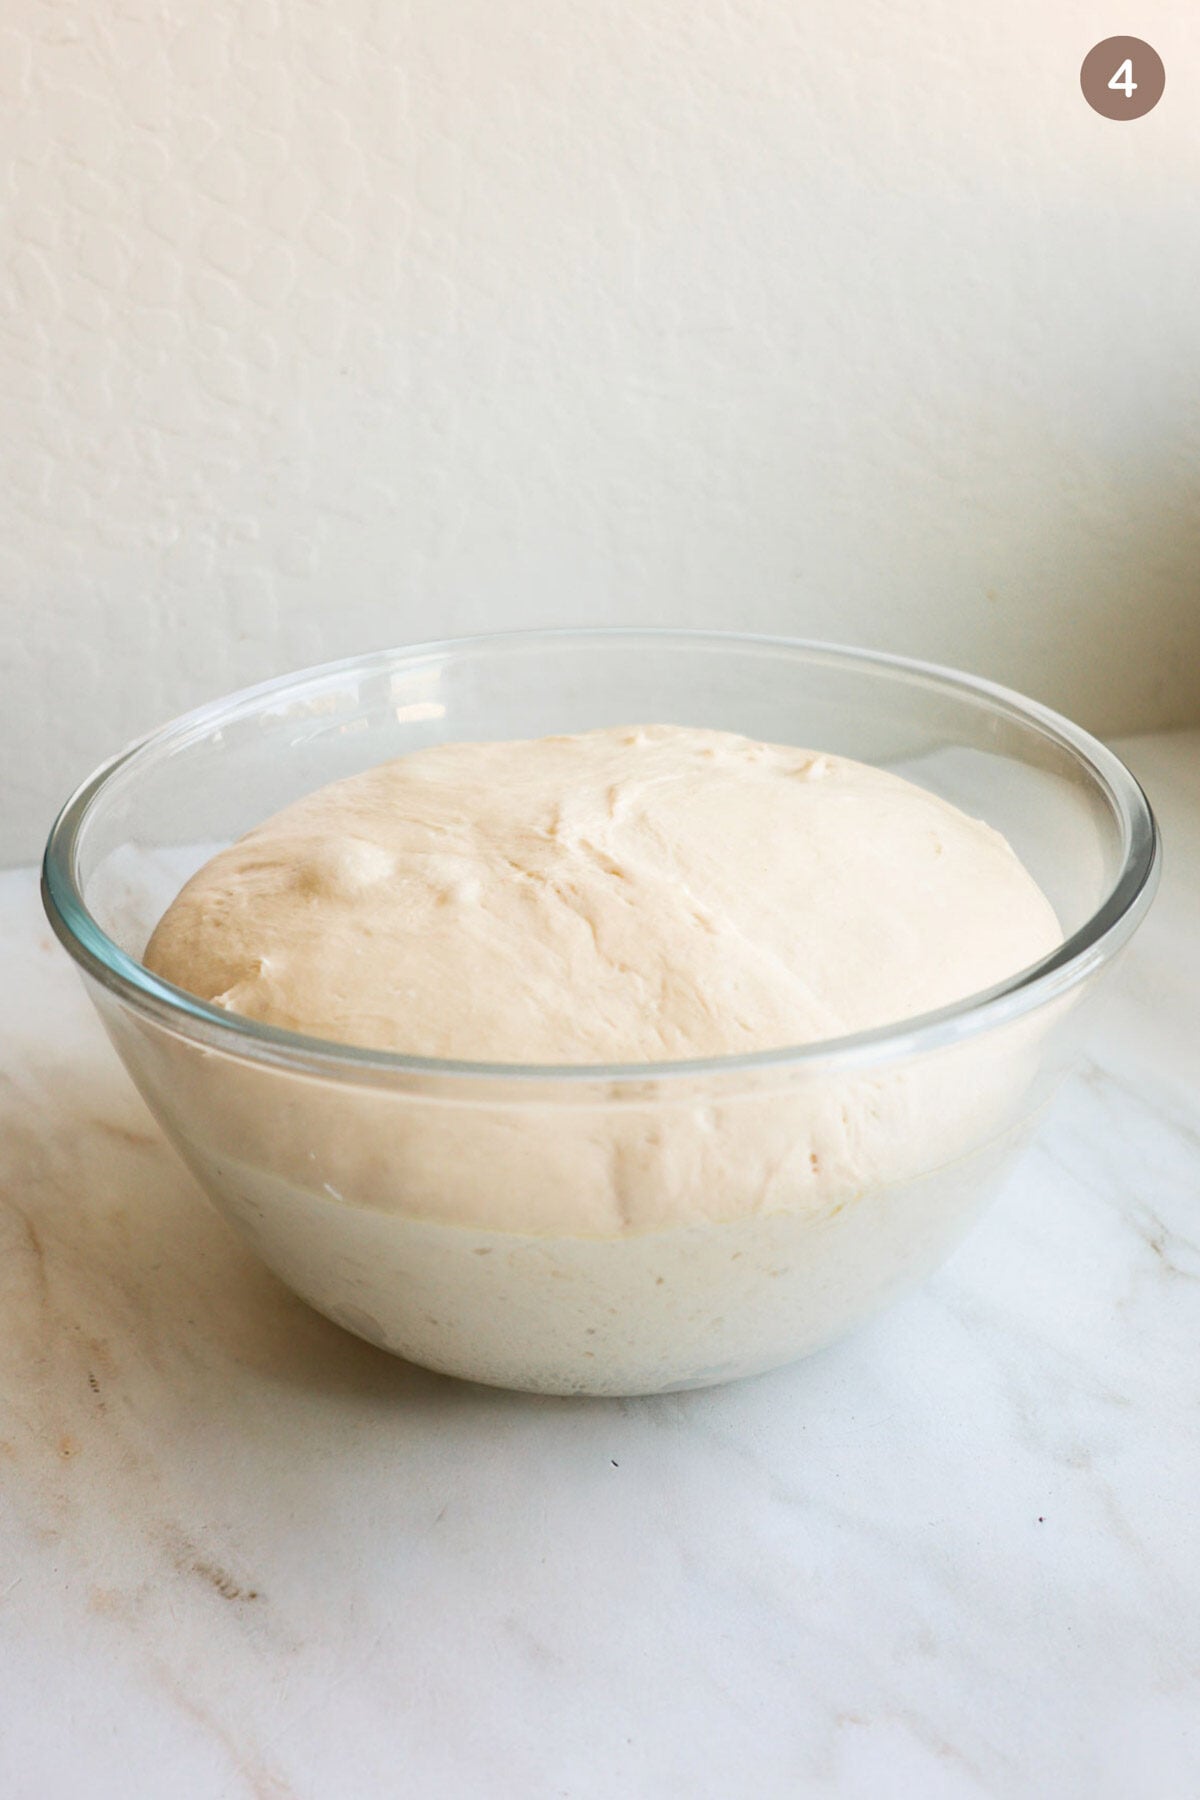
Step 4: Cover the bowl and let the dough rise in a warm place in your kitchen, until it doubles in size. Depending on how warm your kitchen is, this could take anywhere from 90 minutes to 2 hours.
Rolling out the dough
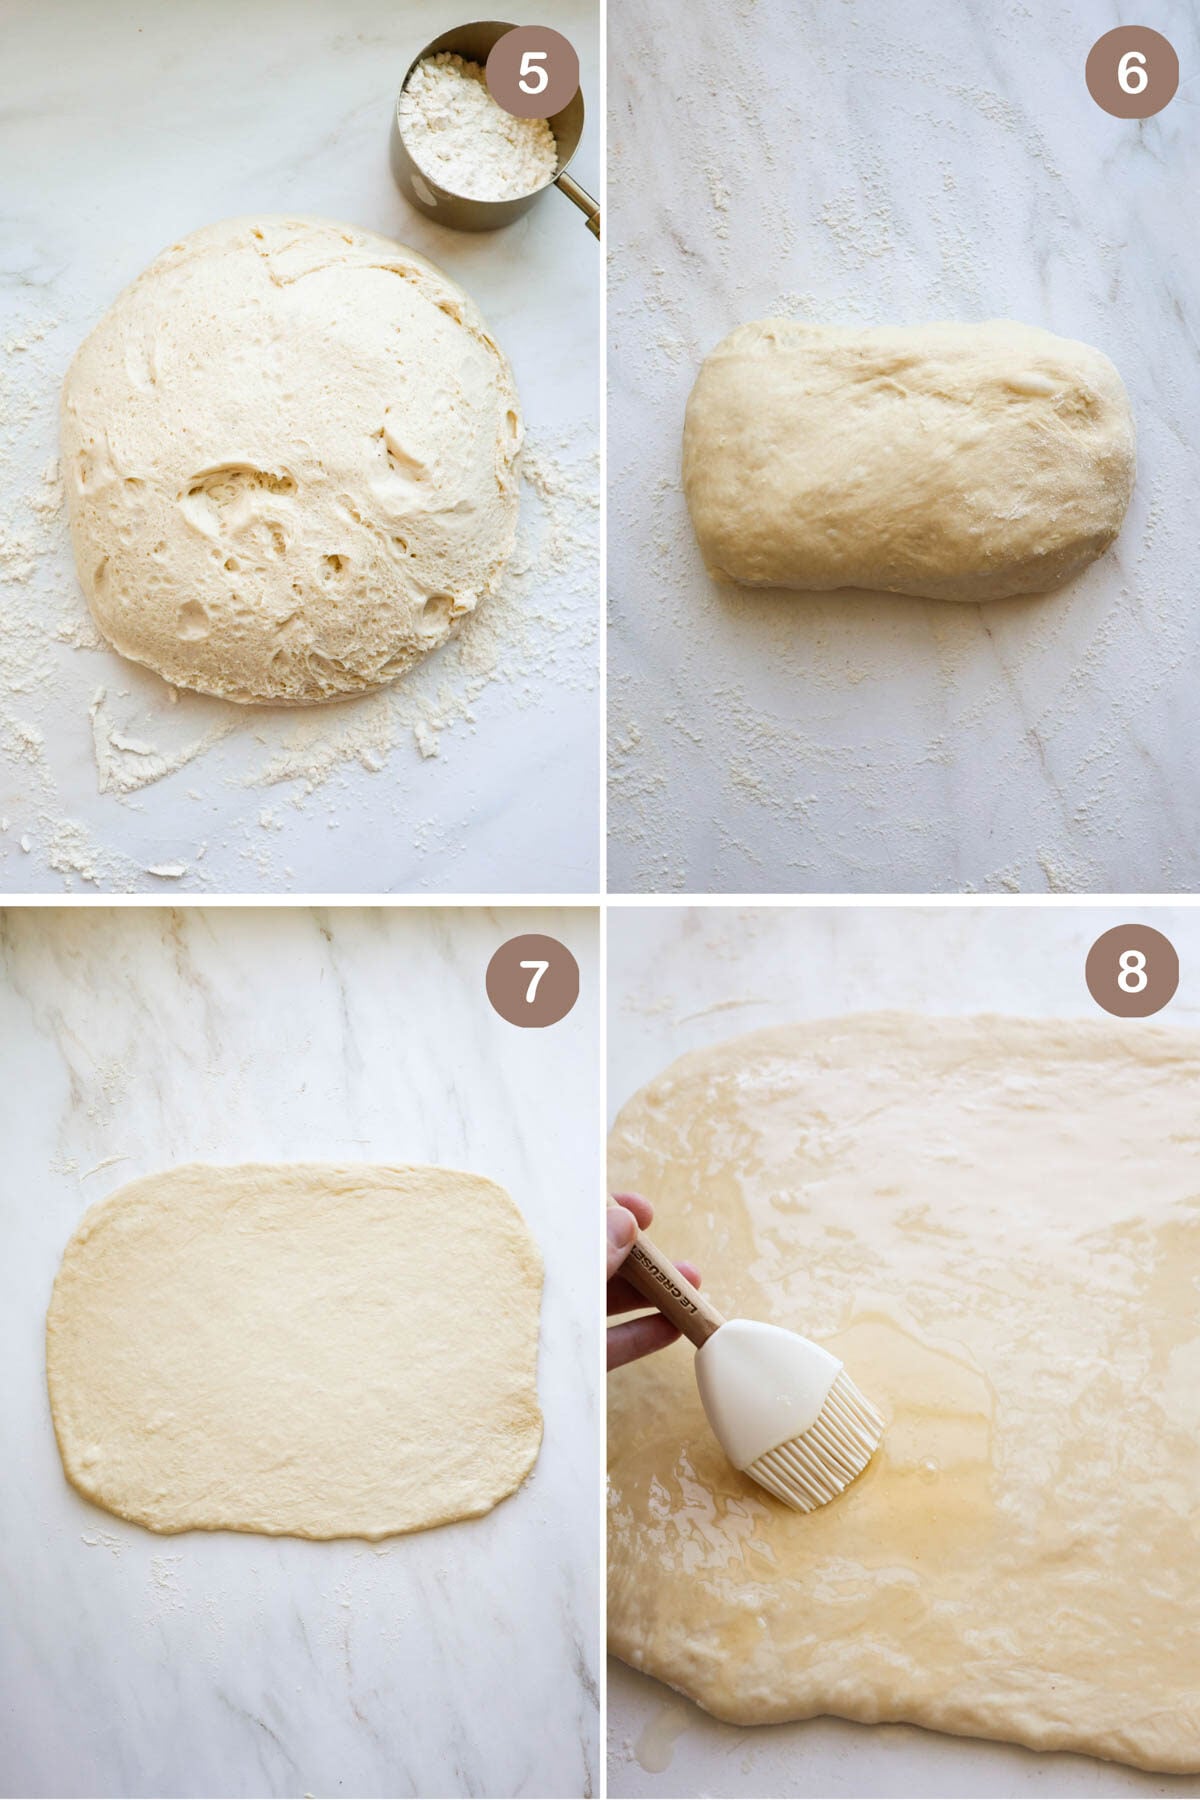
Step 5: Flour your work surface and turn out the risen dough. Divide the dough into 2 equal pieces, about 28 ounces each. Step 6: Flour all sides of the cinnamon roll dough and pinch it (pre-shape) into an oblong shape. Step 7: Working with one piece of dough at a time, use a rolling pin to roll it to a 12×18-inch rectangle. Step 8: Brush the surface with melted butter, leaving a 1 inch board on the long side furthest from you.
👩🍳Baker’s tip: If you’re rolling out the dough and it keeps shrinking back, that’s a sign that the gluten needs to relax. Simply cover the dough with a clean towel and let it rest for 15 minutes. Come back to it and try to roll it out again. The dough should be much more relaxed and will easily roll out.
This is a technique I use all the time for recipes like my All Butter Pie Crust and Easy French Bread.
Filling and shaping cinnamon rolls
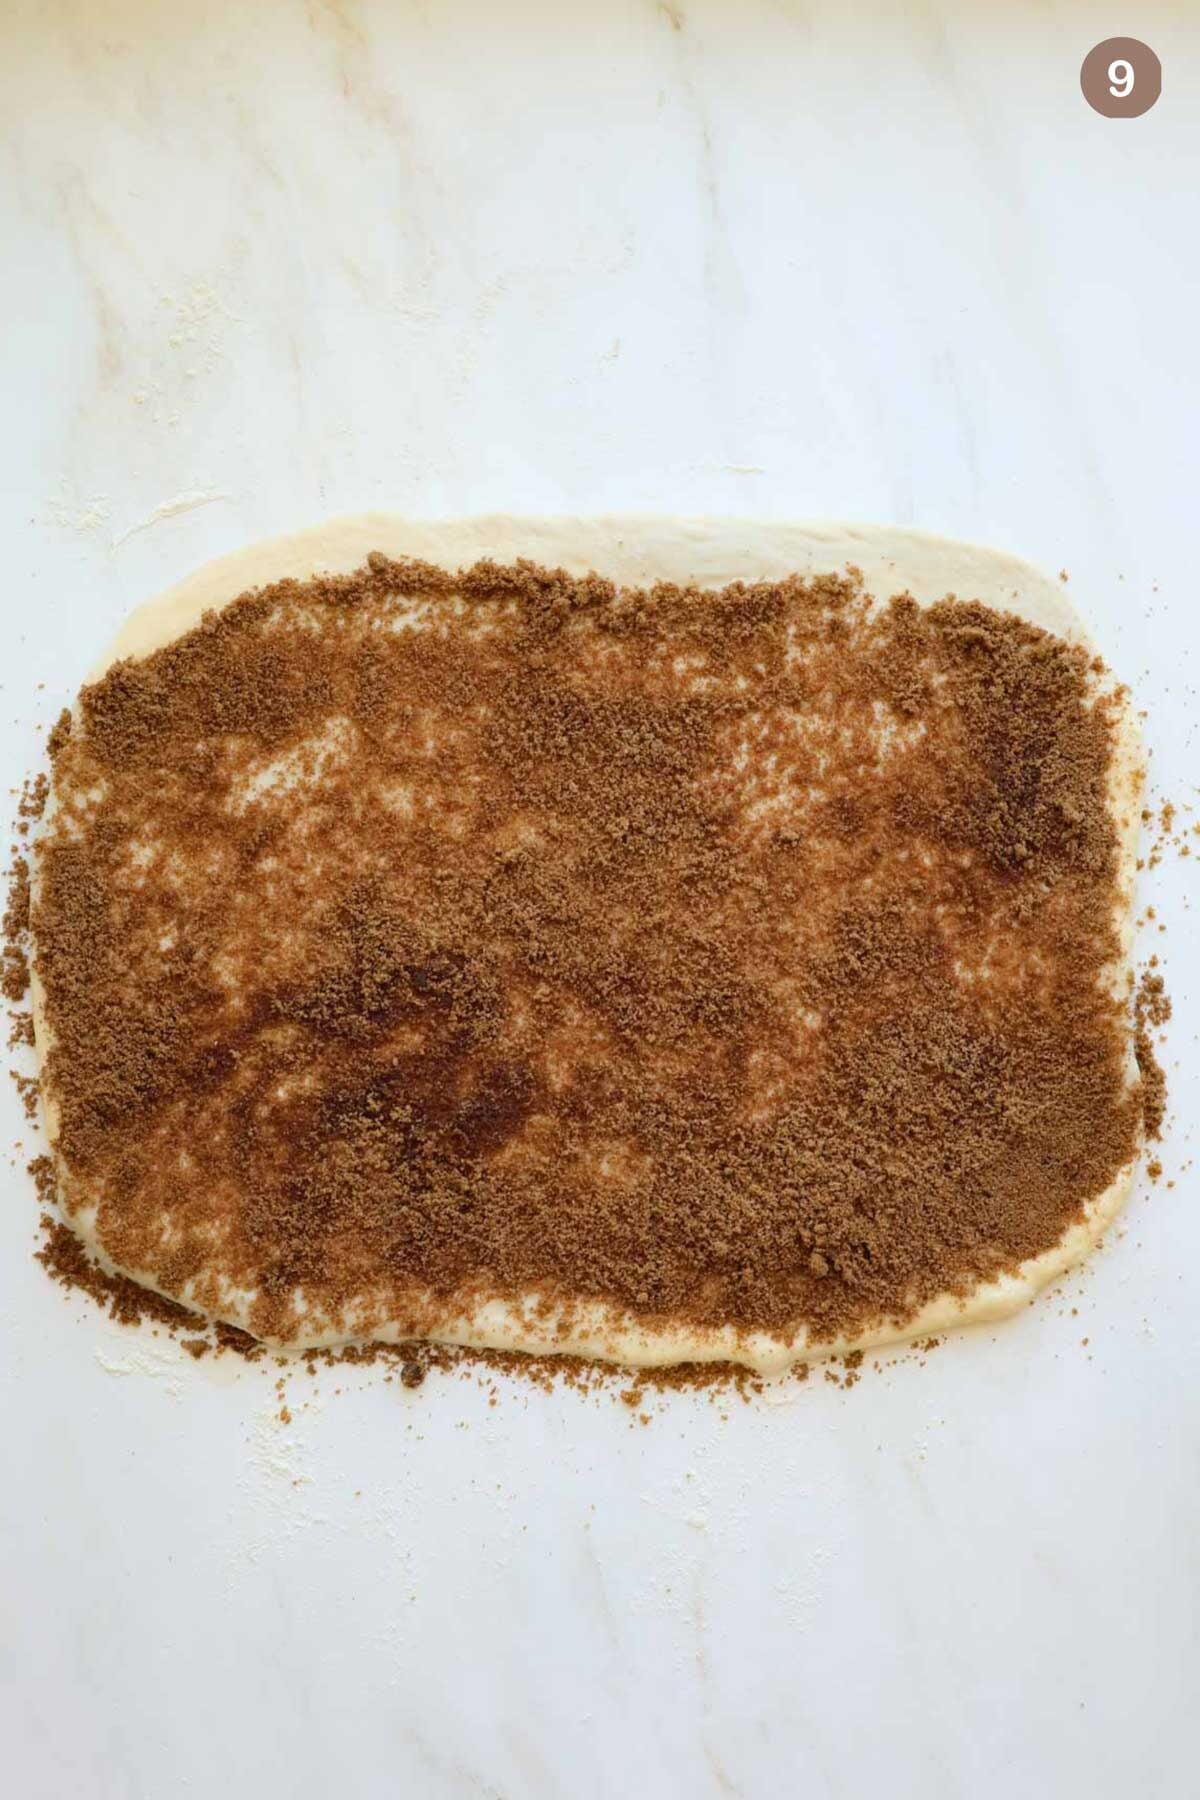
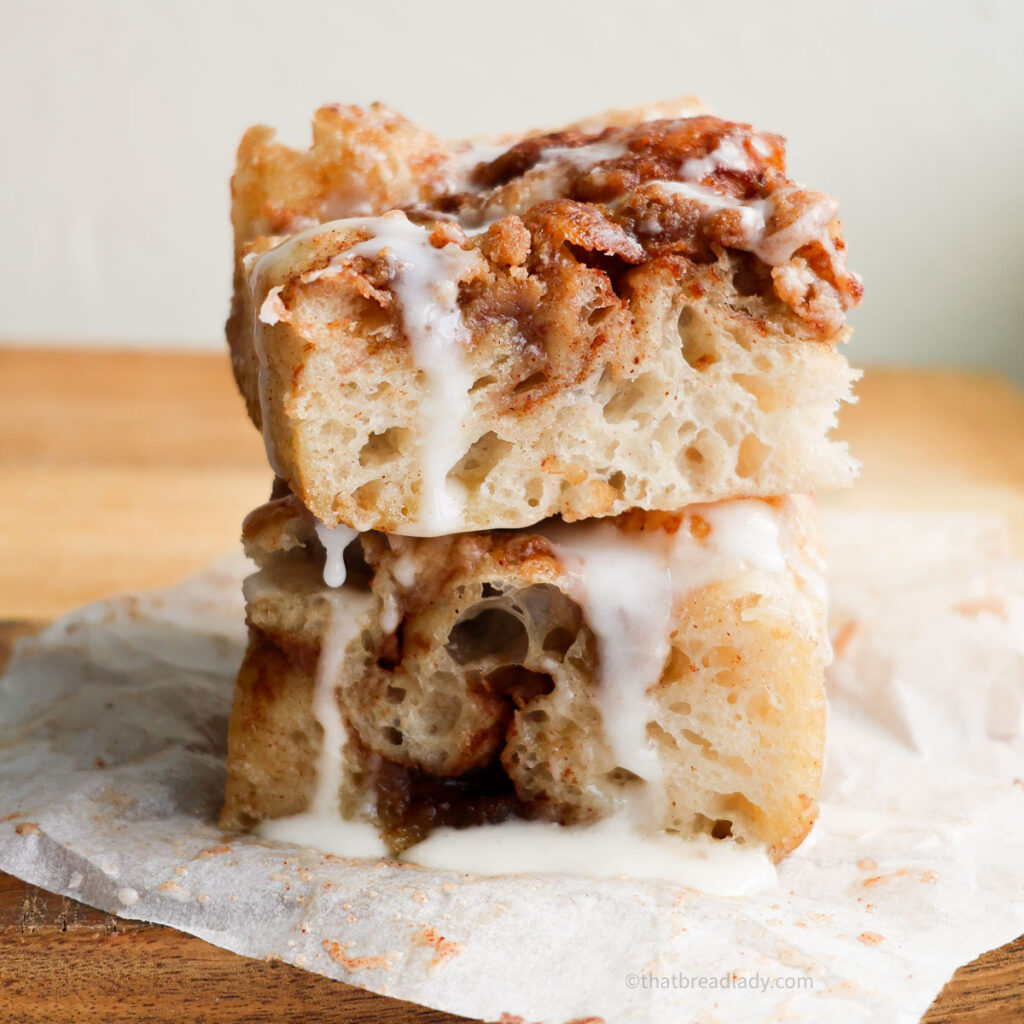
Step 9: Spread the brown sugar and cinnamon filling over the melted butter. Don’t forget to leave that 1-inch border at the top.
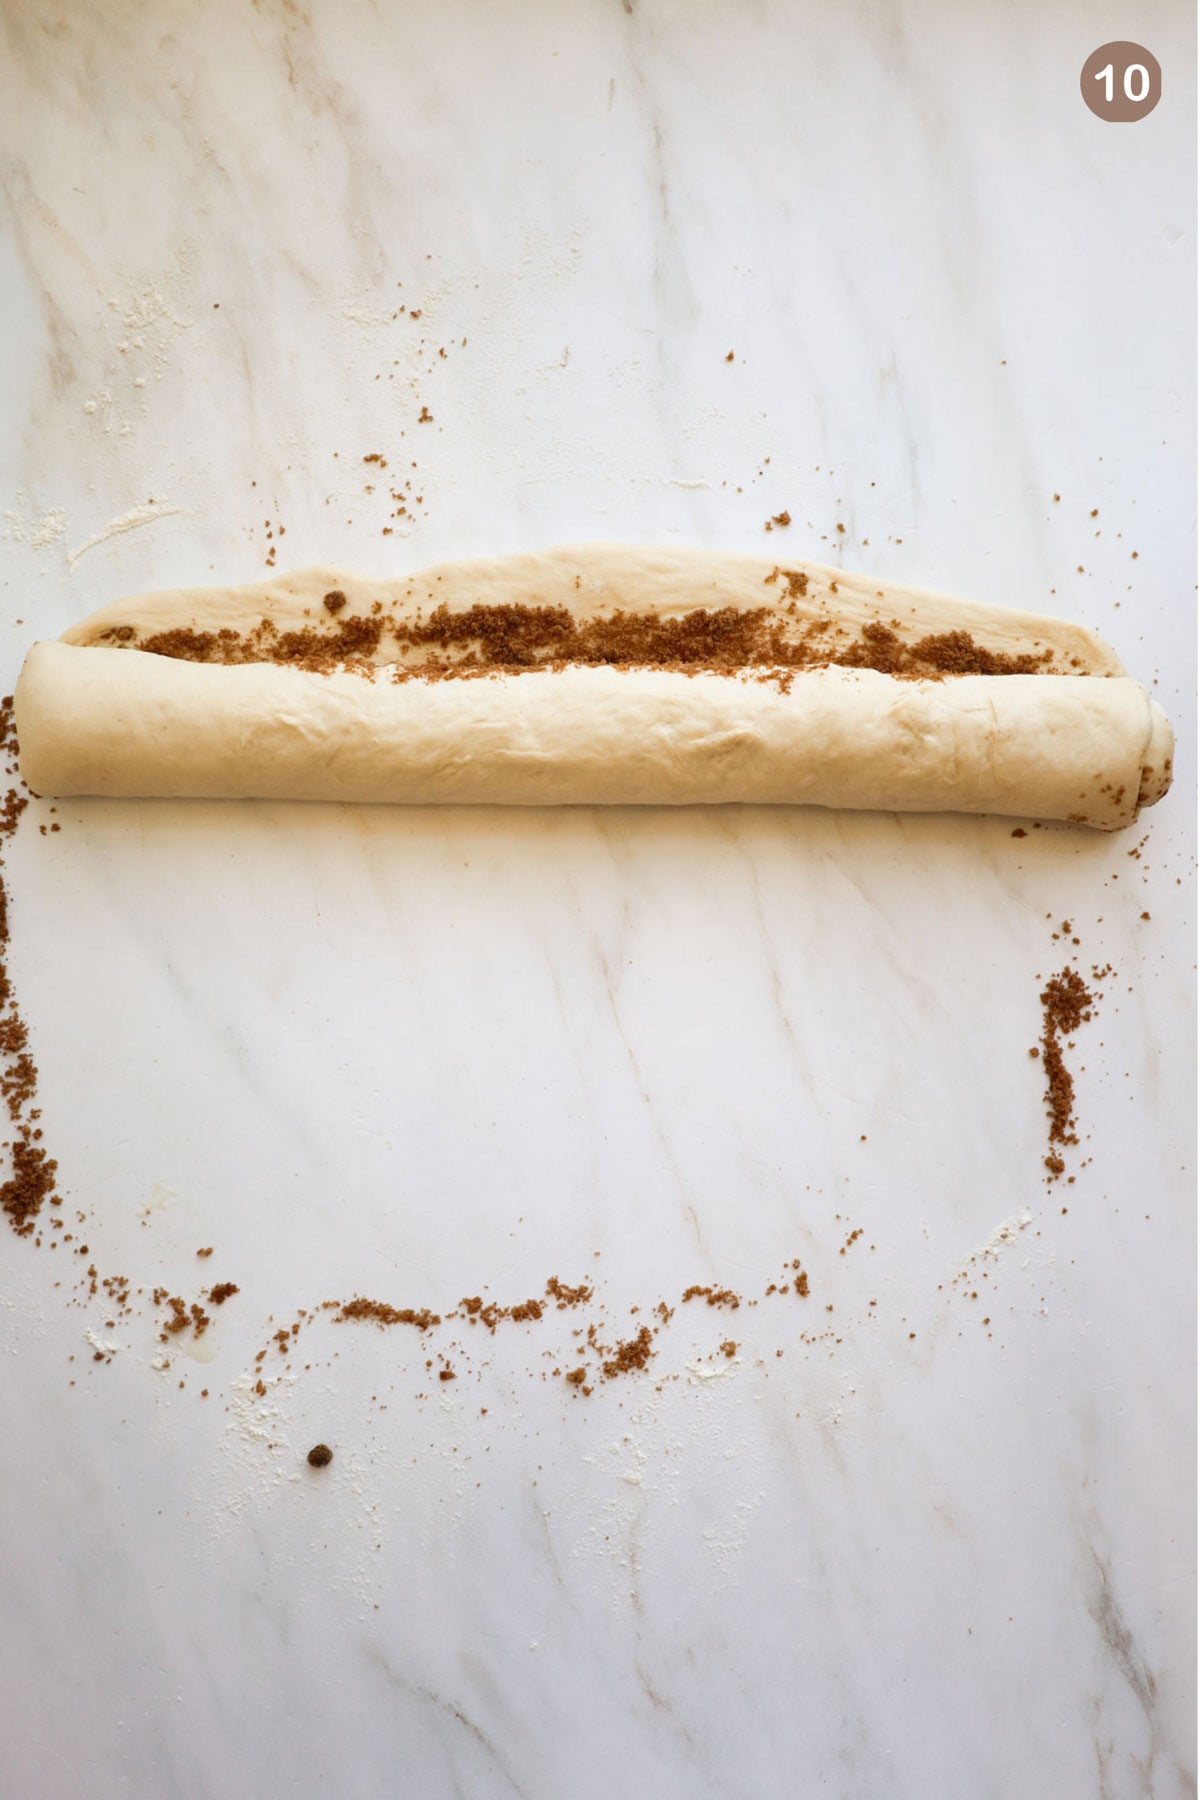
Step 10: Starting at the long side, nearest to you, roll the dough up. Tighten as you go to make sure you get lots of cinnamon sugar swirls in your cinnamon rolls.
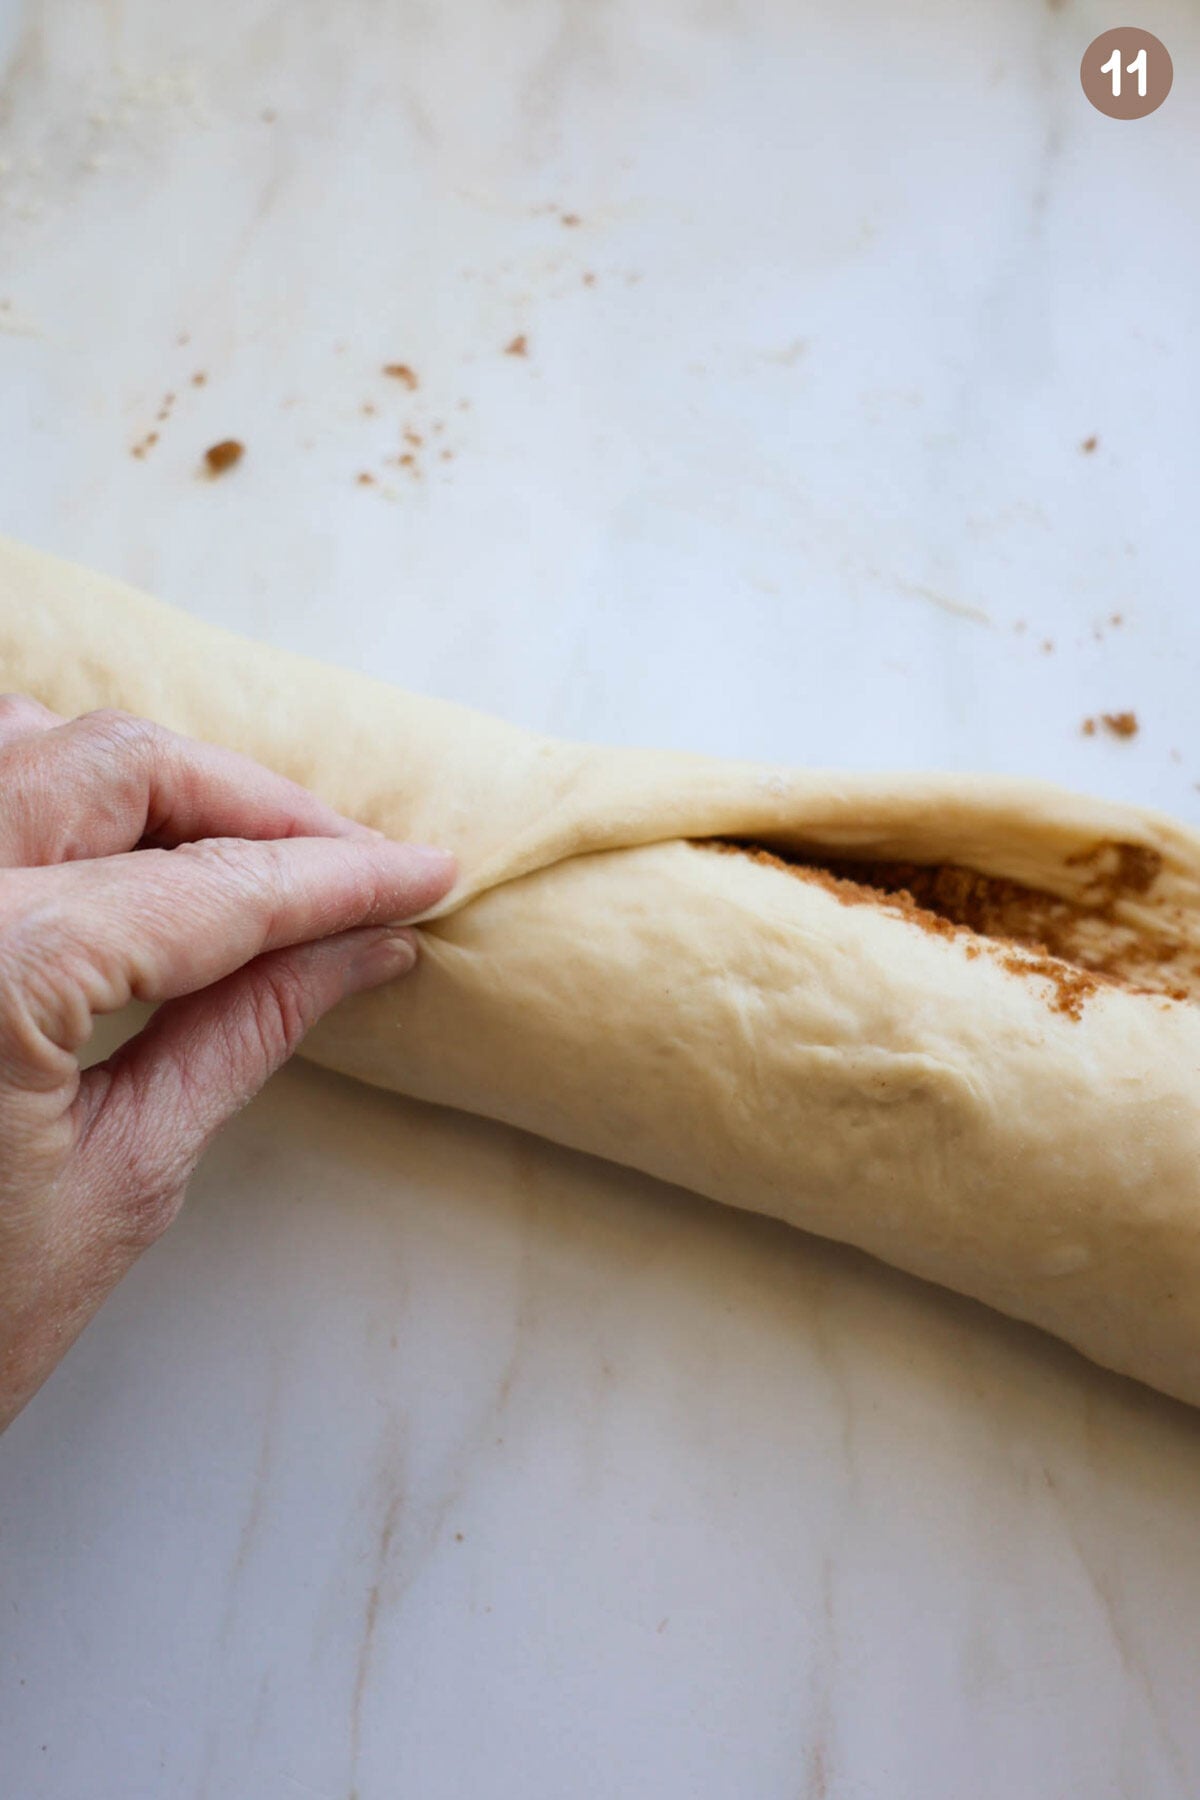
Step 11: Pull that clean edge up and over the rolled up dough. Pinch the dough together, closing the seam.
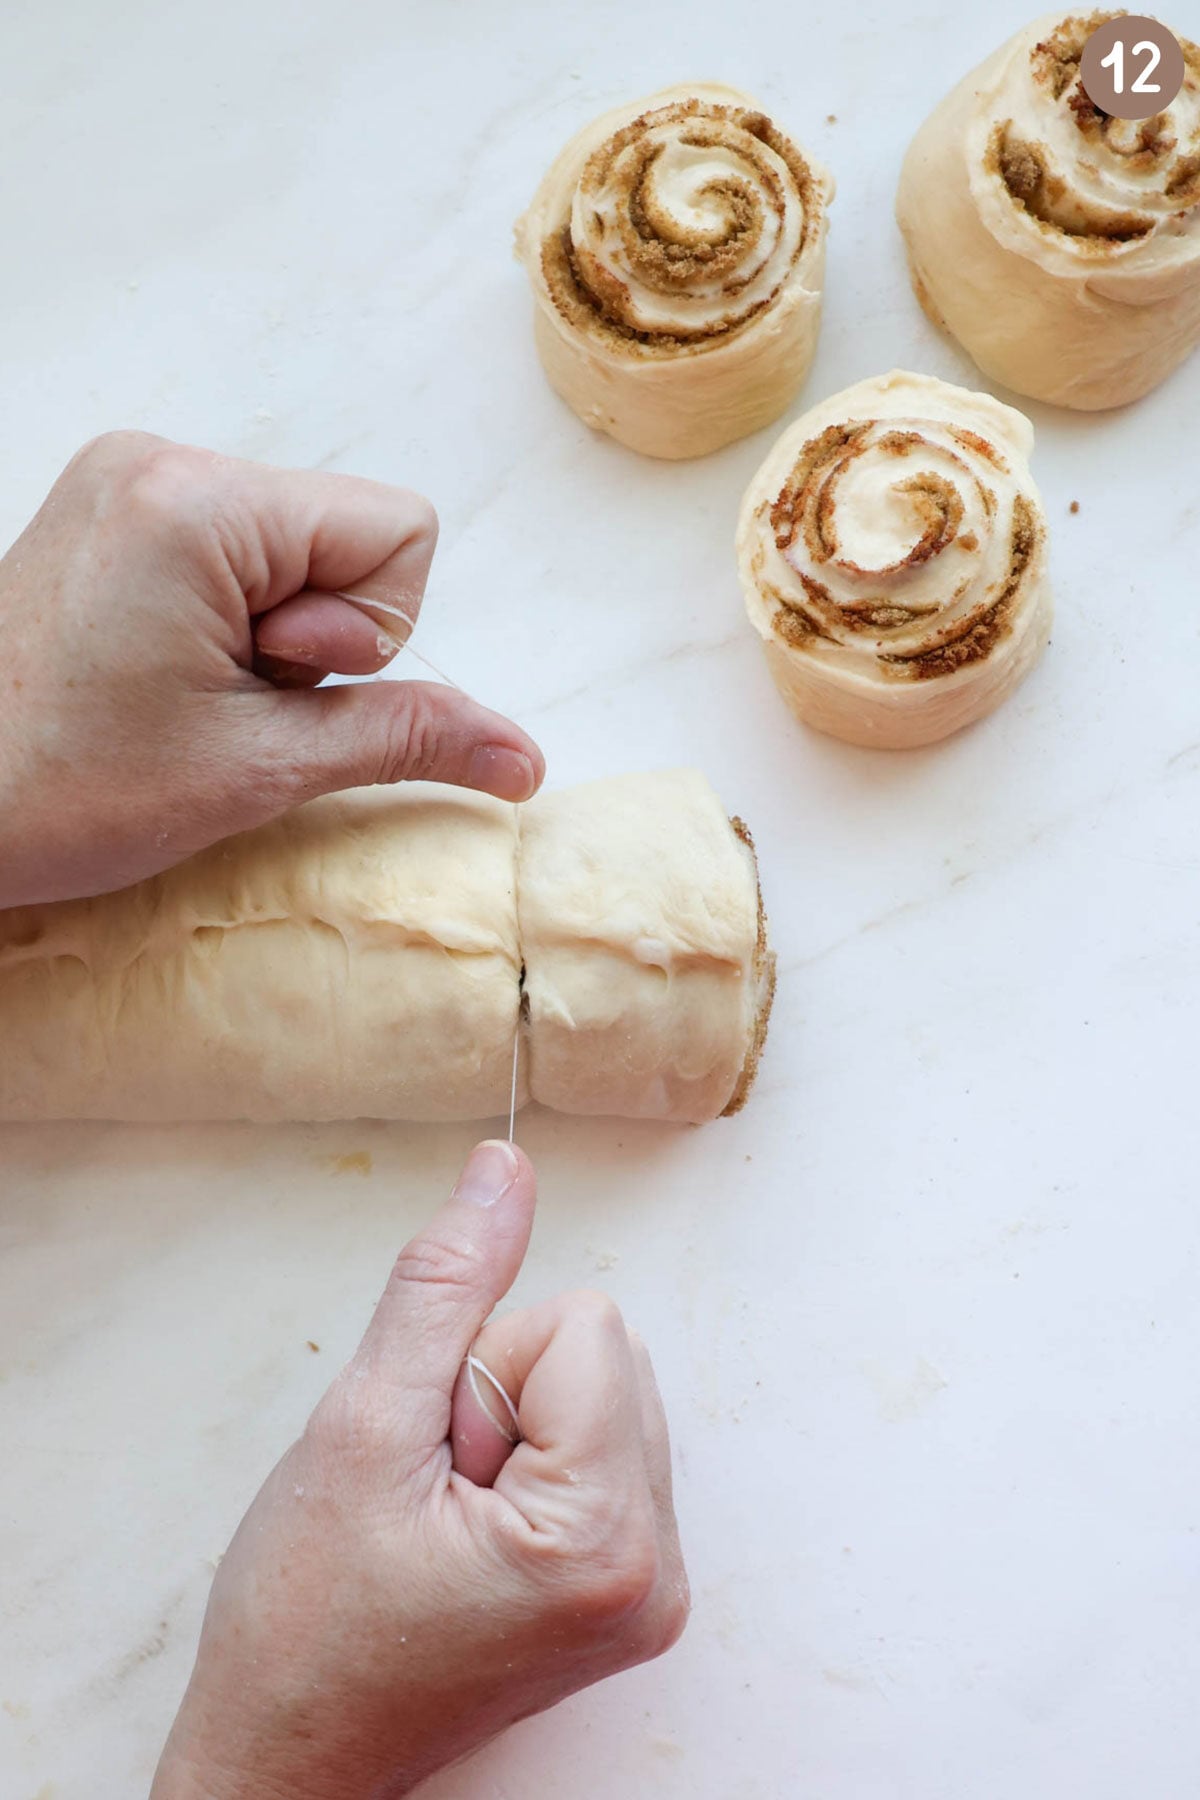
Step 12: Use floss (yep, dental floss) or baker’s twine to cut the cinnamon rolls. You can also use a sharp knife, but I think you get a cleaner cut using floss.
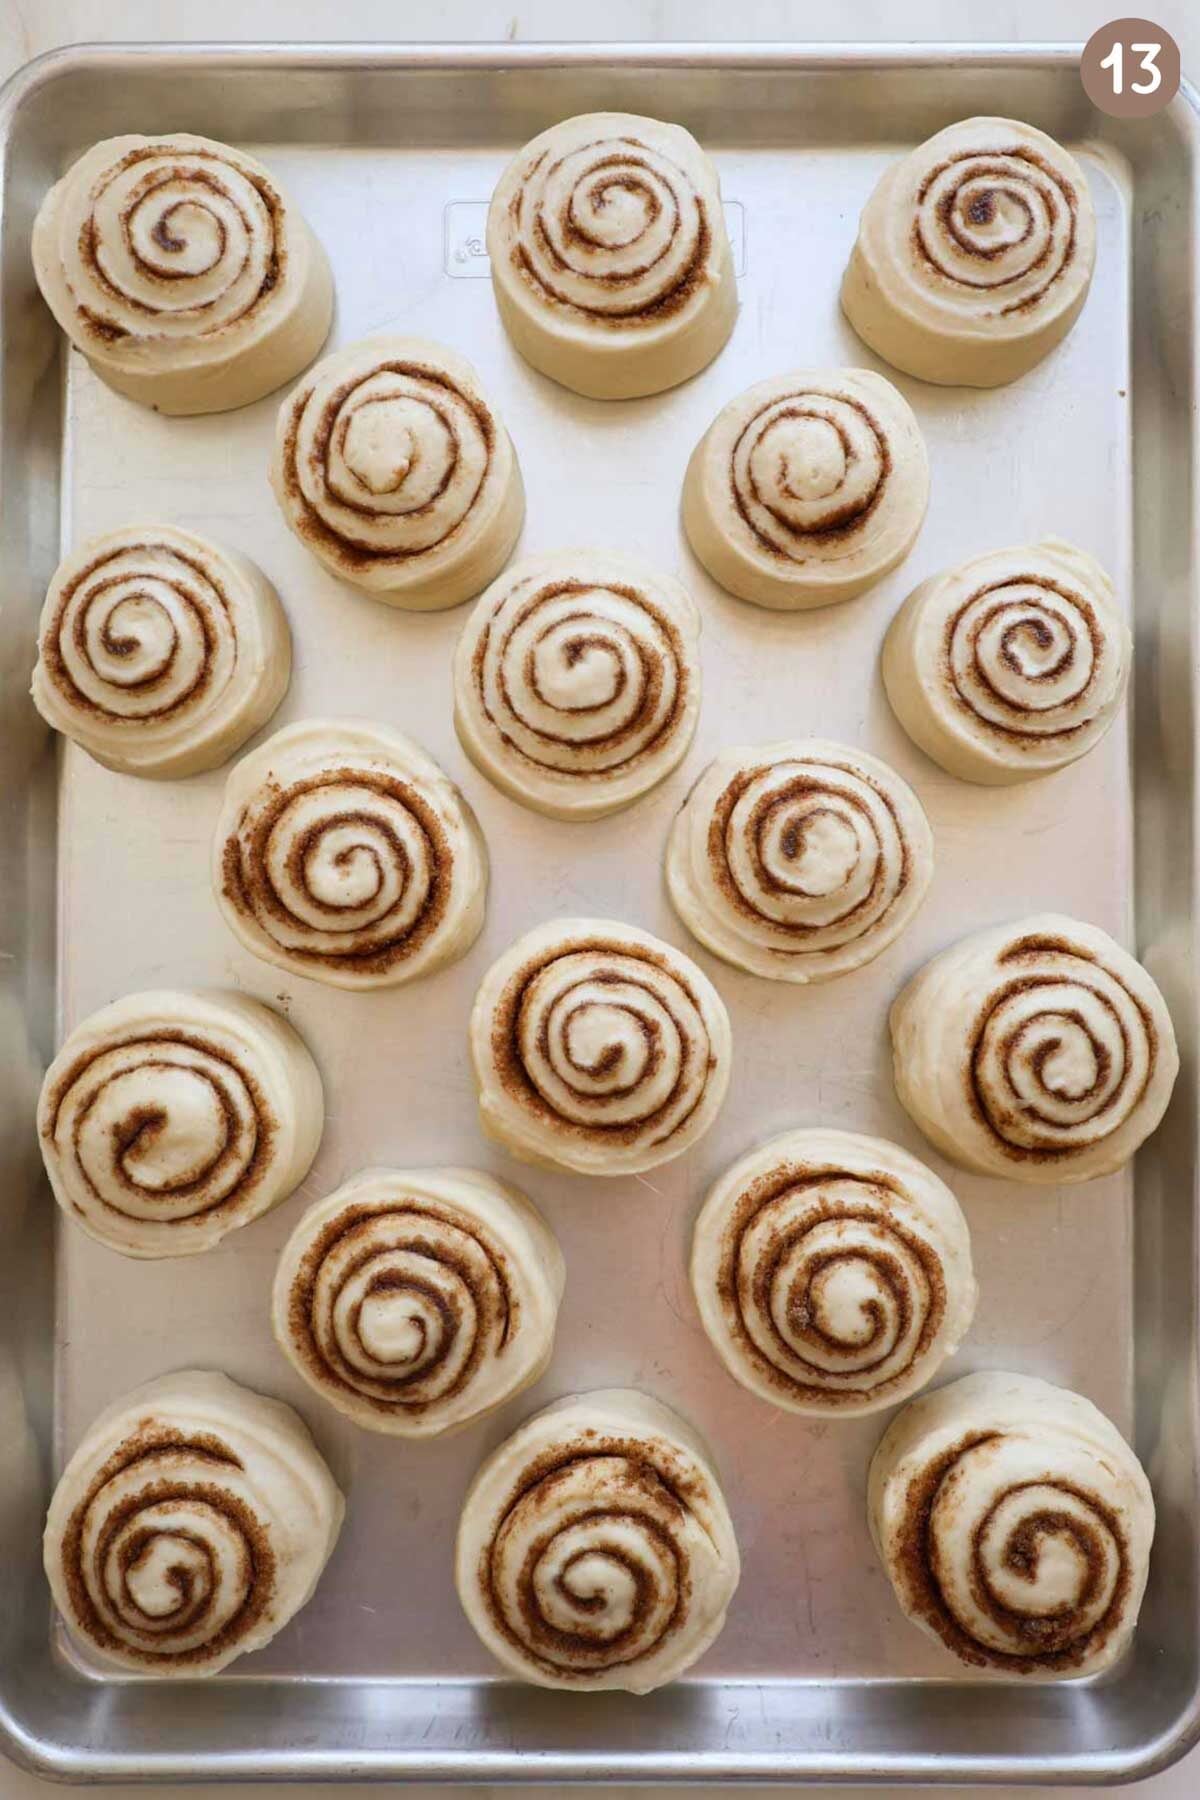
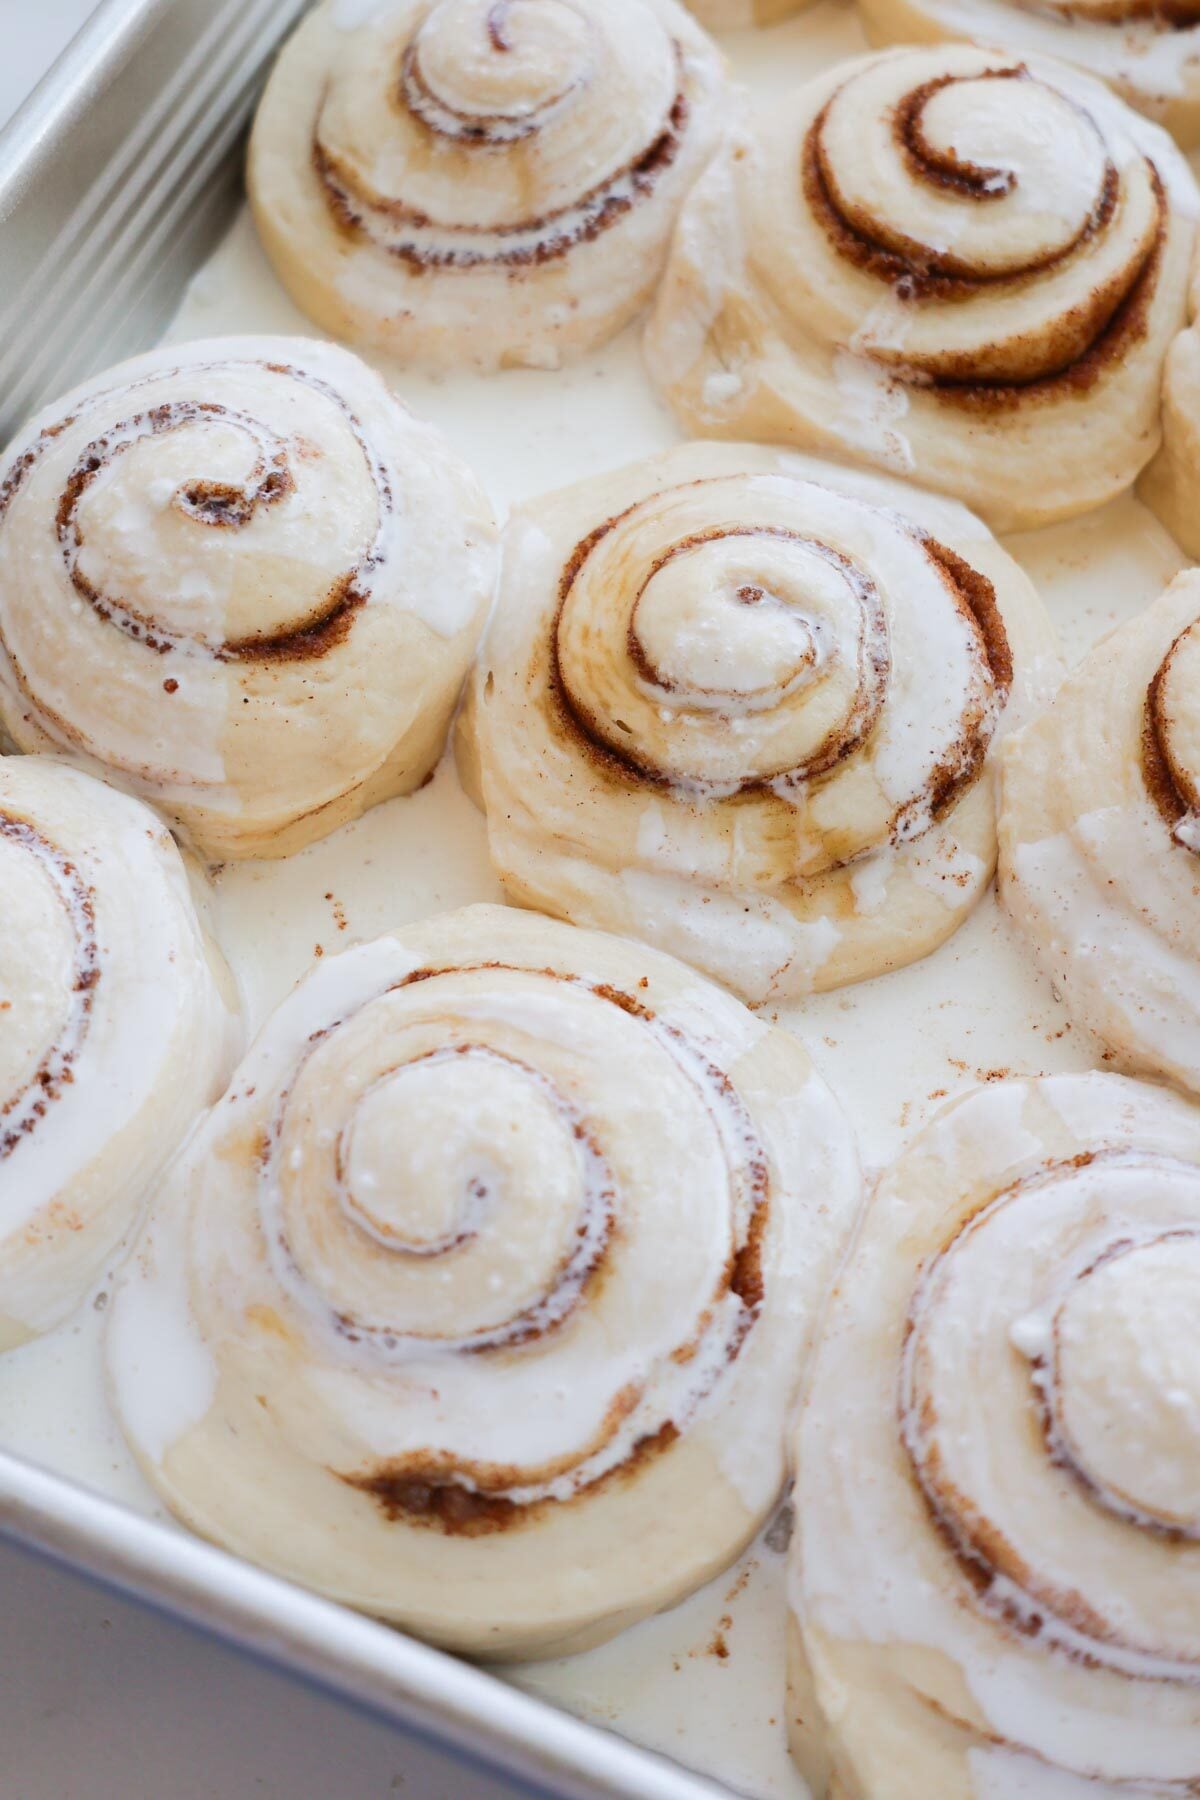
Step 13: Place the cinnamon rolls on a half-size baking sheet. If you arrange them in this pattern, you should be able to easily fit all 18 cinnamon rolls on one sheet pan. *See my recipe notes for how to make mini cinnamon rolls.
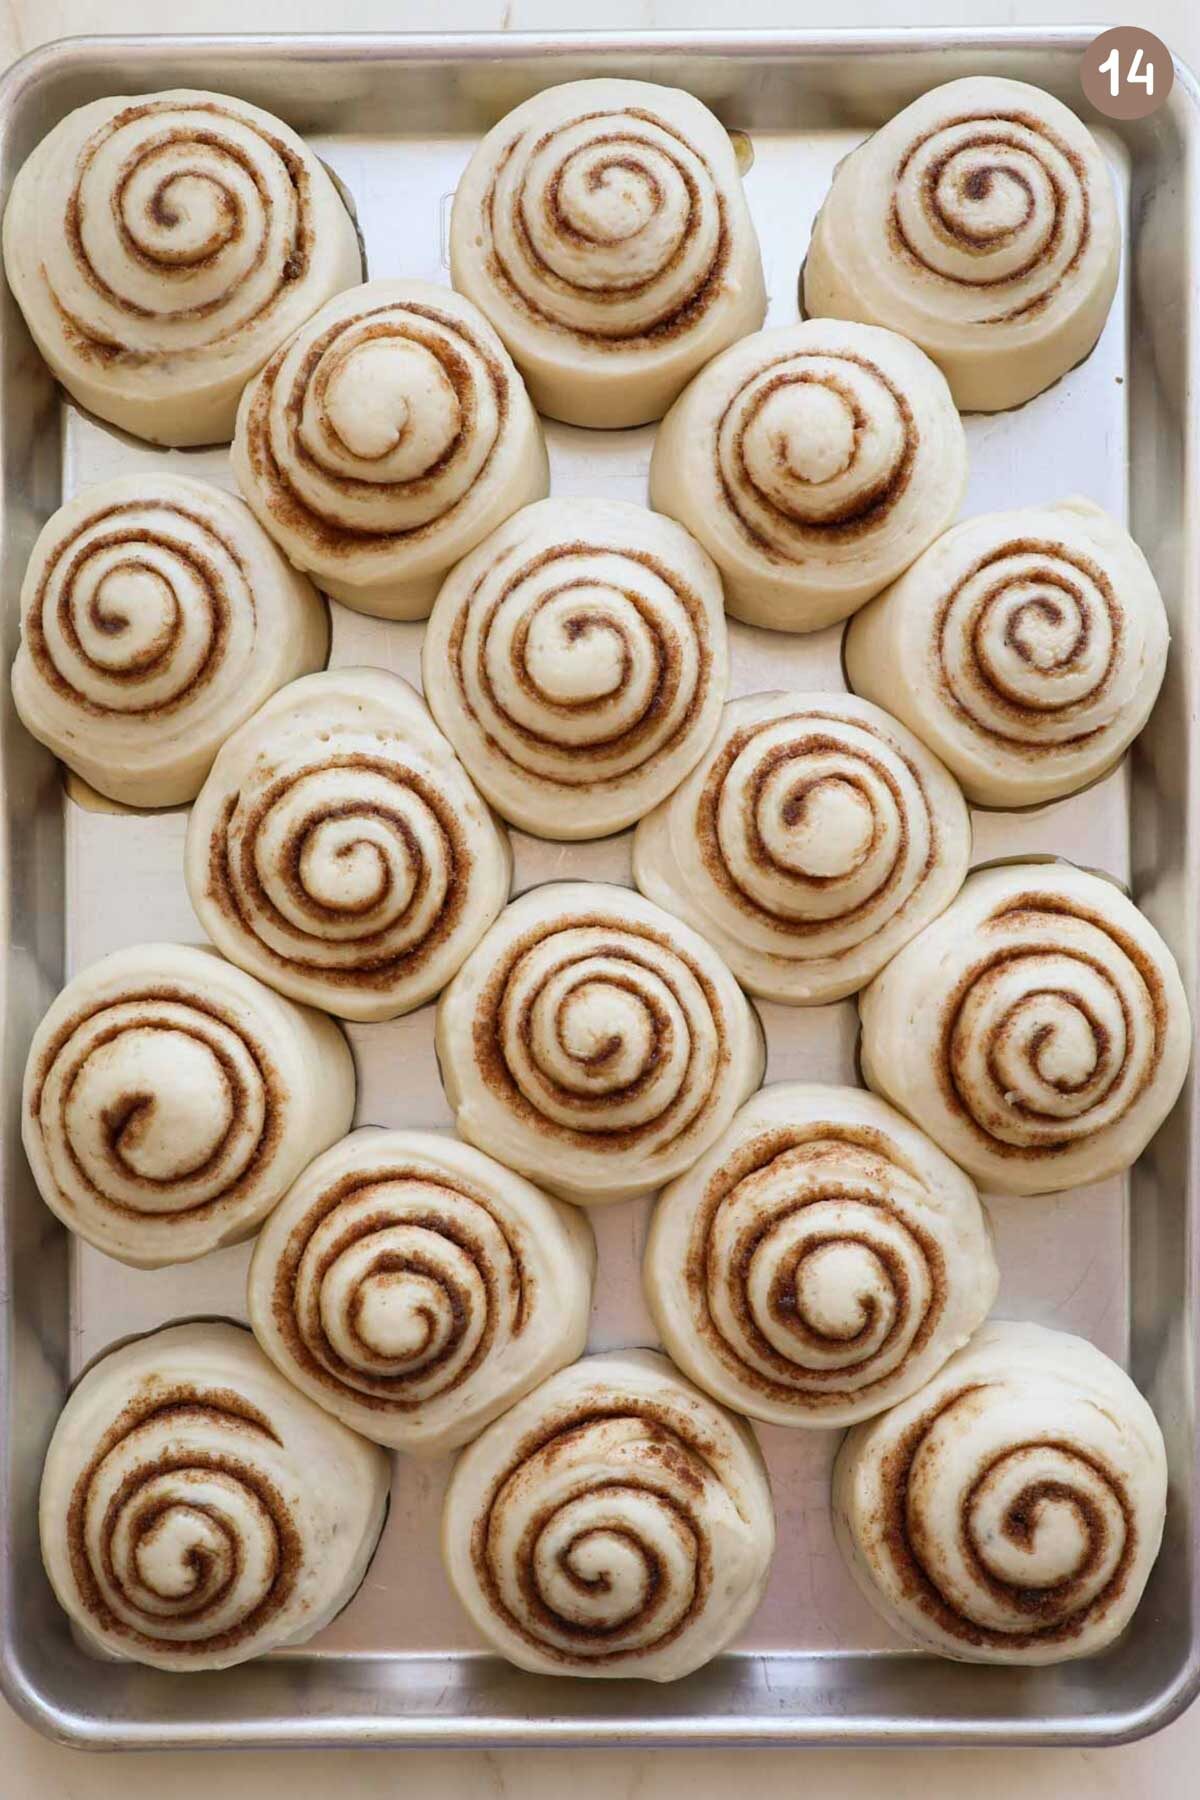
Step 14: Cover the cinnamon rolls and let them rise until nice and puffy. It’s okay if they’re touching. Actually, it’s better if they do touch – they’ll bake into each other, bake taller, and will be softer. The second rise only takes about 45 minutes, so start preheating your oven during the last part of this final rise.
How do I know when my cinnamon rolls are ready to bake?
Allow your cinnamon rolls to get nice and puffy. You can use something called the Poke Test to know when your bread or cinnamon rolls are ready to bake. Flour your finger tip and gently poke the side of one of the rolls. You’ll see one of three results:
- If it doesn’t leave an indent, it needs more time to rise.
- If it leaves an indent that never fills back in, and the dough feels very weak, it has overproofed. Bake them right away.
- If it leaves an indent that slowly fills back in, the dough feels fluffy and bounces back, it’s ready to bake.
The Poke Test is something you can use for all different types of yeasted bread doughs like Honey Whole Wheat Bread or Parker House Dinner Rolls.
Baking giant fluffy cinnamon rolls
Optional Step: You can pour some heavy cream over the risen cinnamon rolls. This is completely optional, but will add an extra rich flavor and create a super soft baked cinnamon roll as they absorb the heavy cream during baking.

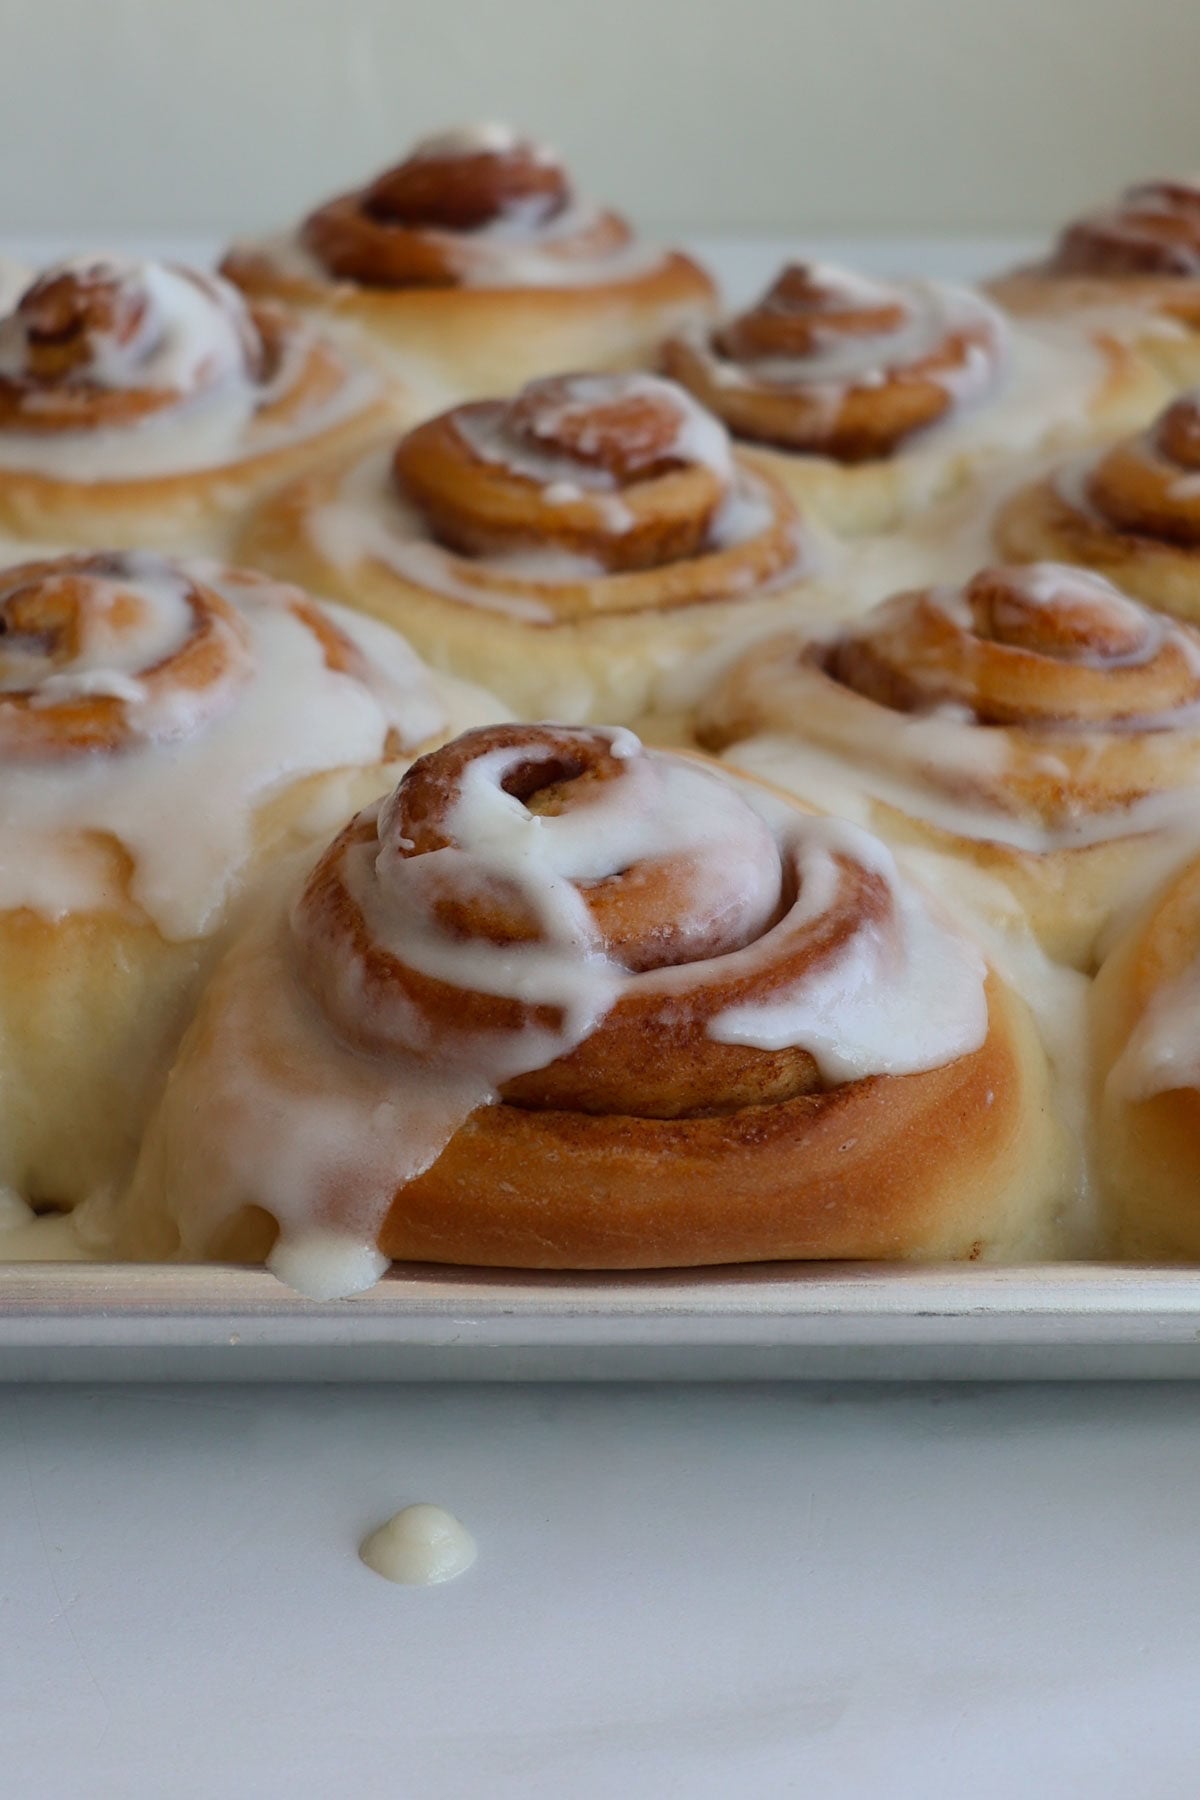
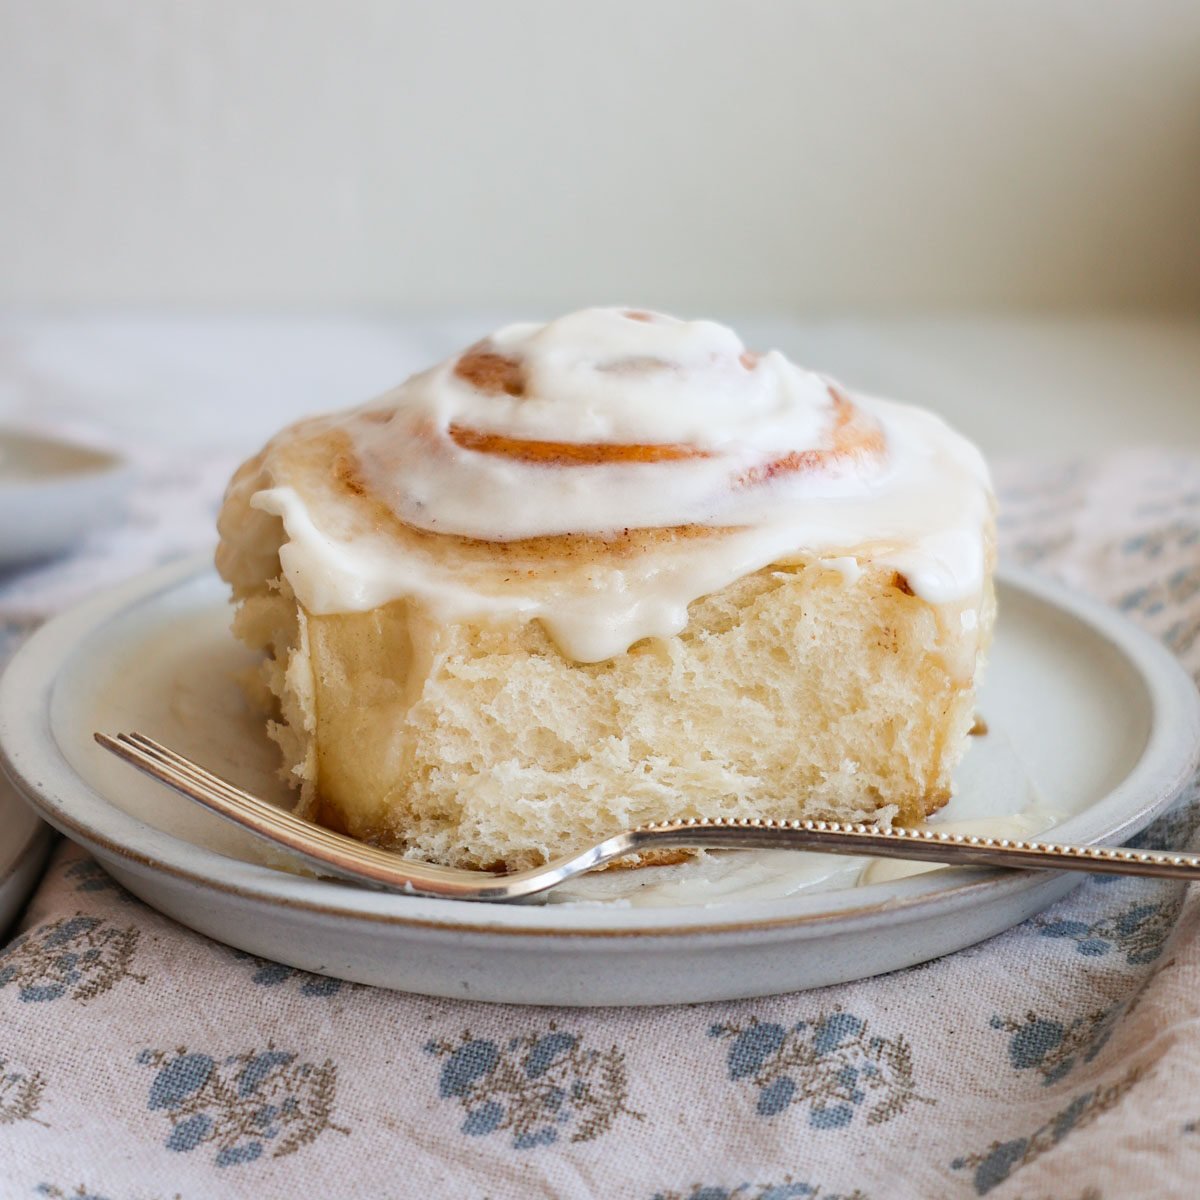
Step 15: Bake at 350°F for about 25 minutes. The edges will be slightly golden. If you’re unsure the cinnamon rolls are baked all the way through, insert a digital food thermometer in the center. It should be at least 195°F. Place the pan on a wire cooling rack and let the cinnamon rolls cool a bit while you make the cream cheese icing.
How to make cinnamon roll icing
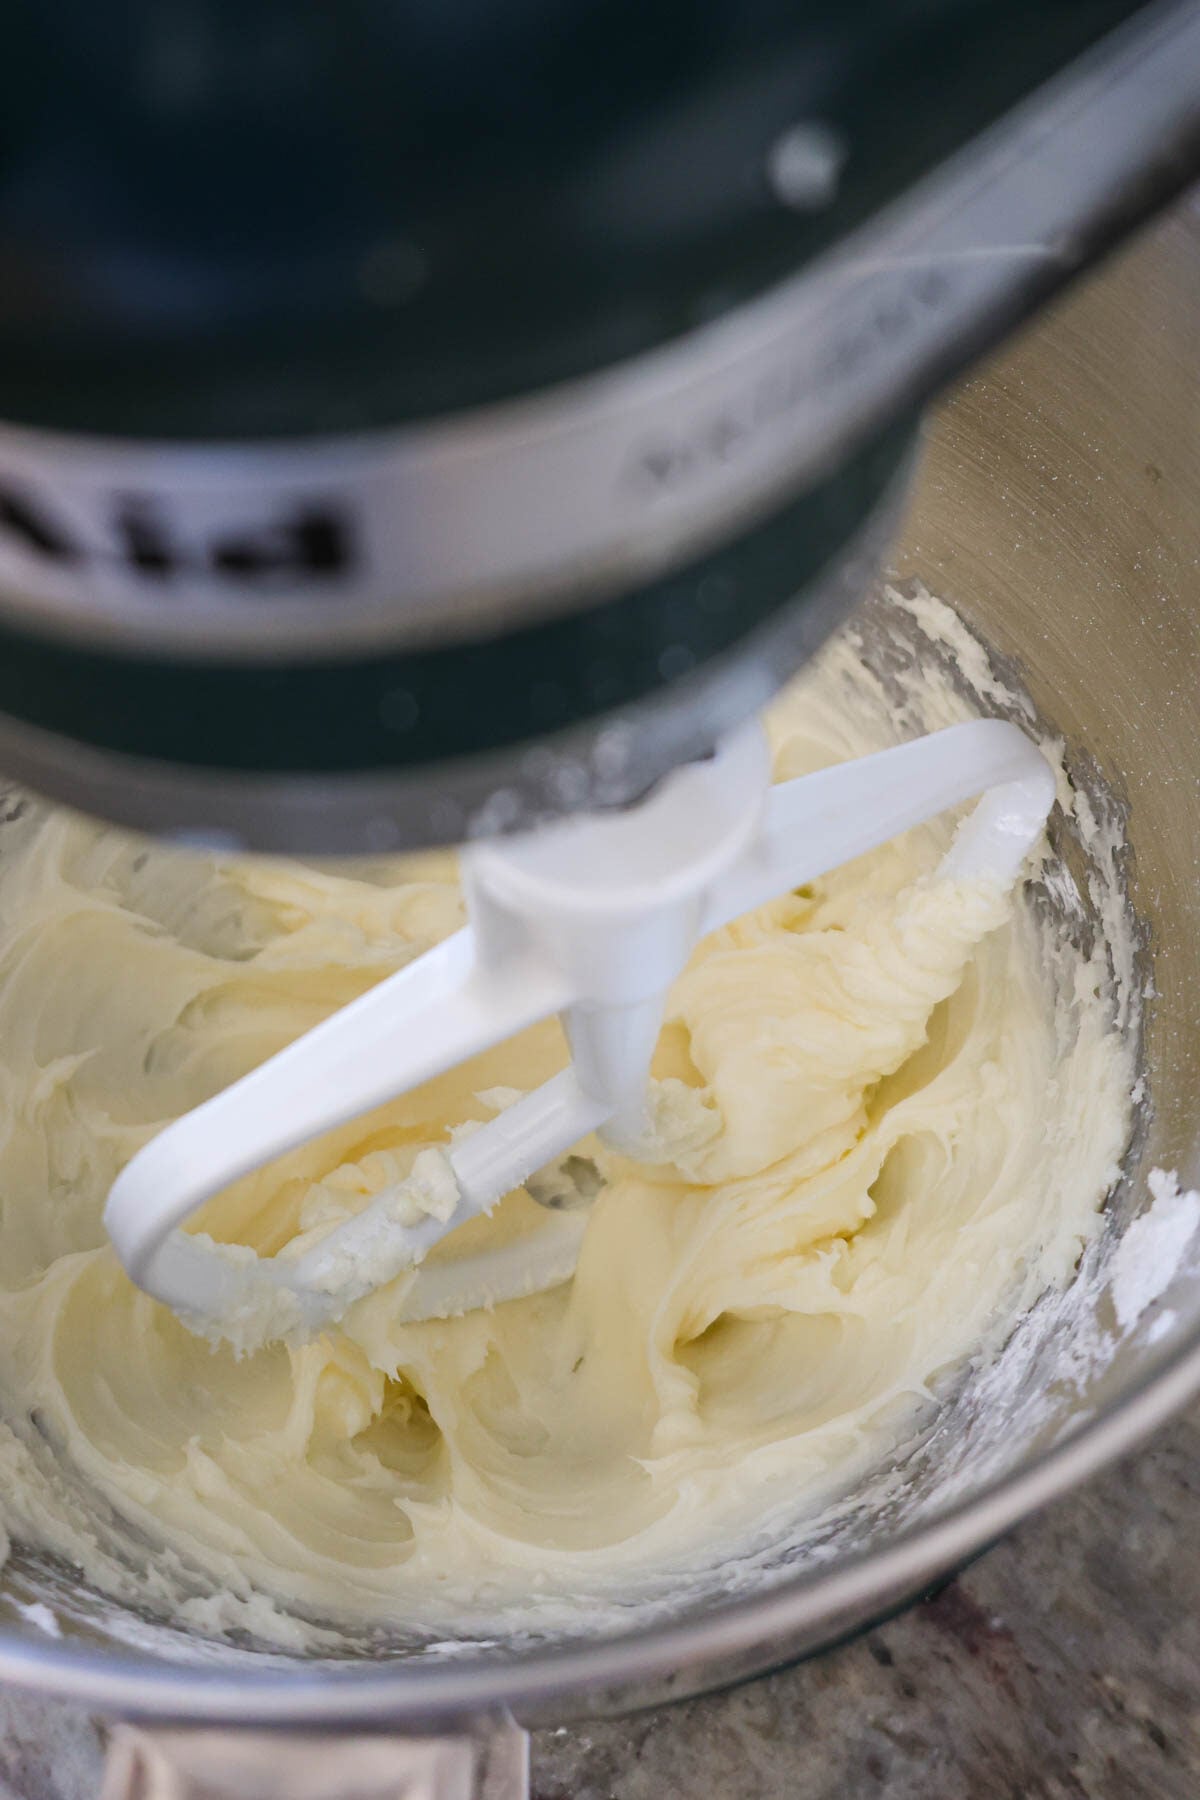
In an electric mixer, combine the cream cheese, butter, vanilla, and powdered sugar. Using the paddle attachment will make it a smooth mixture. If you use a wire whisk, it will incorporate more air into the icing, making a more whipped texture.
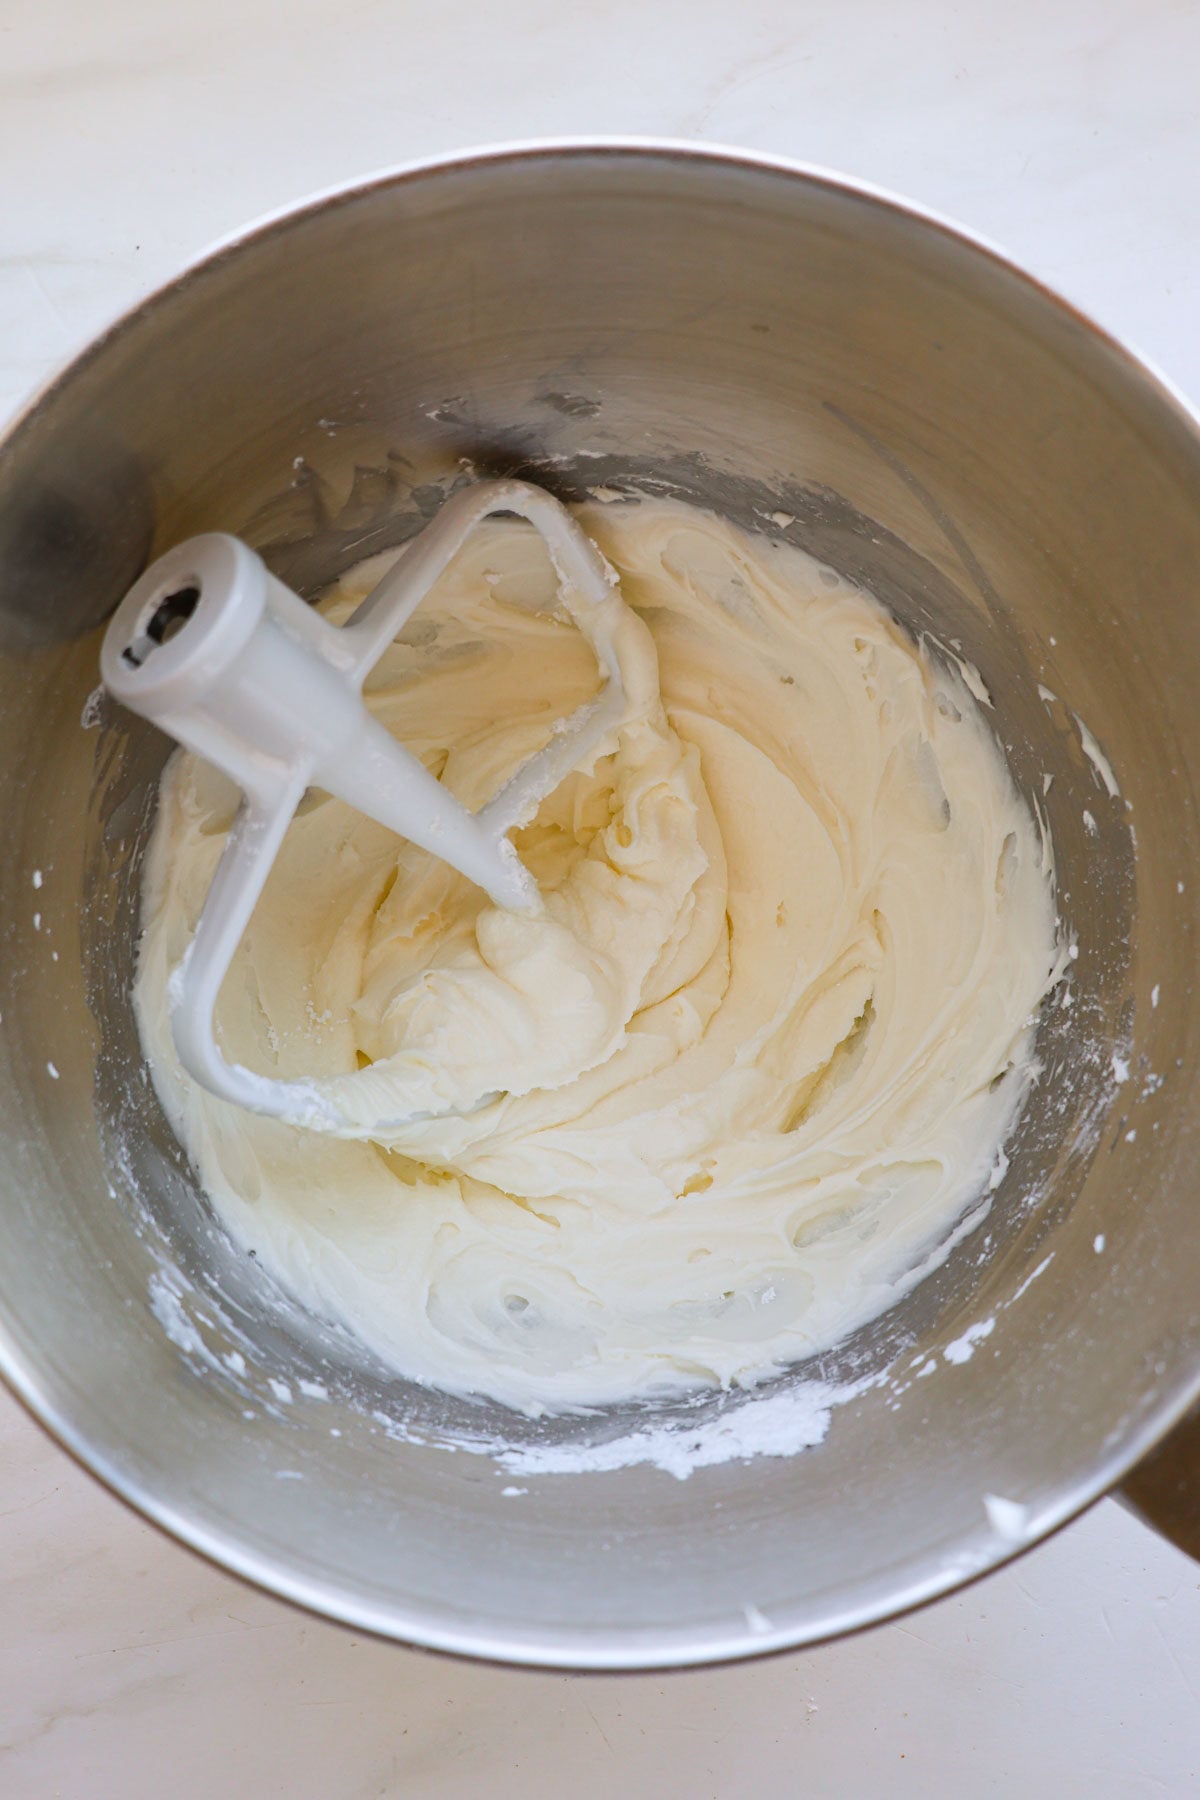
Add just enough milk or heavy cream to thin it out and create a spreadable cream cheese icing – you’ll add about 2-3 Tablespoons. If you accidentally add too much, you can always add more powdered sugar to thicken it up. Now you’re ready to frost your homemade cinnamon rolls.
Icing the cinnamon rolls
There are a couple of different ways you can ice your homemade cinnamon rolls. Each is delicious – choose which way you prefer to enjoy your sweet rolls.
- Frosting the cinnamon rolls while still warm will allow that rich cream cheese icing to melt into all the crevices of the cinnamon rolls. This is a yummy option, but be careful not to ice the cinnamon rolls when they’re too warm or the icing will completely disappear. I like to wait about 20 minutes before icing the cinnamon rolls.
- Allow the cinnamon rolls to cool completely before icing, about 30-40 minutes. The icing will not melt but will sit perfectly on top of the cinnamon rolls, more like a fluffy frosting.
Storing options
- Store your cinnamon rolls in an airtight container. They will stay fresh for up to three or four days.
- Another great way to keep them fresh is to wrap each cinnamon roll individually with plastic wrap.
- Do not put homemade cinnamon rolls in the refrigerator – it will dry them out. I have not had any issues with keeping cream cheese iced cinnamon rolls at room temperature for 3 days.
- If you are concerned about the cream cheese icing going bad, I’d suggest only icing the cinnamon rolls when you’re ready to enjoy them. You can store cream cheese icing in the refrigerator for up to one week and frost as you need to.
How to make Overnight Cinnamon Rolls
- Roll out your homemade cinnamon rolls in the evening, place on the baking sheet, and lightly cover with plastic wrap. Do not leave them out to rise.
- Place the cinnamon rolls in the refrigerator. Allow them to proof in the refrigerator overnight and bake them the next morning!
- Important: These can easily over-proof if left in the refrigerator too long. Whenever I use this option, I always put them into the refrigerator as late as I can (about 10pm), and then bake them early in the morning (about 7am).
- Preheat your oven, then take the cinnamon rolls directly out of the refrigerator and bake.

Frequently Asked Questions
After rolling up and placing the rolls on a baking sheet, cover and put the entire pan of cinnamon rolls in the freezer – allow them to freeze for 24 hours. Once frozen, remove and place them in a freezer ziplock bag. Store in the freezer for later use. When baking frozen rolls, remove them from the freezer bag and place on a baking sheet. Cover and allow them to rise at room temperature, then bake as usual. This could take 3-5 hours, depending on how warm your kitchen is. Make sure they’re puffy and risen before baking.
This can occasionally happen and is simply a result of the dough rising and pushing the filling out of the cinnamon rolls. When they bake, you’ll see that the filling that oozes out of the bottom will bake into the cinnamon rolls. It’s nothing to worry about! Your cinnamon rolls will still be delicious.
When yeast bread dough has over-proofed, it loses its structure. Letting your cinnamon roll rise really big isn’t always a good thing. For the best results, be sure to only let them rise to double in size, or when they pass the Poke Test as I mentioned earlier in this post.
More Homemade Cinnamon Roll recipes to try


Homemade Cinnamon Rolls Recipe
Homemade Cinnamon Rolls
Ingredients
Dough Ingredients:
- 1 ½ cups warm water around 95°F
- ½ cup warm whole milk around 95°F
- 1 Tablespoon instant yeast*
- ½ cup granulated sugar
- 1 ½ teaspoons fine sea salt
- ½ cup boxed potato flakes
- 2 large eggs room temperature
- ½ cup butter flavored shortening
- ¼ cup unsalted butter softened
- 6 cups bread flour
- ⅔ cup heavy cream optional
Filling Ingredients:
- ¼ cup salted butter melted
- ¾ cups dark brown sugar
- 4 Tablespoons ground cinnamon
Cream Cheese Icing
- 3 ounces cream cheese softened
- 1 cup unsalted butter softened
- 4 cups powdered sugar
- 2 teaspoons pure vanilla extract
- 2-3 Tablespoons milk
Instructions
Prepare the dough
- To the bowl of a stand mixer, add the ingredients for the cinnamon roll dough: the water, milk, instant yeast, sugar, salt, dry potato flakes, eggs, shortening, butter, and half the flour. Mix with the dough hook attachment, on low speed until combined and smooth, about 1 minute.
- While on low speed, gradually add the remaining flour, about 1/2 cup at a time. You may or may not need the entire amount of flour. You can stop the mixer and check the dough by lightly tapping on it with your fingertip – it should feel soft, slightly tacky, but not wet. *When in doubt, it’s always best to go lighter on the flour. You can always add more flour later, but you can’t take flour away. Too much flour in your dough will give you dry, dense rolls.
- Knead the dough on low speed for 10-15 minutes, or until it's smooth and cohesive. It should be mostly cleaning the sides of the bowl. If you take a piece of dough, you should be able to stretch it a few inches apart without it tearing.
Bulk Fermentation
- Spray a large bowl with nonstick baking spray. Remove the dough from the mixer and place it the bowl. Cover it with a clean kitchen towel and let it rise until doubled in size, about 60-90 minutes.
Prepare the filling
- In separate bowl combine the brown sugar and cinnamon. Set aside.
Divide and pre-shape
- Turn the risen dough out onto a floured work surface. Divide it into two equal pieces, about 795g each. Pre-shape each piece of dough by tucking the sides under and pinching the dough together on the bottom side. This will make it easier to roll out into a rectangle. Place both pieces on the floured countertop.
- Melt ¼ cup salted butter in microwave safe dish and set aside.
Roll out and shape the cinnamon rolls
- Working with one piece of dough at a time, roll it out to a rectangle, about 12 inches by 18 inches.
- Spread half of the melted butter over the dough, leaving an inch border on the top long edge of the rectangle. Sprinkle half the brown sugar mixture on top of the melted butter, continuing to leave the inch border at the top edge. Leaving this border will help in sealing the dough shut when rolled up.
- Start with the long side closest to you, and working from left to right, roll up the dough into a log. Try to tighten and pull the dough as you go – it will create more cinnamon swirls in your rolls. When you get to the end, pull the dough up and over the roll. Pinch the seam shut.
- Using a piece of dental floss or baker’s twine, make a light indentation where your cuts will be. One rollout will give you 9 large cinnamon rolls. This will be your guide to know where to cut and to help make them all the same size.
- When ready to make your cuts, slide the floss under one end of the dough, bring the ends of the floss up, cross them over and tug to cut through the dough, making a 2-inch-wide roll. Continue to cut to get 9 equal sized cinnamon rolls. Roll out, fill, and divide the second piece of dough.
Final Proof
- Spray a baking sheet with nonstick baking spray. Place cinnamon rolls on the baking sheet about 1 inch apart. (You should be able to fit 18 cinnamon rolls on one baking sheet when arranged as I have pictured.) Cover with a clean kitchen towel and let the cinnamon rolls proof for about 45-60 minutes. They should be puffy and nearly double in size. See recipe notes for more proofing tips. Preheat your oven towards the end of the final proof.


Bake
- *Optional: You can pour the heavy cream over the cinnamon rolls just before baking. This gives them an extra soft texture and makes the filling nice and gooey! But again, this is optional and they're still amazing without the heavy cream.
- Bake in a preheated 350°F oven for 23-28 minutes or until edges are just golden brown. The inside of the cinnamon rolls should reach a temperature of at least 195°F. Place the pan on a wire cooling rack.

Frost with cream cheese icing
- With an electric mixer, combine the ingredients for the cream cheese frosting: the cream cheese, butter, vanilla, powdered sugar, and milk. Mix on medium low speed until smooth, creamy, and spreadable.
- Spread the cream cheese frosting over the cinnamon rolls. I prefer to frost them while they're still warm, about 20 minutes out of the oven – this way the frosting will slightly melt into the cinnamon rolls. You can also let them cool completely before icing. Enjoy them freshly baked and slightly warm for the best, fluffy, delicious cinnamon roll you've ever had! Store any leftovers in an airtight container for up to 4 days.
Video
Notes
- This recipe has been updated from its original version. The original version called for 2 cups (474ml/g) of warm water and 1/4 cup (28g) of powdered milk. I updated the recipe because I found that using regular milk was more available for bakers, and it yields the same results.
- *You can replace the instant yeast with active dry yeast – be sure to proof it first. Proof it by adding the active dry yeast to the water with 1 Tablespoon of the sugar. Let it sit for up to 15 minutes to foam up. If it doesn’t foam, replace yeast with a fresh package.
- Freeze unbaked cinnamon rolls: You can freeze the cinnamon rolls to bake later. After rolling up and placing the rolls on a nonstick cookie sheet, put the entire pan in the freezer and allow the rolls to freeze for 24 hours. Once frozen, remove the sheet pan and you can pop them off, place them in a ziplock bag, and store in the freezer for later use. When baking frozen rolls, remove them from the freezer bag and place on a baking sheet. Allow them to rise at room temperature and bake as usual. This could take 3-5 hours, depending on how warm your kitchen is.
- Overnight cinnamon rolls: Make overnight cinnamon rolls by rolling them out, place on a baking sheet, cover with plastic wrap, and place in the refrigerator overnight. They tend to rise quickly, even in the refrigerator, so I suggest only refrigerating for 8 hours.
- Make the dough the night before: You can make the dough the night before and refrigerate – roll them up in the morning and let rise to double in size, about 45 minutes before baking.
- This is the same dough for my Homemade Crescent Dinner Rolls. You can double this recipe and make both dinner rolls and cinnamon rolls with the same dough.
- To make mini cinnamon rolls, divide dough into one third the regular weight/size and roll out as directed. For example, instead of rolling out a 25-27 oz dough ball, roll out a 8-9 oz dough ball, but divide it into nine cinnamon rolls. This will give you the mini size. Roll the dough out more long and narrow than the regular sized cinnamon rolls. Rise time may be slightly less. Decrease bake time by 2 minutes.
- Substitutions: You can swap out butter for the butter flavored shortening. You can also swap out 1/3 cup cooked potato for every 1/2 cup of the potato flakes. You can use all-purpose flour instead of bread flour – you may need a little bit extra to make it less sticky.
Soooo good! I made these for Christmas Day. I did the first rise, rolled out and added butter cinnamon and sugar, cut and placed in the pan and froze overnight. I took them out to proof Christmas morning and baked them around midday. My family said they are the best cinnamon rolls they’ve ever had ( and we like to try a lot of different bakery cinnamon rolls)
Thank you! I will make this again!
What a great way to make this recipe work for your schedule! So happy your family enjoyed them! Thank you!
Hi! Can you please provide the metric weight for the ingredients of powdered milk and water? I’ve always done the original recipe and I see you listed the 2 cups of water and 1/4 cup of powdered milk, but what is the measurement of those ingredients if I were weighing them using the metric recipe? THANK YOU SO MUCH! 🙂
Yes, I just updated the notes with the metric measurements.
Hi Heather. I still think about these rolls we made in Utah at the retreat. Could I make them using Sourdough?
thanks, Deb
Hi Debbie! That was so fun! Yes, you can use sourdough. Since this is a highly enriched dough, I’d use discard with the combination of dry yeast too – otherwise, it will take a really long time for it to rise, and it may introduce a tangy flavor that would not be ideal for these cinnamon rolls. Try using 100g discard and decrease the water by 50g and decrease the flour by 50g. Use the same amount of instant yeast. Let me know how it turns out!
When baking breads, what is the best substitute for eggs (I’m allergic)? I typically gear towards unsweetened applesauce or egg replacer (mixture of baking soda and tapioca and potato starches). Applesauce can make the mixture too moist so I’m guessing egg replacer is the way to go from my experience, but I was wondering if you agreed or knew of a better substitution.
Also when replacing the shortening fully with butter, is it a 1:1?
Thanks for your expert insight!
I don’t have much experience with replacing eggs, but I’m thinking an egg replacer might work best. I’ve also read that aquafaba (the liquid from canned chick peas) works well in many baked goods, including breads.
Experienced baker here and the recipe multiplier does NOT work! Be Warned. When doing 2x or 3x the math in grams is incorrect. Had to recalculate the mistakes in the recipe multiple times.
Thank you for letting me know Tony! I’ll take a look and get that fixed.
Why such a large disparity in the min and max amount of flour?
Going by touch for this dough is key. There are many factors that can affect your dough, like humidity and flour type. Adding too much flour can result in dry rolls – for this reason, I encourage you to add just enough so that the dough is soft, but not sticking to your fingers. Since this amount can vary, I give you a range of how much flour that could possibly be for you. Hope this helps.