Homemade Orange Sweet Rolls
Super fluffy sweet rolls, layered with orange zested butter, these orange rolls taste like an orange croissant! Top them with a sweet orange icing! Your family will love these homemade orange sweet rolls recipe!

Orange Rolls have been a treat we love enjoying on Christmas morning! We love orange desserts and making things like Orange Pound Cake and Orange Cranberry Rolls too! Here in Arizona, it’s pretty common to have several citrus trees in your yard. During the winter months, we have plenty of oranges, grapefruit and lemons. We try to make the most of citrus season by making fresh orange juice, orange marmalade and incorporating fresh orange zest into our baking!
Oranges
You can use just about any type of oranges for this recipe. Typically a juicing orange like Valencia, navel or even a blood orange will work well! The most important part of the orange that you’ll be using is the peel, or zest. This is what will give your orange rolls all of their delicious citrus flavoring! If you don’t have access to delicious citrus trees, most likely you’ll be able to get oranges at the grocery store that will work just great!

How to bake with yeast
Working with yeast dough can be intimidating at first, but the more you do it, the more comfortable you will get! Yeast is a living organism that just needs the right conditions to thrive. It feeds off of sugar and starches. When it feeds, it releases carbon dioxide gas in the form of air bubbles in the dough. This process is also known as “fermentation”. This is what gives bread dough its volume and airy texture.
If you want more information about yeast, check out my article about Active Dry Yeast vs. Instant Yeast. I also have a Guide to making Sourdough Starter, which is how to make a natural yeast.
Ingredients
There are some unique ingredients in this recipe that makes it so delicious! Each serves an important role in how this dough and these orange rolls will turn out.
- Bread flour: Most bread recipes will use bread flour. It has a higher protein content (11-13%) than an all-purpose flour. Higher protein flours also mean a higher gluten flour – yielding a bread with a strong crumb structure.
- Powdered milk: In baked goods it provides a creamier flavor and helps yield a more golden brown color when baked. Look for powdered milk that is fine in texture. If you are looking for a non dairy option, try using a milk powder substitute like coconut, soy or rice powder.
- Eggs: Eggs in bread help to create a fluffy, big rise. They are perfect for these rolls, since it’s meant to be soft and fluffy.
- Potato Flakes: Potato flakes in bread make the crumb more moist and tender. They also extend the shelf life of homemade bread.
- Butter Flavor Shortening: Vegetable shortening has a high melt point, allowing it to create more steam in the dough when baked. This produces a lighter, airy texture bread. The butter flavor gives it a more rich, butter flavor. If you can’t find the Butter Flavor Shortening, use plain shortening – it will still turn out amazing!
- Fresh Orange Zest: The flavorful impact of fresh orange zest can’t be beat! Using it in the butter filling and in the orange glaze will give these sweet rolls amazing flavor! I use a microplane like this one to zest my oranges and other citruses.
Mixing the Dough
I love baking with this dough! It’s such a pillowy, soft dough that’s so easy to work with! I use it in several other recipes like classic cinnamon rolls, Crescent Dinner Rolls and S’mores Sweet Rolls! You’ll see it is so easy to mix up and use.
You will need to use some type of a stand mixer to make this dough. My favorite mixer to use for bread doughs is by far my Bosch Universal Plus mixer! It is widely known as one of the best home kitchen mixers for mixing bread dough with ease. It has a high mixing capacity and high performing motor – making it an excellent option for mixing denser doughs like bread. It also allows you to mix larger quantities. I will usually double this recipe if using my Bosch mixer.
If you don’t have a Bosch mixer, the recipe I’m providing you with will fit nicely in a Kitchen Aid type stand mixer. Whichever mixer you use, be sure to use your dough hook attachment.
- Measure out all of your ingredients ahead of time. I always do this when making a recipe – it helps to prevent me from making any mistakes in measurements or leaving out ingredients. It also makes the mixing process go much smoother. I always suggest weighing out your ingredients with a food scale – you will get much more accurate results!
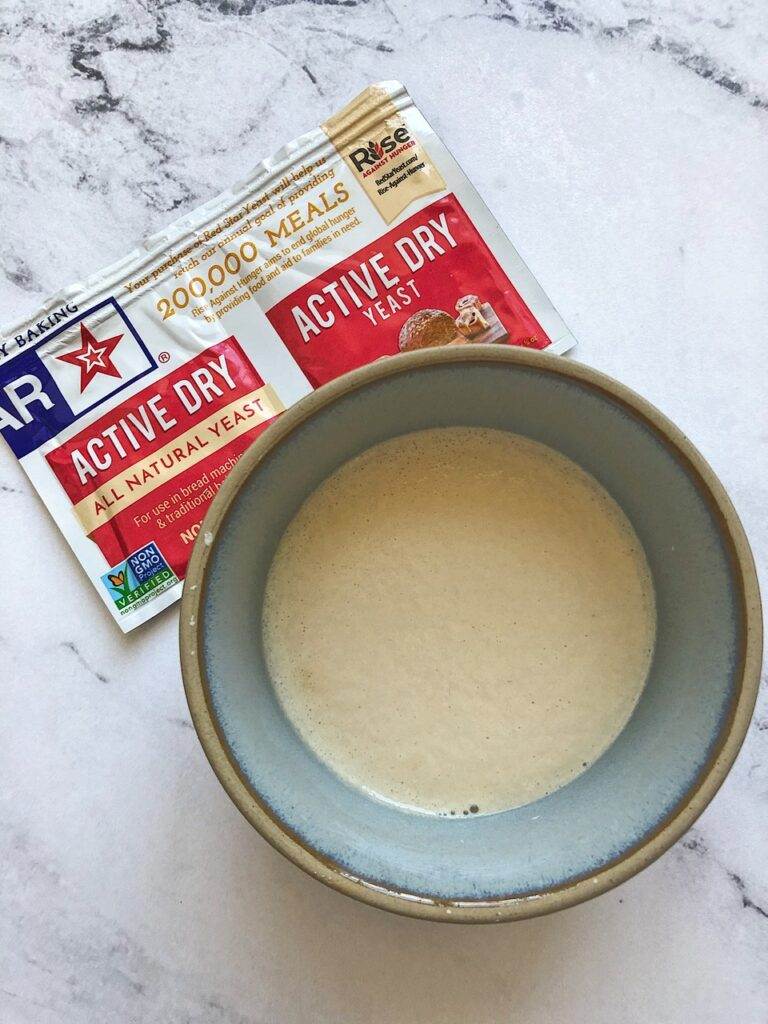
- In a large bowl, combine the warm water, powdered milk, potato flakes, sugar, salt, yeast. Whisk them together – this helps to break up the powdered milk and potato flakes and gets all of those ingredients incorporated before adding the heavier ingredients. Pour the yeast mixture into the bowl of a stand mixer.
- Add the eggs, room temperature butter and shortening. Add 3 cups of the flour (about half) and mix on low, just until all of the ingredients are combined and smooth.
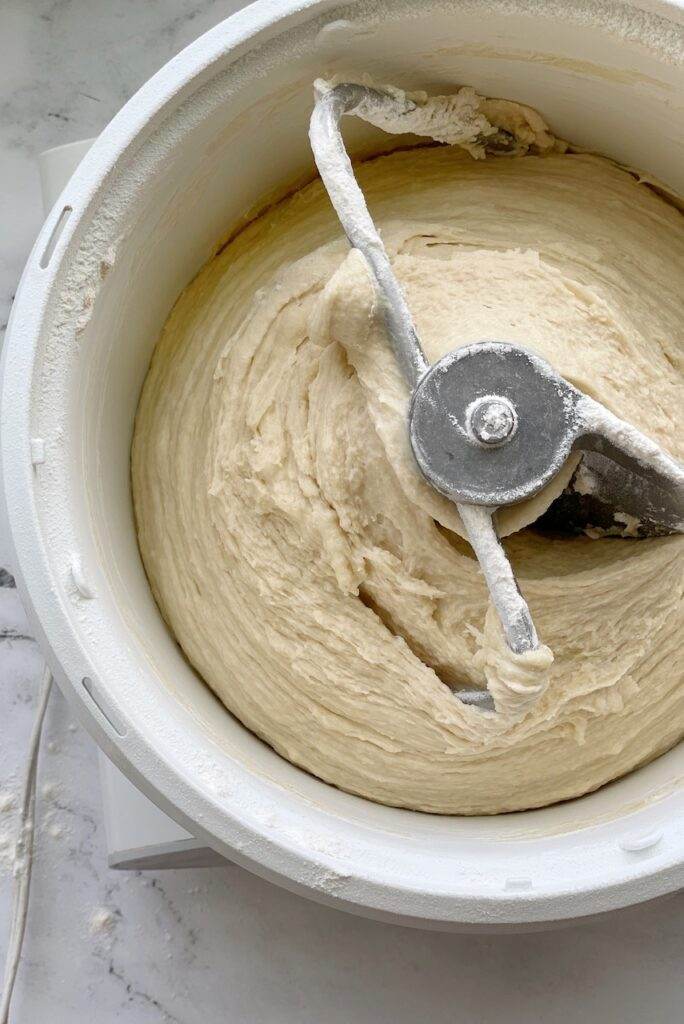
- While the mixer is on low, gradually add two cups of the remaining flour, 1/2 cup at a time, mixing well after each addition. This is where getting to know your dough comes into play. You’re looking for the dough to clean the sides of the bowl as it’s mixing. It should be concentrated around your dough hook. Once you get it to this point, stop the mixer and lightly tap on the dough with your finger. If it feels soft, but not wet and sticky & is cleaning the sides of the bowl, it’s ready to knead. Return to mixing it on low and allow your mixer to knead it for 5 minutes.
My number one tip for mixing this dough
Avoid the urge to add more flour. This dough is very soft and easy to work with – it’s very forgiving! You may see a little bit of dough sticking to the sides of the bowl when it’s kneading – don’t panic! Go by how it feels. You want to use just enough flour so that it doesn’t feel wet or excessively sticky. Too much flour in your dough will give you dry, dense rolls. You can always add a bit more flour after it has kneaded if it’s too sticky to work with.
Double Rise
Like most bread doughs, this roll dough will have a double rise – meaning you will let it rise twice. Remember, the process of “rising” is simply allowing the yeast to feed and create those magical air bubbles in the dough.
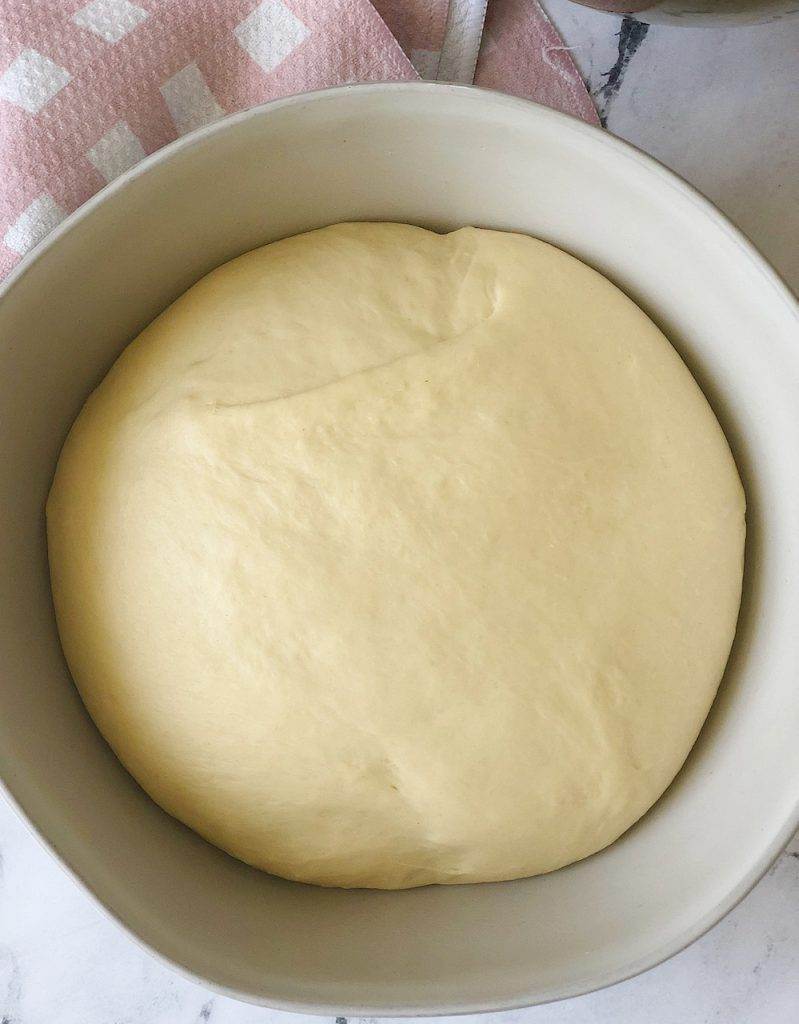
The first rise happens right after the kneading is over, but before you divide and roll out the rolls. The first rise in bread making is called the “Bulk Fermentation”. It is vital to the development of your dough structure. It creates important volume and gluten development. You’ll see that after the bulk fermentation, your dough will be much easier to work with!
For the first dough rise, place the dough in a greased bowl and cover with a clean kitchen towel or plastic wrap. Put it in a draft-free place in your kitchen. The first rise typically takes about 60-90 minutes, depending on the ambient temperature of your kitchen. You want to keep your dough covered, in a warm place in your kitchen. You are looking for your dough to double in size.
The second rise happens after you have shaped the rolls and place them onto the pan. This is called “proofing”. The second rise will usually take about half of the first rise time. Your beautiful homemade orange rolls will puff up to double in size at this point, usually taking about 45 minutes.


Rolling up your sweet rolls
Get your work space all ready with everything you need at your fingertips. You’ll need a small bowl with flour, a rolling pin, floss, your orange filling and brown sugar.
- Divide the dough into two equal pieces, about 28-30-ounce portions. If you don’t have a scale you can eyeball it. Round each portion to an oval shaped ball by pulling and tucking the dough under. This will make it easier to roll out into a rectangle.
- Flour your work surface and roll the dough out to a rectangular shape, about 10 inches by 18 inches and 1/4 inch thick.
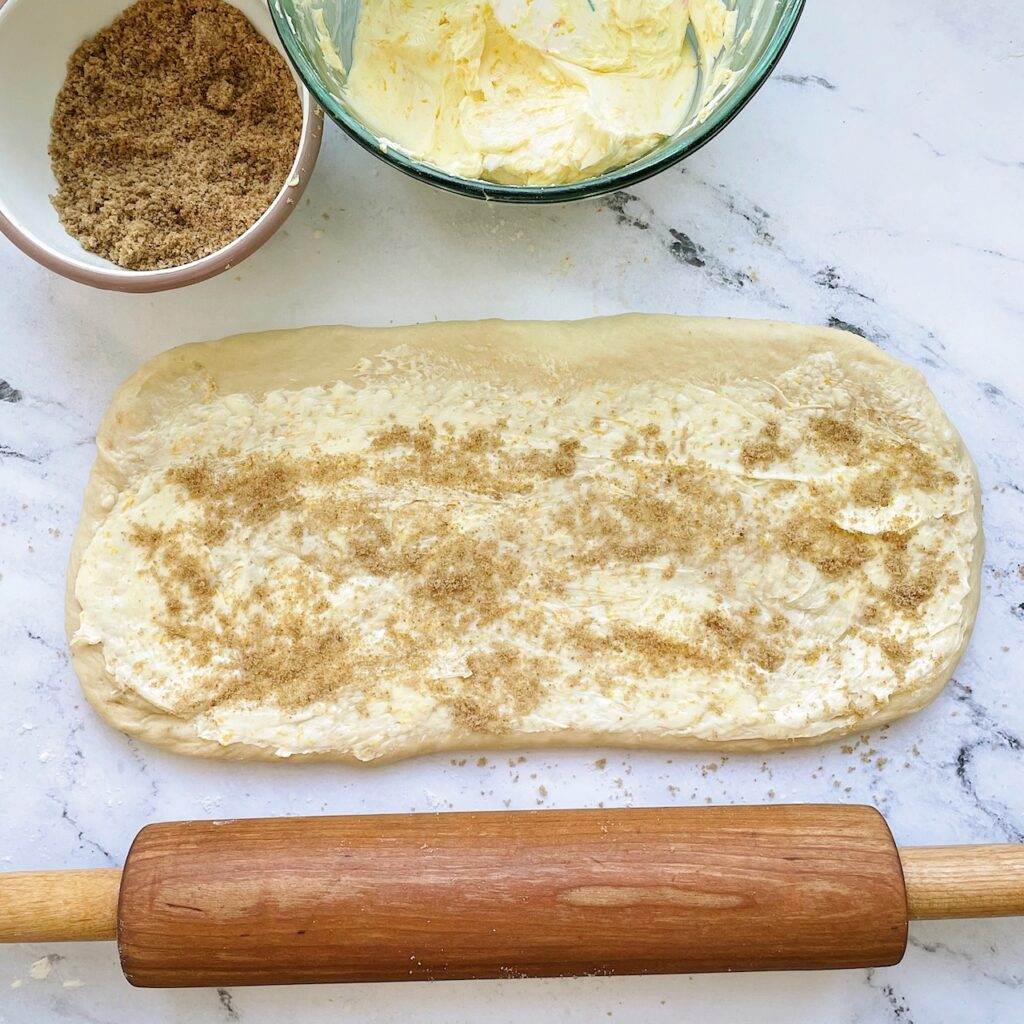
- Spread the orange butter on the dough, leaving an inch border on the top side of the rectangle. Reserve some of the orange butter for the tops of the rolls. Sprinkle about 1/4 – 1/3 cup of brown sugar on top of the orange butter, continuing to leave the inch border at the top edge. Leaving this border will help in sealing the dough shut when rolled up.
- Start with the long side, closest to you and working from left to right begin to roll the dough up. You can tug and pull as you go which will tighten the roll and make more swirls.
- Once it’s all rolled up, pinch the seam shut.
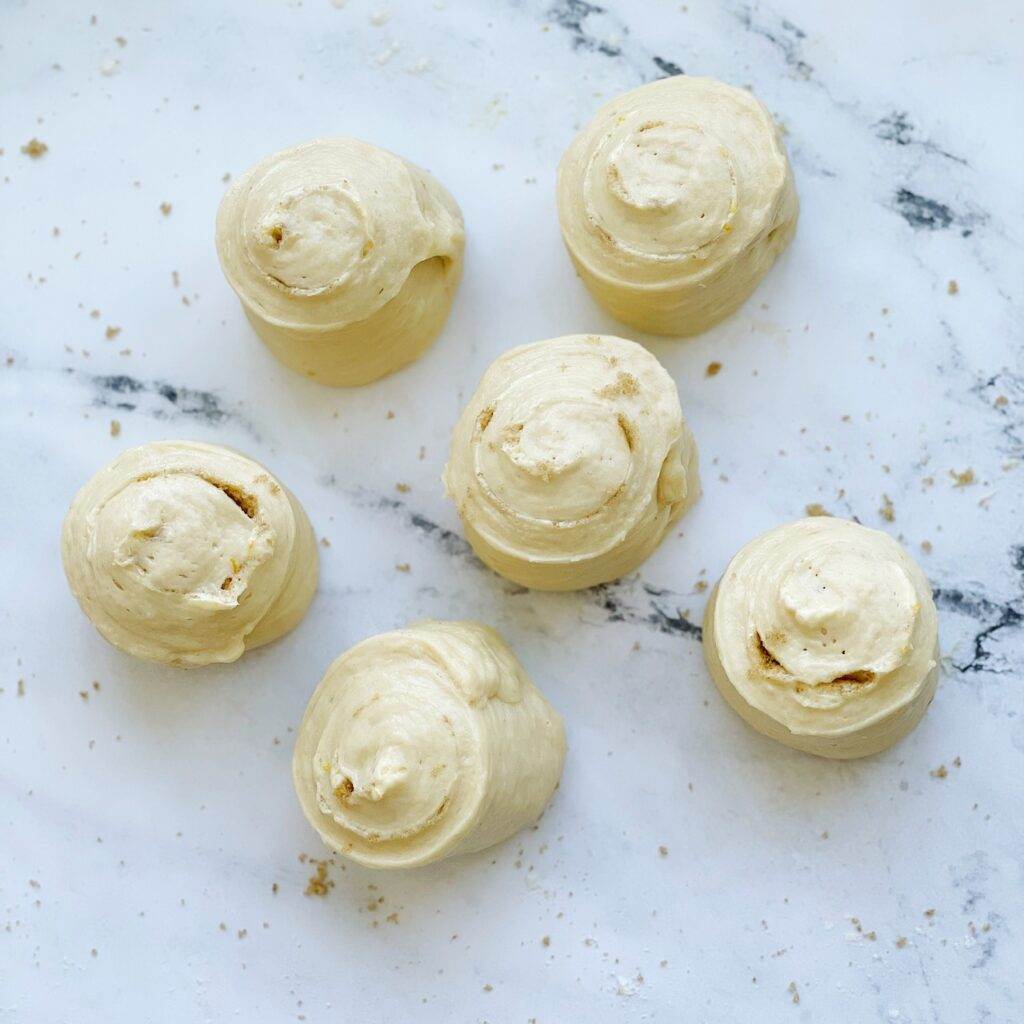
- Using a piece of dental floss, make a light indentation where your cuts will be. Each of these roll outs will give you 9 orange rolls. This will be your guide to know where to cut and to help make them all the same size.
- When ready to make your cuts, slide the floss under one end of the dough, bring the ends of the floss up, cross them over and tug to cut through the dough to make a 2-inch-wide orange roll. Continue to cut to get 9 equal sized orange rolls.
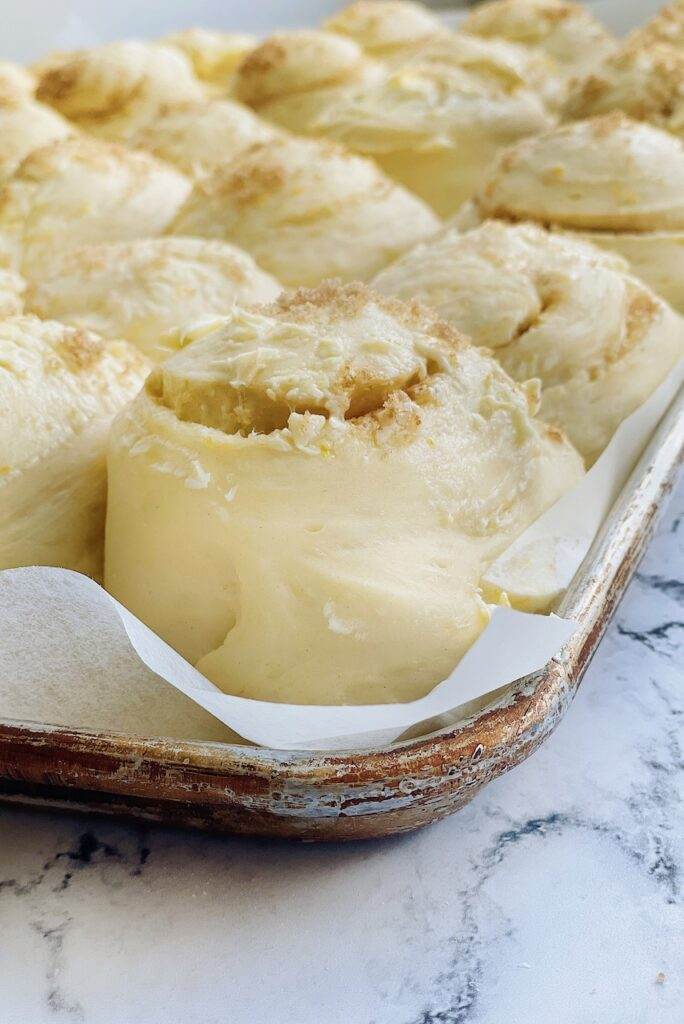
- Place rolls on a baking sheet sprayed with cooking spray or lined with parchment, about 1-2 inches apart. With your rubber spatula, smear a small amount of orange butter on top of the rolls and sprinkle with a small amount of brown sugar. Cover with clean kitchen towel for about 45 – 60 minutes, or until they at least double in size.
Save some time
Here are a few ways you can prepare ahead of time to enjoy freshly baked cinnamon rolls without having to start from the very beginning!
- You can freeze rolls to bake for later: After rolling up and placing the rolls on a nonstick cookie sheet, put the entire pan in the freezer and allow the rolls to freeze for 24 hours. Once frozen, remove the sheet pan and you can pop them off, place them in a ziplock bag, and store in the freezer for later use. When baking frozen rolls, remove them from the freezer bag and place on a baking sheet. Allow them to rise at room temperature and bake as usual. This could take 3-5 hours, depending on how warm your kitchen is. You could also let them thaw on a baking sheet in the refrigerator overnight – plan on this taking about 12 hours. Remove them from the refrigerator and let them sit at room temperature for about 30 minutes while you preheat your oven.
- Make overnight orange rolls: Roll out your rolls in the evening, place on your pan and lightly cover with plastic wrap. Place them in the refrigerator. Allow them to proof in the refrigerator overnight and bake them the next morning! Overnight orange rolls are a great way to enjoy them freshly baked without all of the work! Allow them to sit on the counter for about 30 minutes while you preheat your oven. It’s important to keep an eye on them – they ideally should not be in the refrigerator for more than 8-10 hours, or they may over proof.
- Make the dough the night before and roll up in the morning: Make the dough the night before and refrigerate: This can be a better option than rolling them up the night before IF your overnight cinnamon rolls tend to over proof. After you finish rolling them up, they will rise within 45 minutes and be ready to bake and frost!
My number one tip for baking orange sweet rolls
Bake the orange rolls for about 18-22 minutes or until the edges are golden brown. If your rolls are light, without any golden color, they most likely are a bit doughy inside.
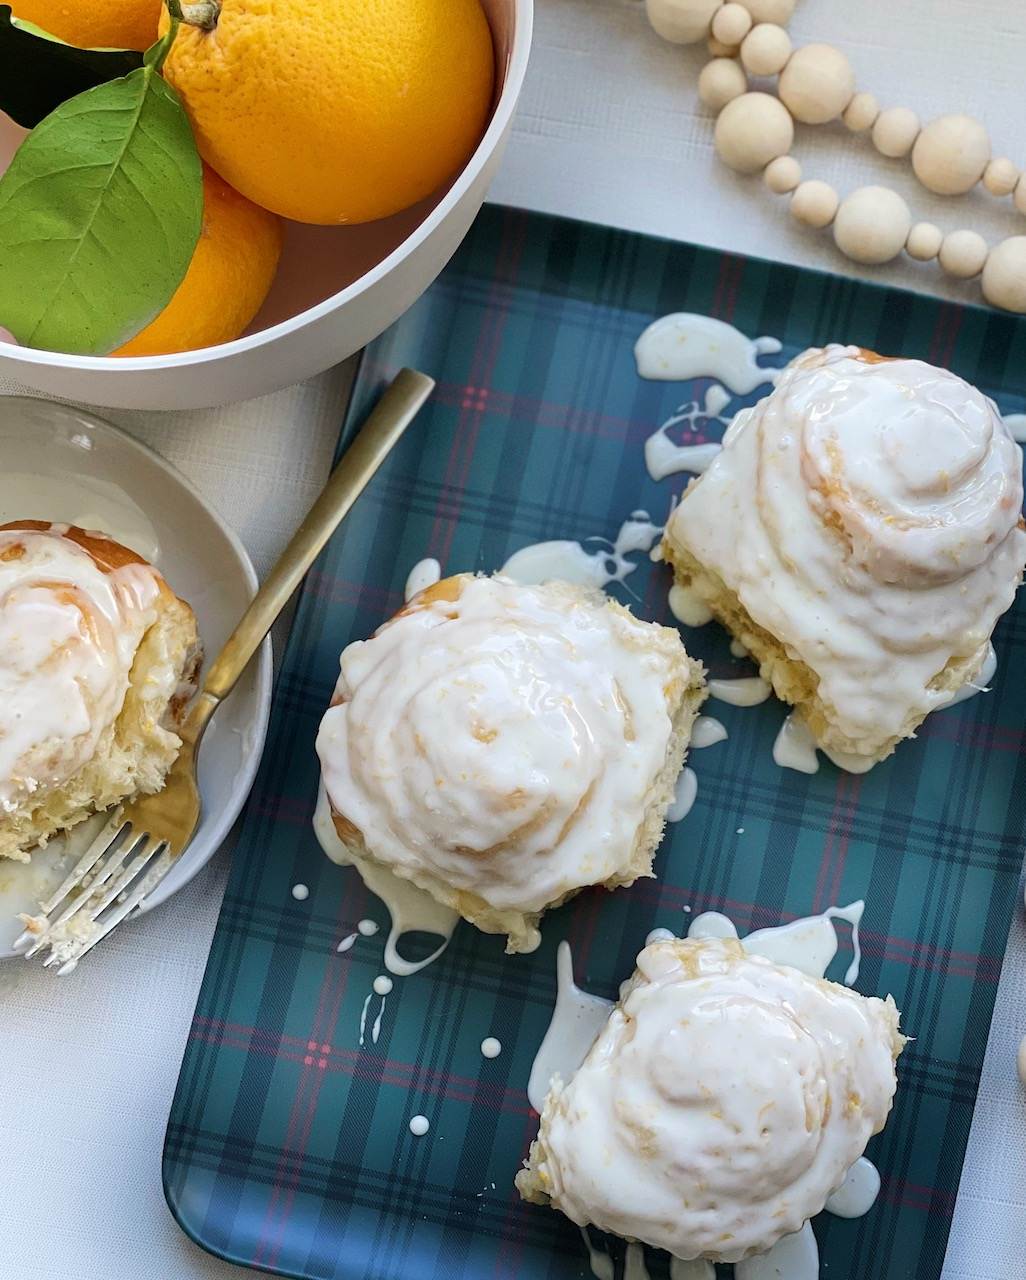
Icing your orange sweet rolls
Make sure your rolls have cooled completely before icing. Mixing up an icing that is on the thicker side will ensure two things: it sets up nicely and doesn’t soak into your rolls & the orange flavor will be much more present in each and every bite! Allow the icing to set for about 10-15 minutes. While the icing recipe suggests using milk, you can definitely use the juice from your orange instead – it will turn out wonderful! I prefer to use milk as it gives the orange icing a more creamy texture and flavor.

Your family will absolutely love these rolls! It’s the perfect sweet roll recipe for the Holidays or anytime you want to enjoy an amazing sweet citrus treat! Try this recipe today!
Other recipes to try
Christmas Sugar Cookies with Buttercream Frosting
Share and follow along!
I love to see how you are enjoying my recipes! Please leave a comment below and let me know how it turned out for you! Follow me on Instagram @thatbreadlady, Facebook and YouTube for more baking tips and videos! Be sure to tag me #thatbreadlady when you try one of my recipes. I’d love to see your baking successes!
(This post contains affiliate links. I receive a commission on purchases made from affiliate links, at no cost to you.)
Homemade Orange Sweet Rolls
Ingredients
Dough Ingredients:
- 2 cups 454g warm water (about 115°F)
- ¼ cup 28g nonfat powdered milk
- ½ cup 43g boxed potato flakes
- ½ cup 99g granulated sugar
- 1 Tablespoon plus 1 teaspoon 12g instant yeast *
- 1 and 1/2 teaspoons 9g salt
- ¼ cup 56g unsalted butter, softened to room temperature
- ½ cup 92g butter flavored shortening
- 2 large eggs
- 5 –6 cups 600-720g bread flour
Filling Ingredients:
- 6 Tablespoons 84g salted butter, softened
- ½ cup 107g brown sugar, packed
- 1 Tablespoon orange zest
Orange Zest Glaze
- 2 cups 227g powdered sugar
- 1 Tablespoon 6g orange zest
- ½ teaspoon vanilla
- 2 –4 Tablespoons milk or enough to yield a thick glaze (use 2%, whole or cream)
Instructions
- Prepare the dough.
- In a large bowl, combine warm water, powdered milk, potato flakes, sugar, yeast and salt. Mix well with a wire whisk. Pour into the mixer bowl and secure the dough hook attachment to your mixer.
- Add the butter, butter flavored shortening and eggs. Add 3 cups of the bread flour. Mix for about 30 seconds until ingredients are incorporated. Stop the mixer and scrape down sides of bowl with a spatula.
- Turn mixer on low and add 2 more cups of the bread flour, 1/2 cup at a time. After adding the 2 cups of flour, let dough continue to mix for about 1 minute. Stop and scrape the sides of the bowl as needed. If dough is not mostly cleaning sides of the bowl, add more flour 1/4 cup at a time until it cleans the sides of the bowl. Stop the mixer and check the dough by gently pressing your finger into it. If the dough does not stick to your finger, it should be ready to knead. *When in doubt, it’s always best to go lighter on the flour. You can always add more flour, but you can’t take flour away. Too much flour in your dough will give you dry, dense rolls.
- Knead on low speed for 5 minutes.
- Remove dough from mixer and place in a greased bowl. Cover with a clean kitchen towel and let rise until doubled in size, about 60-90 minutes.
Prepare the filling.
- Zest orange(s) into a bowl with the softened butter. Smash and mix up with a fork to get it all incorporated and set aside.
- Have your brown sugar handy.
It’s time to roll.
- Divide dough into two 28-30-ounce portions. If you don’t have a scale, you can eyeball it. Round each portion to an oval shaped piece of dough by pulling and tucking it under. This will make it easier to roll out into a rectangle.
- Flour your work surface and roll dough out to a rectangular shape, about 10 inches by 18 inches.
- Spread the orange butter on the dough, leaving an inch border on the top side of the rectangle. Reserve some of the orange butter for the tops of the rolls. Sprinkle about 1/4 – 1/3 cup of brown sugar on top of the orange butter, continuing to leave the inch border at the top edge. Leaving this border will help in sealing the dough shut when rolled up.
- Start with the long side closest to you, and working from left to right begin to roll dough up. You can tug and pull as you go which will tighten the roll and make more swirls.
- Once it’s all rolled up, pinch the seam shut.
- Using a piece of dental floss, make a light indentation where your cuts will be. Each of these roll outs will give you 9 large orange rolls. This will be your guide to know where to cut and to help make them all the same size.
- When ready to make your cuts, slide the floss under one end of the dough, bring the ends of the floss up, cross them over and tug to cut through the dough to make a 2-inch-wide orange roll. Continue to cut to get 9 equal sized orange rolls.
- Place orange rolls on a greased or parchment lined baking sheet about 1-2 inches apart. With rubber spatula, smear a small amount of orange butter on tops of the rolls and sprinkle with a small amount of brown sugar. Cover with clean kitchen towel and let proof for about 45-60 minutes, or until they double in size.
Bake.
- Bake in a fully preheated 350°F oven for 18-22 minutes or until edges are just golden brown. Allow to cool before frosting.
- Top with my Orange Zest Glaze.
Make Orange Zest Glaze.
- In a medium bowl, sift the powdered sugar. Add the orange zest and vanilla. Add 1-2 Tablespoons of milk at a time and mix with wire whisk. Continue to add just enough milk to get it to a thick glaze (similar to the thickness of Elmer’s glue). If you accidentally add too much milk, just add a bit more powdered sugar and whisk…add enough to get that thick consistency. (You may substitute the milk with orange juice, but it sets up better with milk.)
- Drizzle over cooled orange rolls. The glaze should set up within 10-15 minutes. Using a thick glaze like this will yield a stronger orange flavor to your orange rolls and prevent it from getting absorbed by the rolls.
- Serve and enjoy!
Notes
-
- Store any leftover orange rolls by covering with plastic wrap. They will stay fresh for 2-3 days.
- You can freeze the orange rolls to bake later. After rolling up the orange rolls but before they rise, place them on a baking sheet. Place the baking sheet in the freezer and allow the orange rolls to freeze solid (usually takes about 24 hours). Then store in Ziplock bag in the freezer for up to 2 months. To bake, place on baking sheet and allow to rise and bake as usual. Rise time will typically be 4-5 hours, depending on how warm your kitchen is. They could rise overnight and still not get too big – I wouldn’t go longer than 8 hours. I love doing this when I have extra dough. It saves my future self lots of time to have these on hand!
- You can also roll them out and place in the refrigerator to overnight rise.
- This dough is the same base dough for my Crescent Dinner Rolls. It can also be used for various sweet rolls by switching up the filling and the frosting.
- Be sure to let them rise until doubled in size. Not letting them rise long enough will result in dense rolls. On the other hand, letting them rise too long will cause them to collapse and flatten after baked.
- To make mini orange rolls, divide dough into one third the regular weight/size and roll out as directed. For example, instead of rolling out a 28-30oz dough ball, roll out a 13oz dough ball, but divide it into one dozen orange rolls. This will give you the mini size. Rise time may be slightly less. Decrease bake time by 2 minutes.
sometimes my roll layers separate during cooking or cooling. How can I prevent that. The ones in your picture did that a little bit too
Thanks
Hi Cherie,
I think this can happen sometimes when the dough gets overproofed. It might go into the oven puffy, but will deflate and separate after baking and cooling. Try cutting the final proof down a bit and see if that helps.
Hey there! Thank You so much for sharing this recipe. My sister just recently made it and raved about it. Is there any way I can make this if I don’t have a standup mixer or a Bosch??
Hello! I’m so glad you liked it! Yes, you could mix and knead by hand…it will just require extra work. You’ll need to knead it for longer…until it’s smooth and cohesive. It’s a fairly soft dough, so it may help to oil your hands when hand kneading.