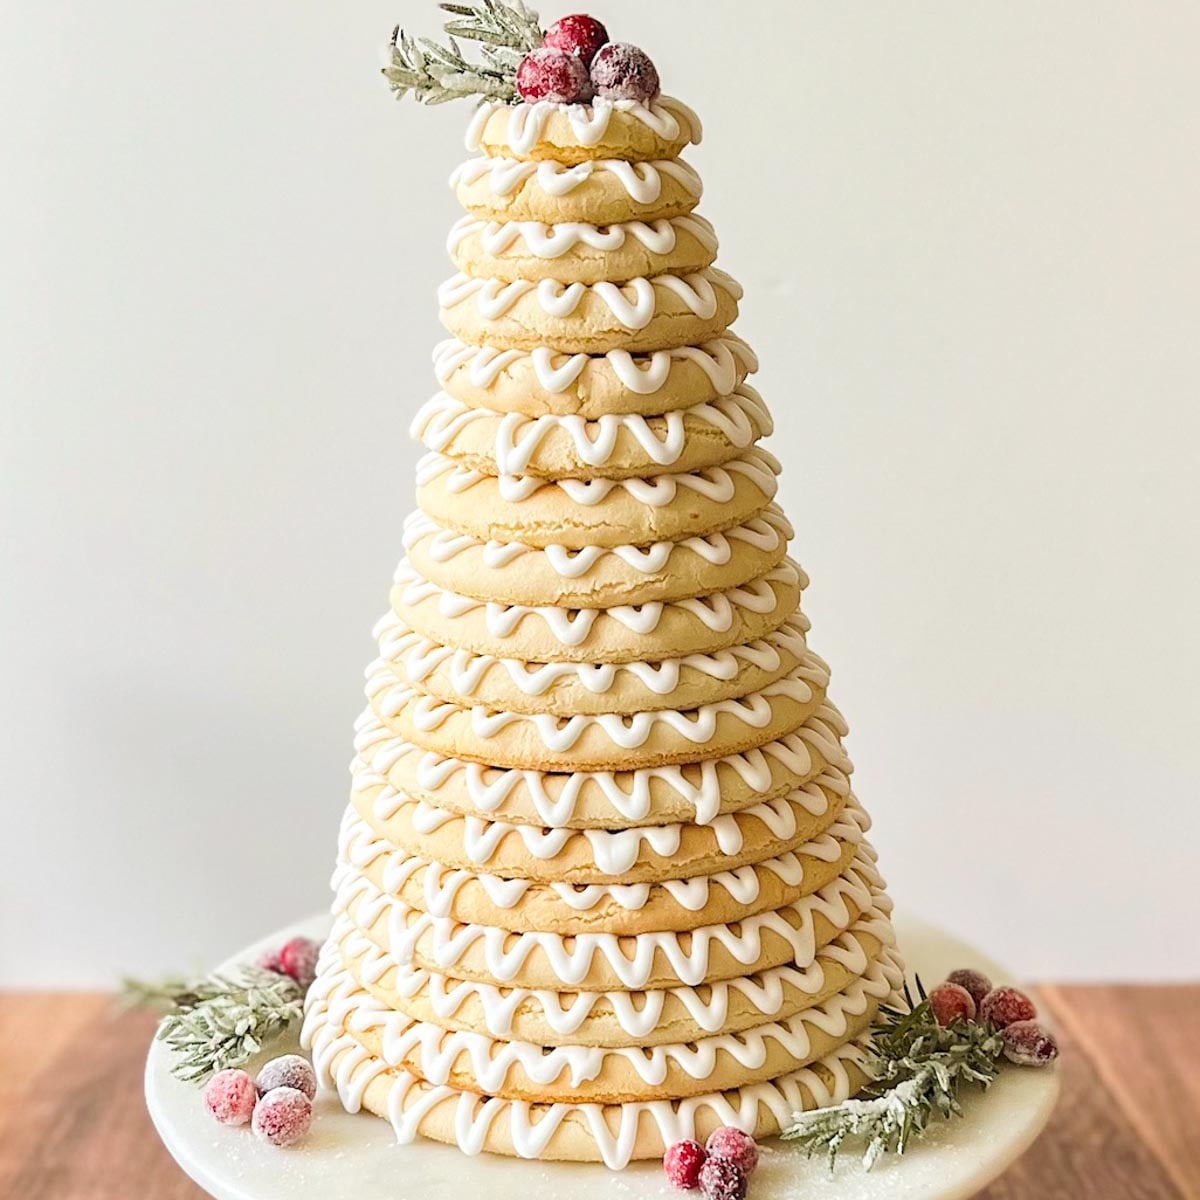
Kransekake
A traditional Norwegian cake, kransekake is made of 18 delicious, chewy, almond cookie rings and stands out as the centerpiece for any celebration. Also known as a “wreath cake”, it’s baked in round kransekake molds and carefully stacked with royal icing. This impressive dessert is much easier than you think – follow my step-by-step video below to see how this kransekake recipe comes together.

If you enjoy making impressive baked desserts like a Perfect Pavlova, or a festive Gingerbread Loaf in a beautiful bundt pan, this kransekake recipe is one you’ll love creating!
⭐️⭐️⭐️⭐️⭐️
One reader says about her Kransekake: “I’ve always wanted wondered how to make a kransekake, and been too afraid to try it until I came across your recipe and video. You made it so easy and simple to follow the recipe and it turned out even more beautiful than I dreamed it would be! Everyone at my holiday party was so impressed! I think this will be a new tradition every Christmas. Thank you for sharing this recipe!”
What is Kransekake
- a traditional Norwegian wreath cake
- made of 18 stacked, chewy almond cookie rings (gluten free!)
- enjoyed at Christmas, often used for a Norwegian wedding cake, and made for other special occasions like Norway’s Constitution Day (17th of May)
- made famous from the Great British Bake off (but in my opinion, this is the best kransekake recipe!)

I was introduced to Kransekake by my son, Clayton, who lived in Norway for two years while serving a mission for our church. While he was gone, he was really missing his favorite treats like S’mores Cookies and Cinnamon Rolls from Scratch. But he was introduced to a Norwegian dessert that he absolutely fell in love with! He kept telling me about this kransekake recipe and how much he loved it. I knew it was something I needed to learn to make for him – and what a fun recipe it turned out to be!
Ingredients

- Almond flour – Most traditional recipes will have you blanching almonds, peeling some of them and letting them dry for a long period of time (24 hours up to one week), then grinding them into flour. Using almond flour is so much faster and easier, and still produces a perfectly yummy kransekake. I also use almond flour for a yummy flavor in my Blueberry Protein Muffins.
- Powdered Sugar – A fine sugar that incorporates sweetness into these almond cookies.
- Cardamom – A classic European spice, this adds notes of citrus and spice to the kransekake cake.
- Royal Icing is a great option for the “glue” that holds the 18 kransekake rings together. (tip: This is the same, strong icing I use for Homemade Gingerbread houses!)
- Optional: Use sugared cranberries and/or rosemary to decorate your kransekake. It’s so pretty and festive!
See the recipe card for a full list of ingredients and measurements.
How to make Kransekake
Mixing the dough

Step 1: In a stand mixer, combine the ingredients for the kransekake – it should come together to form a texture like cookie dough.

Step 2: Wrap the kransekake dough with plastic wrap, flatten to a disc, and place in the refrigerator to chill for at least 8 hours.
Shaping the Kransekake rings

Step 3: Prepare your kransekake molds by spraying them with nonstick spray. Then dust them with semolina flour to keep the kransekake cake from sticking to the pans.

Step 4: Divide the chilled dough and begin rolling them out into thin ropes.

You’ll want to make sure they are slightly larger than the circumference of of a pencil (3/8-inch to 1/2-inch) . *Be sure to keep the rest of the dough covered as you form the ropes – they can dry out easily.

Step 5: Place the rolled out dough into the kransekake molds. If you need to piece any pieces together to get the correct length, be sure to pinch the ends together to create a seamless transition.
Kransekake Molds
I’m sure not all Norwegians use ring molds to bake their Kransekake layers in, but it is an incredibly helpful tool to use when making this recipe! It makes the recipe go so much faster and gives me perfectly sized and round rings. If you don’t have a ring mold pan, you can make the rings on a parchment lined baking sheet. Simply use a pencil to make 18 circles in the following measurements as a guide, each listed in inches:
- 8 – inches
- 7.5 – inches
- 7.25 – inches
- 7 – inches
- 6.5 – inches
- 6.25 – inches
- 6 – inches
- 5.5 – inches
- 5.25 – inches
- 5 – inches
- 4.75 – inches
- 4.5 – inches
- 4.25 – inches
- 3.75 -inches
- 3.5 – inches
- 3.25 – inches
- 3 – inches
- 2.5 – inches

Try not to over bake the Kransekake cookies or they’ll dry out. Remove the bake rings from the pans and cool completely on a wire cooling rack. While they’re cooling, you can prepare your royal icing.

Step 7: Mix the royal icing with an electric mixer. When using for piping, the royal icing consistency should reach a stiff peak – see my Royal Icing post for more details. You can also use it to decorate Homemade Gingerbread Houses.
Stacking the rings

Step 8: Use a piping bag and a round piping tip, start with the largest ring and pipe icing in a zig-zag pattern along the top of the cookie. Royal icing is perfect for this job – it acts

Stack the next smallest ring on top of that, and then pipe more royal icing on top of that ring. Continue to stack the kransekake cookies until you form an 18-ring tower.

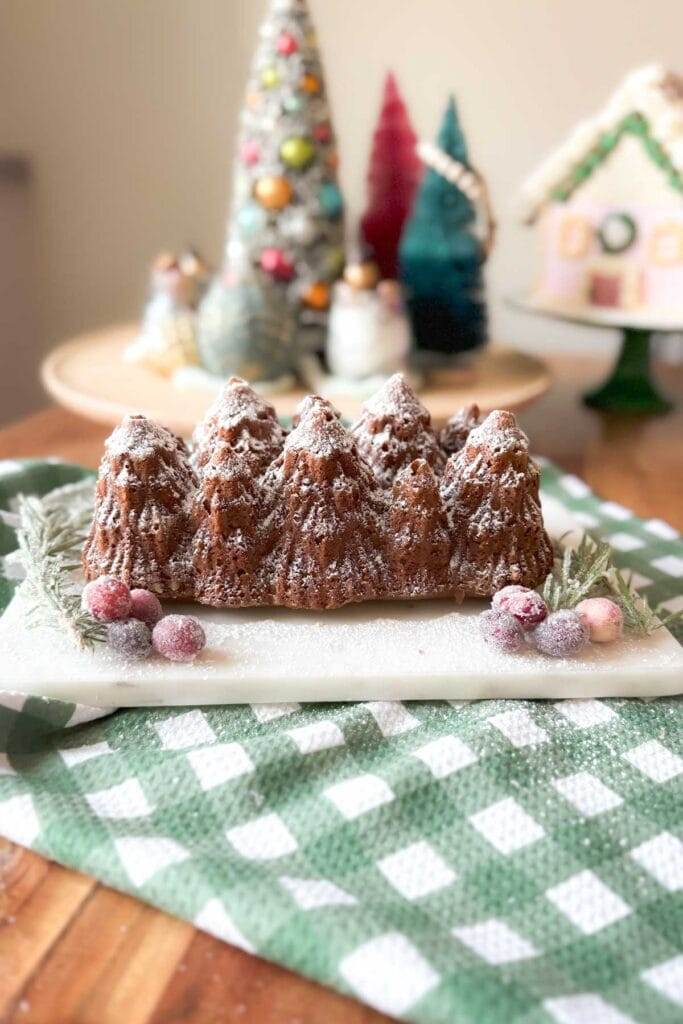
When making kransekake for Christmas, it’s so pretty to add sugared cranberries and rosemary for garnishing. It’s the easiest process and makes a big impact!

Serve your kransekake on your favorite cake platter. Place sugared cranberries and/or rosemary around the base and at the top for an extra festive cake! Enjoy!
Frequently Asked Questions
It’s a sweet, chewy cookie. It’s not overly sweet and since its made with almond flour, it has a bit of a nutty flavor. It’s a yummy treat.
It can seem really confusing how to serve a tower of 18 rings of cookies, all held together by icing. I’ve used different ways you can serve it. The first option is to take the rings from the bottom – this would keep the same tower shape at the top, which would look prettier than taking it from the top. The second option is to take the smallest ring from the top and serve it that way. This might be an easier option. Use a knife to separate the rings and cut them into individual servings if needed.
Store kransekake at room temperature, lightly covering it with plastic wrap. Homemade kransekaki will stay fresh, when stored correctly, for up to 3 days.
More Impressive Recipes


Kransekake Recipe
Kransekake
Equipment
Ingredients
Dough:
- 1 pound plus 5 Tablespoons almond flour
- 1 pound powdered sugar
- 1 teaspoon ground cardamom
- 4 egg whites
- 1 teaspoon almond extract
- ¼ cup semolina flour or all-purpose flour
- ½ batch my Royal Icing recipe
Instructions
Mix the dough
- To the bowl of a stand mixer, add the almond flour, cardamom and powdered sugar. Mix with a wire whisk until they’re fully combined.
- Add the egg whites and almond extract. Mix with the paddle attachment on low speed until smooth, about 2-3 minutes. The dough should feel very soft and slightly sticky.
Chill the dough
- Remove the dough from the mixer and cover with plastic wrap. Flatten to a disc. Refrigerate the dough for at least 8 hours.
Shaping
- Spray the kransekake molds with nonstick spray and dust with semolina flour to prevent them from sticking. Semolina works best but you can use all-purpose flour if needed.
- Divide the chilled dough into six pieces and begin to roll each piece out on a lightly floured work surface – lightly rolling it back and forth with the palm of your hand. Roll it slightly larger than the circumference of a pencil (about 3/8-inch to 1/2-inch). Fill the pans as you roll out each piece. *While you are working, keep the dough and filled pans covered to avoid it drying out.

- Lay the ropes into the ring molds. Pinch the ends together and smooth the dough out to hide the seam. *If you run out of dough before filling all of the pans, you have rolled out your dough too thick. You can remove some of the ropes, roll them out a bit thinner and you'll get more dough to complete your 18 rings. As you fill the rings, gently rest the rolled up dough into each ring form. Break the dough as needed to fit the pan.


Bake
- Bake the cookies at 375°F for 10-14 minutes, just until the edges begin to barely brown. They should be more of a light pale brown color – if they are over baked, the cookies will be very crispy and not chewy. Allow them to cool completely in the pans before removing. As they cool, they will begin to stiffen.
Assemble the Kransekake
- Group similar sized rings together to keep you organized as you assemble. Starting with the largest ring, pipe the royal icing around the top in a zig zag pattern. Top with the next largest ring, ice and repeat until all 18 layers have been stacked.

Serving
- Remove rings and break apart to serve. The almond cookies should stay soft and chewy for 2-3 days.
Video
Notes
- Find my Royal Icing recipe here: https://thatbreadlady.com/royal-icing/
- Most traditional recipes will have you blanching almonds, peeling some of them and letting them dry for 24-48 hours, then grinding them into flour. If you’re feeling ambitious, I’ve been told by my Norwegian friends that making your own almond flour makes for an incredible flavor.
- If you don’t have a ring mold pan, you can make the rings free-form on parchment. Simply use a pencil to make 18 circles in slightly different, but graduating sizes. Use the following measurements as a guide:(Each measurement is the ring diameter in inches) 8, 7.5, 7.25, 7, 6.5, 6.25, 6, 5.5, 5.25, 5, 4.75, 4.5, 4.25, 3.75, 3.5, 3.25, 3 and 2.5. Flip the parchment over, so that the pencil or marker is on the underneath but still visible. Arrange the dough in the specified sizes. You can save space by nesting smaller rings inside larger ones. Be sure that they are at least 2 inches from each other.
I’ve always wanted wondered how to make a kransekake, and been too afraid to try it until I came across your recipe and video. You made it so easy and simple to follow the recipe and it turned out even more beautiful than I dreamed it would be! Everyone at my holiday party was so impressed! I think this will be a new tradition every Christmas. Thank you for sharing this recipe!
A few questions… how to you eat this? Do you break off the rings one at a time? Cut it?
Also it looks like you decorated with cranberries but what did you use for the leafs you decorated beside them? Thank you!
Hi Cheryl. You can break off the rings from the top and slice them into smaller pieces for serving. I decorated with sugared cranberries and rosemary twigs.
Actually, when you serve it, remove the rings from the bottom so it still looks festive.
Another tip: after baking it, put the rings in a container and freeze for about 3 days. This contributes to making it chewy. I’m Norwegian/Canadian and was taught by my aunt in Norway.
Oh Thank you so much for that suggestion! I have a Norwegian family member and I’ve heard both ways. Thank you!
will a half batch of the royal icing be enough for the 18 layers?
You can try using a half batch and see if you can stretch it that far. I usually do have a bit of icing leftover, but not sure that it’s half. You can always make more if needed.
Do you mean diameter for the ring sizes when making your own? 2” circumference seems small!
Hi Julia! Oh gosh, yes! Me and math, hahaha. I updated the recipe and post to say diameter. That’s how far across you want the ring.
Hello can you please tell me what brand of stand mixer you used in the video link?
I love it!!
you were making Kransekake
Hello. I’m using an Ankarsrum mixer in this video. My favorite!
You have two different temperatures and two different baking times…which do you recommend?
Hi Nancy,
Thank you for catching that. I have updated the post. Bake at 375°F for 10-14 minutes. Hope you enjoy!
Thank you! I winged it and it turned out awesome…my stamping customers loved it!
This is the e first time I will be making so can I use little milk so it does not dry up
Hello. No I would not add milk. If you are making the kransekake cakes in advance, just store them in an airtight container until you are ready to assemble them. This should keep them soft until you’re ready to assemble the tower and serve.
I’m looking forward to learning to make the kransekake cake for my grandsons wedding. I love the idea of adding cardamom. How much do you suggest to use? I appreciate your recipe, great tips and video.
The recipe calls for one teaspoon cardamom. Hope you enjoy!
how long did you roll them?
The length isn’t as important as the width. I just updated the directions to be more specific – you should roll the dough to a little larger than the circumference of a pencil (about 3/8-inch to 1/2-inch). You’ll need to tear the ropes of dough to fit the rings in the pan, as needed. Small pieces can be pinched together at the ends and you can roll them a bit more to smooth out the seams. If you are not using a ring form pan and are making these freeform, I updated this post to show those measurements. Let me know how it turns out! It’s a fun recipe to make!
Is there a substitution for the Nutella for someone that cannot have Nutella? Thank you Heather!
Hi Tammy,
Are you talking about the almond flour?