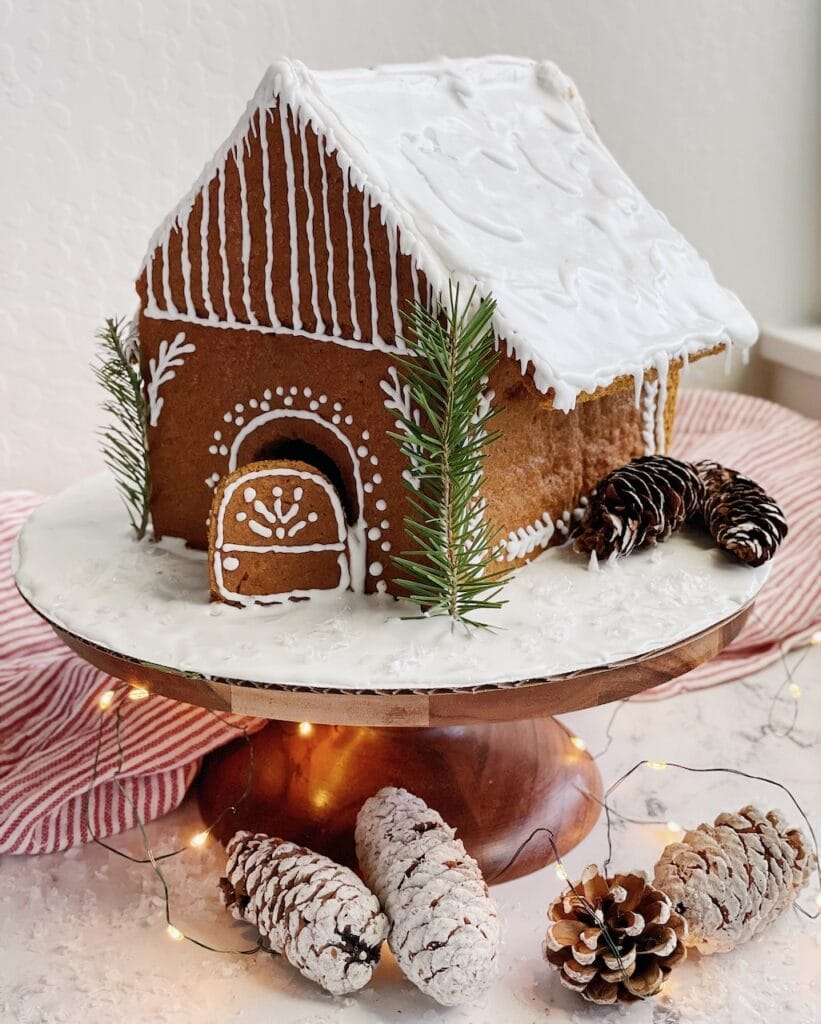
A gingerbread house made from scratch is the perfect way to create Holiday traditions with your family! It’s fun and festive and will make your house smell like Christmas! Learn how simple it is to make your own gingerbread house with my step by step guide and free template!
Make it a family tradition
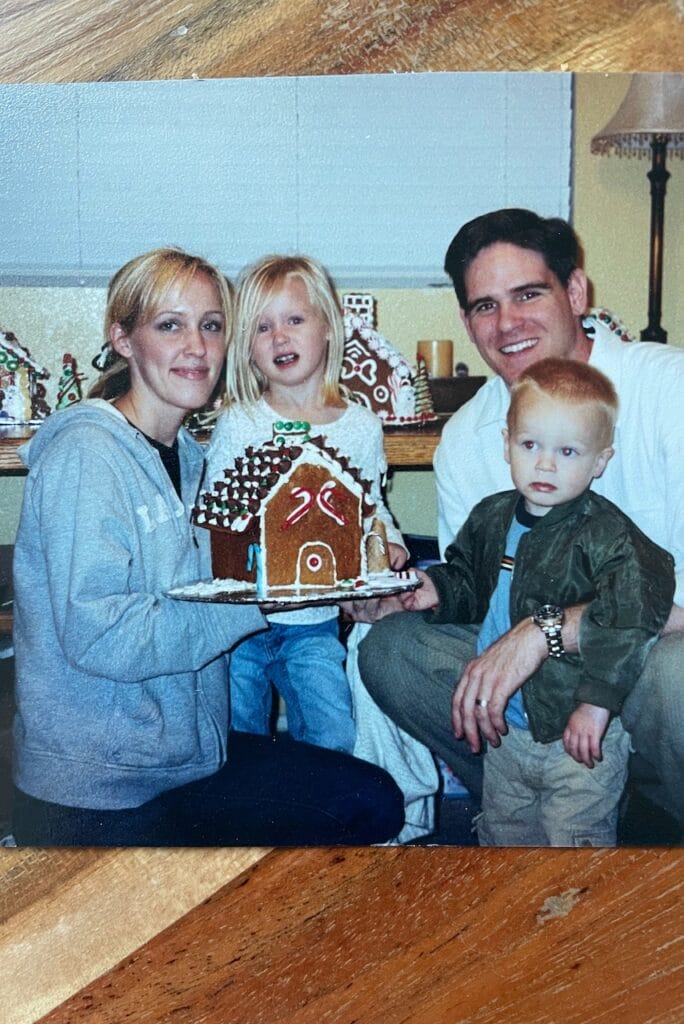
My family has been making gingerbread houses from scratch since I can remember. When I was growing up, we gathered with our cousins every year and each family would decorate a gingerbread house. It was made from scratch, giving off the most fragrant smell of molasses, cinnamon and ginger – every smell that reminds me of Christmas! We would carefully plan the theme of our house and put together our own custom gingerbread house kit with items to decorate it like candy canes, pretzels, chocolate and shredded coconut. For New Year’s Eve, the tradition continued and we’d meet again for more fun. After a long-anticipated countdown to midnight, the grandkids would get to smash our Grandma’s gingerbread house and keep whatever pieces we could get our hands on. Of course, everyone always tried to get the biggest piece that had the most candy on it! As our families grew up, we began our own traditions, but my mom has continued the tradition with my own siblings and our children, and we still decorate gingerbread houses every December!
We’ve had so many great memories from decorating gingerbread houses together. Coming up with a theme, planning the candies and items to decorate it with, and displaying it in our home all throughout the Holiday season has become something we all look forward to each year!
Can I make cookies with this gingerbread dough?
You might be thinking, you’d like to use this dough for cookies too. Since we’re using it to build a house, it needs to be on the dry side – so, I wouldn’t suggest it for cookies. If you are looking for a delicious, soft and chewy cookie then be sure to try my Gingerbread Cookies recipe! You’ll love them! Another amazing Holiday cookie recipe is my Eggnog Snickerdoodle Cookie! It’s so yummy! (p.s. you don’t have to love Eggnog to enjoy these cookies!)
The Steps of making a gingerbread house.
Making a gingerbread house from scratch may sound intimidating, but it’s really much more simple than you think. If this is your first gingerbread house, don’t worry – I’m here to walk you through it step by step! This blog post gives you lots of pictures and directions to make it successfully!
Here’s a quick overview of how it’s going to go, and then we will dive into each step with more details.
- Mix the gingerbread dough in a stand mixer. Chill the dough for at least three hours.
- Roll the dough out onto a rimmed cookie sheet.
- Bake for 25-30 minutes.
- As soon as it comes out of the oven, cut the shapes out of the sheet of gingerbread while it’s still in the pan. Place them on a cooling rack to cool completely.
- Assemble the gingerbread house pieces and allow it to set for about 5 hours before decorating.
- Decorate your house with the family and make some Holiday memories!
Making the gingerbread dough
The dough is so easy to make and takes hardly any time at all! It is a more stiff dough, so you will definitely need a stand mixer to get it all mixed up. If you have a mixer that is at least a 5 quart capacity, you should be able to double this recipe if you like.
Let’s break down all the steps of mixing up this gingerbread!
- About an hour before mixing, take out your egg and let it come to room temperature. *I have a shortcut if you forget – you can place a chilled egg in a bowl of warm water and it will bring it to room temperature in about 10 minutes!
- In a large bowl, combine the all purpose flour, salt, ground ginger, baking powder, cinnamon and cloves. Stir them together to combine and set it aside.
- In your stand mixer, you’ll add the molasses, brown sugar, 100g of vegetable oil and egg. Use the paddle attachment to mix them until well-combined.
- Slowly add in the dry ingredients to the molasses mixture while the mixer is on low speed. Mix until it’s all combined, avoiding over-mixing. Stop the mixer and scrape down the sides as needed.
- Remove the dough and wrap in some plastic wrap. Chill the dough for at least 3 hours – I usually make the dough the night before and let it chill overnight. You can leave it chilled in your refrigerator for up to 5 days!
Rolling out the gingerbread dough
Before you begin rolling out the dough, preheat your oven. I always suggest allowing it to preheat for a half hour before baking. All ovens heat differently, but typically a half hour will allow it to fully preheat. Oven thermometers are so useful in helping you to know if your oven is truly preheated.
Use a baking sheet with at least a one inch deep rim. It should be 12×17 inches in size (also known as a “half sheet” size pan). You will be able to perfectly fit the pieces of the entire house using this size of pan.
- Pour 1/3 cup of vegetable oil in the sheet pan and cover the entire surface with it. This will prevent the gingerbread from sticking to the pan when baked.
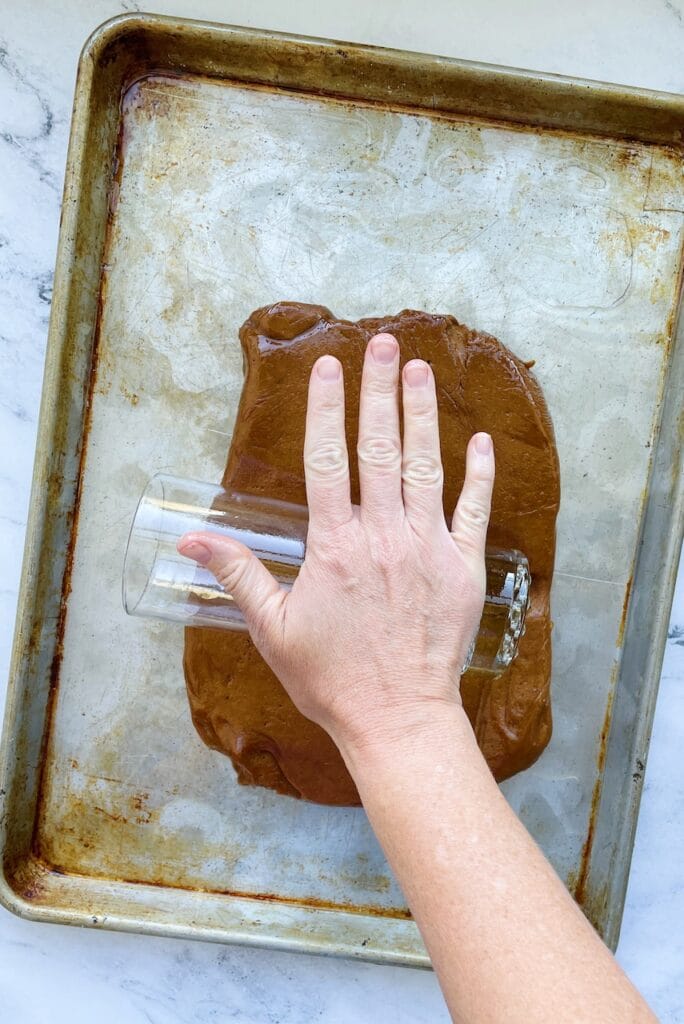
- Place your chilled dough onto the oiled baking sheet and turn it so that all the sides are coated in oil. Oiling all the sides will help keep the dough from sticking as you roll it out.
- To roll it out, you can use a rolling pin as long as it fits – I have a rolling pin that has handles that hit the rim of the baking sheet so I’ve come up with a creative way to roll out the dough. If you’re like me and your rolling pin won’t work, use a straight edged drinking glass or bottle (one that’s not tapered). You should be able to easily roll it back and forth to spread the dough evenly to cover the entire surface of the baking sheet.
- Get eye level and make sure the dough is rolled out to a flat surface with an even thickness.
If you have oil settling on top of the surface of the dough, you can leave it there. It will help the gingerbread to bake with a smooth surface. Bake the gingerbread until the edges are golden brown and the edges are slightly pulling away from the pan.
Gingerbread House Printable Template
There are lots of different gingerbread house templates that you can use. I’m providing you with the one my family has used for years! You can download and print this template for free! I would suggest printing it on card stock – this helps to provide a more sturdy template.
Cutting out the gingerbread pieces
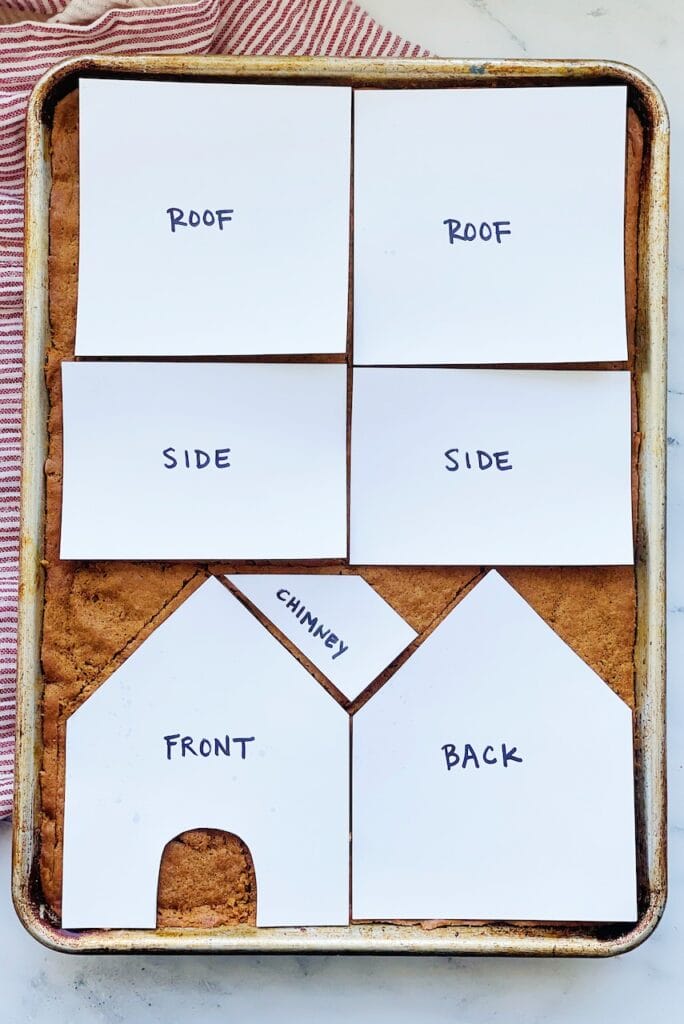
As soon as you remove your pan from the oven, arrange your template over the top of the baked gingerbread. See the picture below for the best way to fit them all on there. The template I’m providing fits perfectly, using up as much gingerbread as possible. You won’t have much leftover dough, but you’ll have just enough to cut out one or two small Christmas trees or other small shapes with a cookie cutter.
There’s a short window of time to cut out your gingerbread house pieces. You need to cut them out while the gingerbread is still warm. It starts to harden quickly and cutting them out while it’s still warm will make the process much easier.
Place the templates on top of the gingerbread and use a sharp knife to cut around them. As soon as you have all of the shapes cut out, use a metal spatula to carefully lift them out of the pan and place them on a wire rack to cool completely.
Assembling your gingerbread house
Once your gingerbread pieces have completely cooled, you can start assembling your house. I like to use a round cake board as a base for my house. I use a 12 inch round. There’s several different kinds – try to find one that has a coated side (usually white, gold or silver). If you can’t find one that is coated, you can wrap it in aluminum foil. This helps to keep the board from getting oily from the gingerbread.
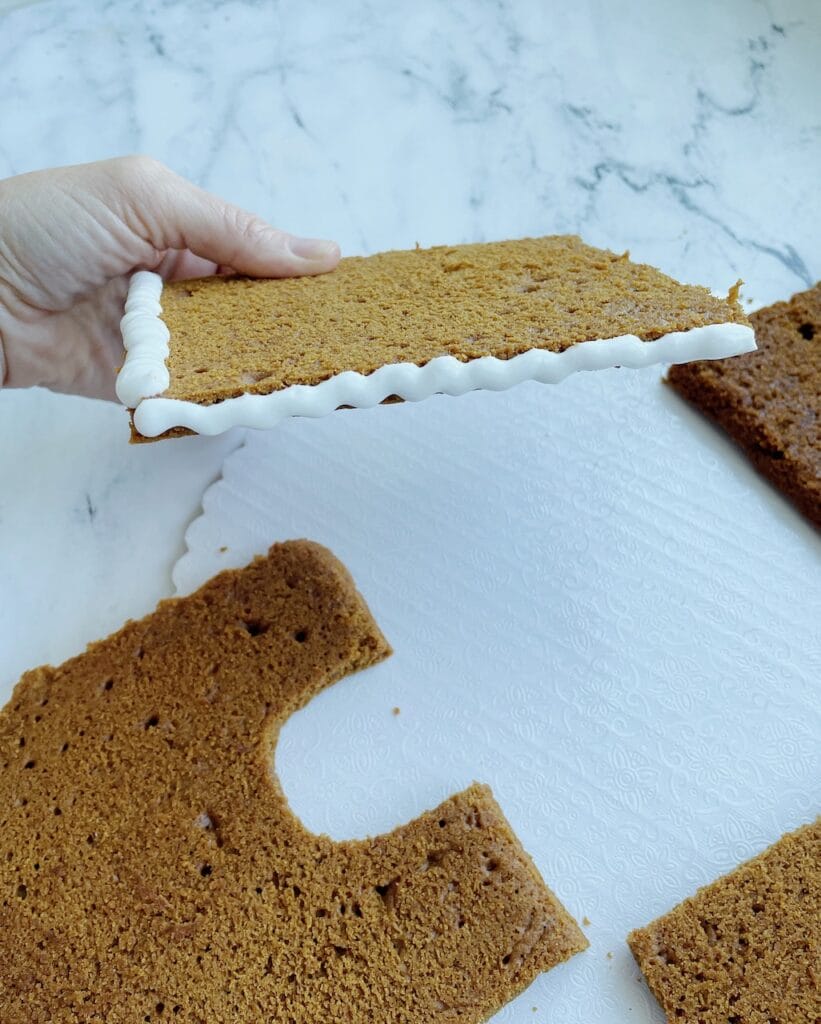
As you build your house, you will be piping icing onto the edges of the pieces to adhere them to the cake stand and to each other. Royal icing sets quickly, so you shouldn’t have to hold them in place for more than 1-2 minutes at a time.
Now it’s time to build your house! Have your royal icing all ready in a pastry bag and off to the side to access it easily.
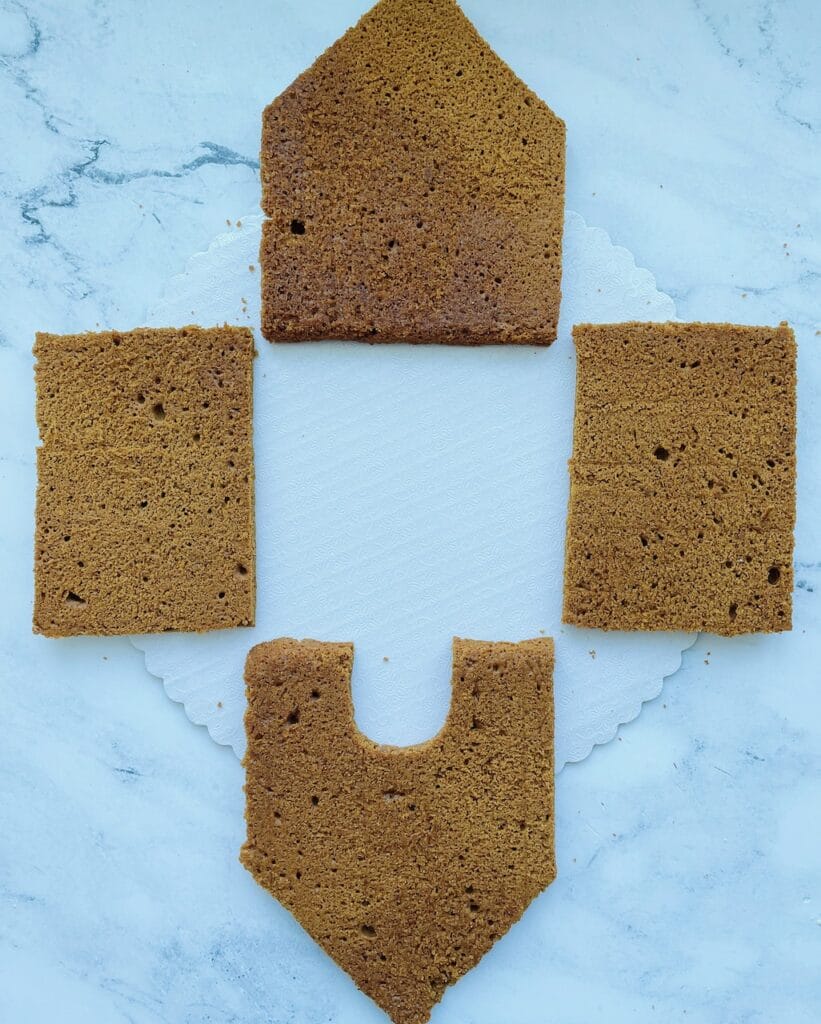
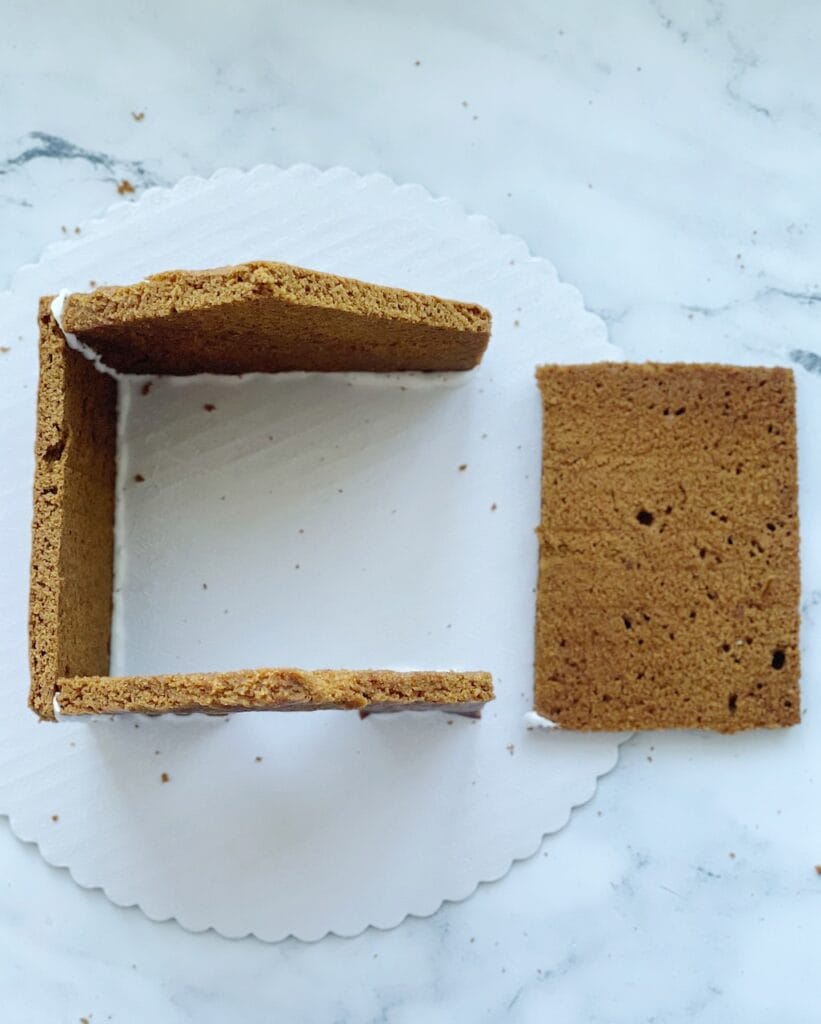
Lay all four of the bottom structures in the center of your cake board, outside facing down.
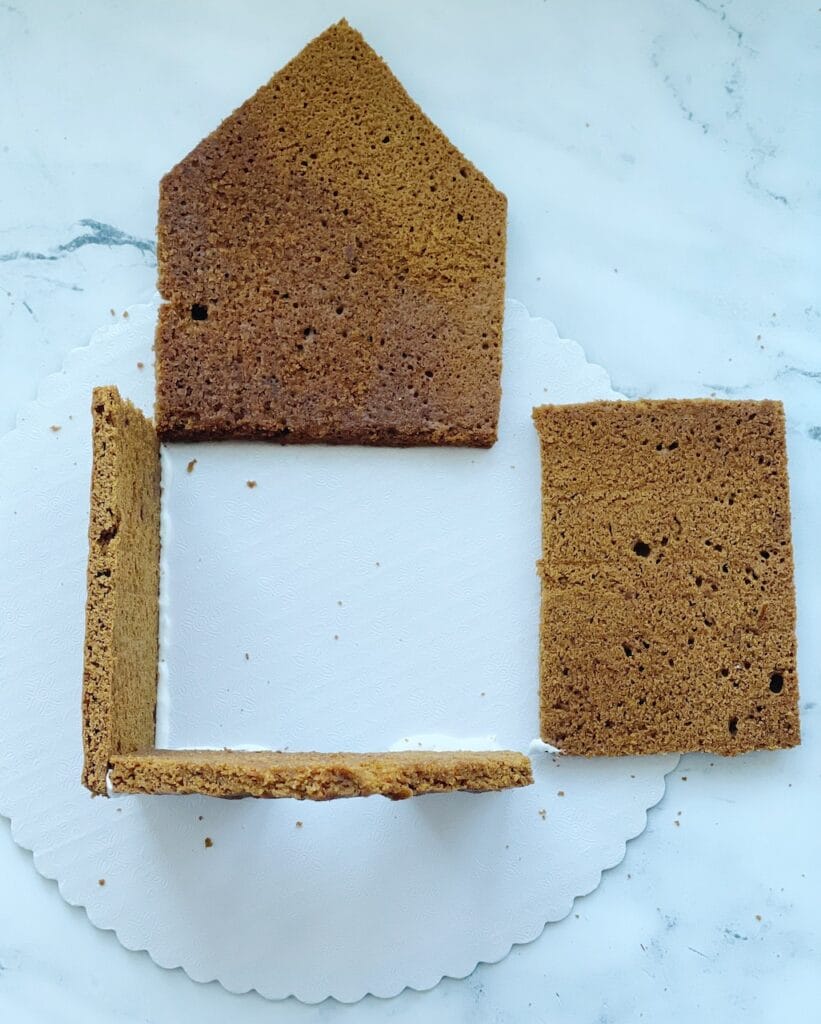
First, you will assemble the front of the house and one of the side walls. You’re going to be placing the side walls on the outer edges of the front and back pieces. Pipe the frosting on the bottom edge of the front wall and on the bottom edge and interior edge of the side wall. Stand them upright and joint them together for one minute, allowing the icing to set.
Next, you will add the back wall. Pipe frosting on the bottom edge and one side of the piece, so that it will adhere to the standing side wall. Now you should have 3 of the four base pieces standing. If they aren’t standing on their own and are collapsing when you let go, place a jar or can or something to support and hold them up while the frosting continues to set.
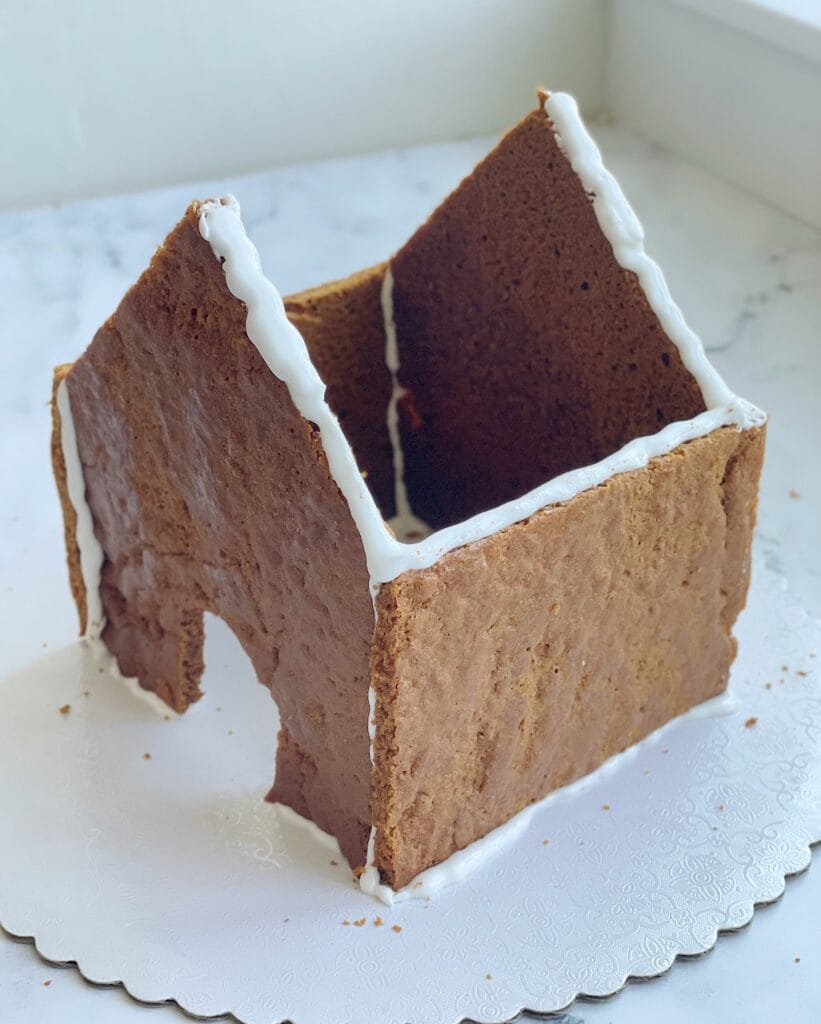
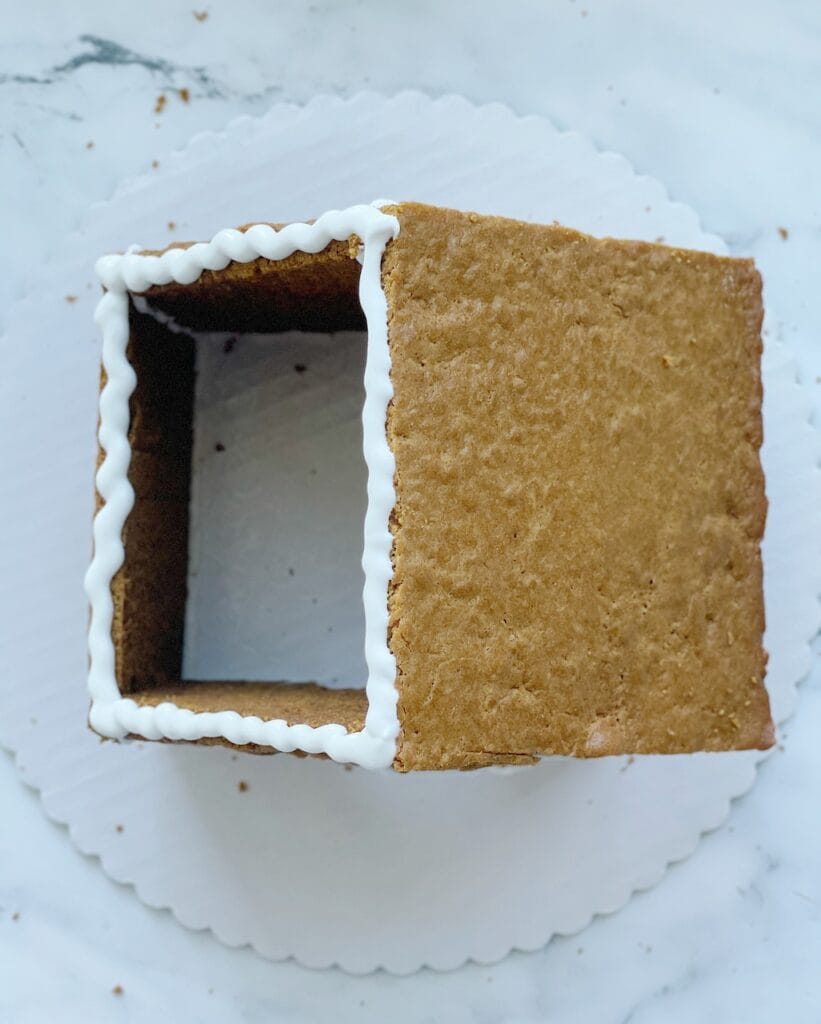
Finally, add the last piece of the base, the second of the two side pieces. Allow the four base pieces to set about 10-15 minutes before adding the roof pieces.
Next, add the roof pieces, one at a time, piping frosting along all of the edges where it will meet with the top edges of the house. Hold the roof pieces in place for 1-2 minutes until they set.
The finishing touches
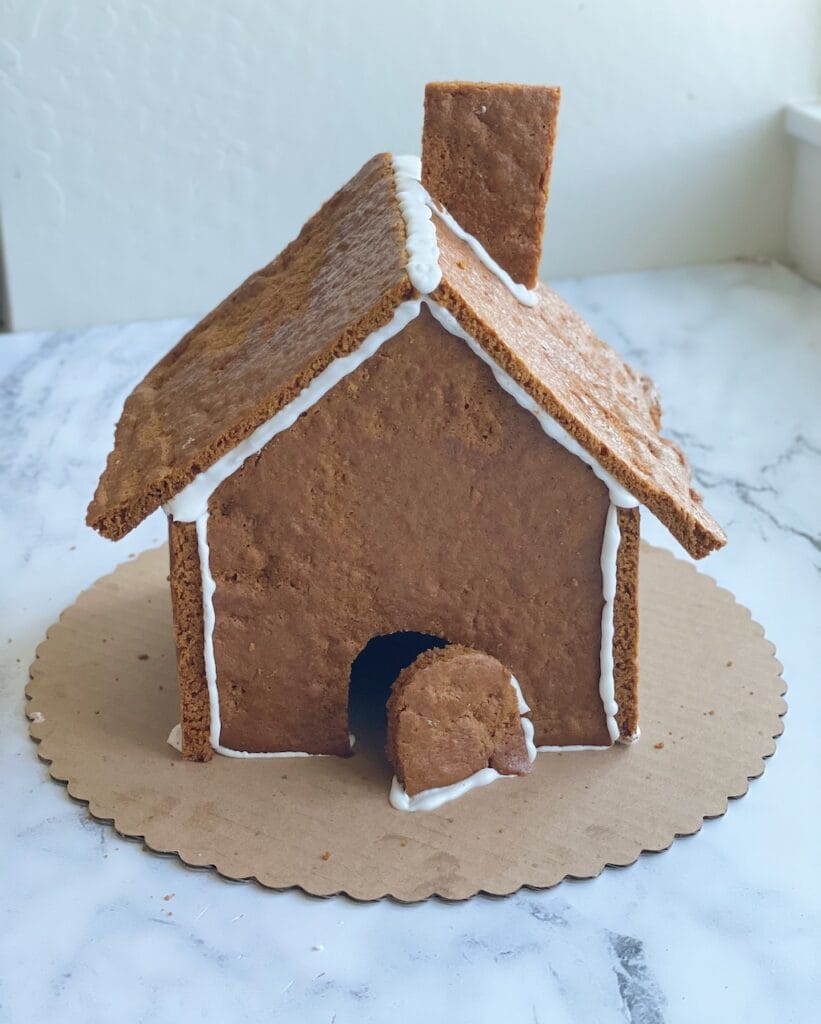
Add the chimney and door pieces. You may need to hold the chimney on with your hands for 2-3 minutes to keep it from sliding.
Voila! You have a beautiful homemade gingerbread house! Allow the house to set for at least 5 hours before decorating. I usually like to assemble my house at least one day before we decorate.
Royal Icing
Royal icing is the perfect icing to use for a strong, solid gingerbread house. It sets quickly and hardens, keeping the joints of the house together. It’s also the icing you will use to decorate with. Since it sets quickly, you’ll need to keep any icing you have in a bowl, covered to keep it from hardening.
You’ll also need to work quickly as you decorate – have your candy and toppings strategy planned out before you pipe on any frosting. If you are piping a decorative design onto the walls or roof of your gingerbread house, you may want to do it before you build your house – it is easier to pipe when the pieces are laying down flat rather than standing up.
Royal Icing is so easy to make! I have another royal icing recipe that uses egg whites to make a meringue base (the thickener) – I usually use this recipe when making my gingerbread cookies. For this gingerbread house, I like to use the recipe I’m providing you with here – it cuts out the egg whites and uses a meringue powder instead. It’s a much quicker process and creates a more stable icing. If you don’t have meringue powder, you can definitely still use my other Royal Icing recipe – just be sure to mix it really thick, forming stiff peaks when mixed.
Royal Icing is a very versatile icing. You can easily thin it with water. If you want to create any designs with it, use a thicker consistency for the outer edges of your designs and a thinner consistency to flood the inside with icing. When tinting royal icing, tint it with gel food coloring and then thin with water to your desired consistency.
Use pastry bags to pipe on your icing. You may also find a coupler useful if you want to easily switch between more than one size piping tip. Generally, I use an Ateco size 8 tip to pipe on my royal icing. When piping more detailed designs, I’ll use a size 5 or 6 tip.
Gingerbread House decorating ideas
Since I’ve made a gingerbread house every year, for as long as I can remember, I have a lot of decorating ideas! Involve your kids and let them help plan it. We usually decide on a theme first and then shop for the decorations. We’ve had themes like chocolate, peppermint, fruity, cold cereal, rustic, all white, or all pink. The possibilities are endless! Let your imagination go wild! Here’s a few ideas for materials:
- Peppermint – mini candy canes, red & white pinwheel candies, crushed candy canes, small candy cane rods, peppermint bark
- Roof – mini Nilla Wafer cookies dusted with powdered sugar, shredded wheat cereal, pretzel sticks, Dots candy, all frosting to resemble snow, coconut flakes, Necco candy wafers
- Walls – pretzel rods to look like a log cabin, Kit Kat candy, licorice rope, jelly beans or jelly belly’s to resemble stones, Cinnamon Toast Crunch cereal to resemble shingles or bricks
- Other – Cotton candy makes realistic looking smoke coming from the chimney. Use fresh pine clippings from your Christmas tree for a beautiful nature vibe. Place two small pieces of licorice rope each topped with a chocolate chip on top of the chimney – to resemble Santa going down the chimney
There’s so many options! This is where all of the magic and fun happens!
Gingerbread House Challenge – #gingerbreadshare
Join my first annual December Baking Challenge! I’m calling it #gingerbreadshare ! Create and share your Holiday Gingerbread House and share it on Instagram for a chance to win an amazing prize! Find all the details HERE!
It’s so much fun to see everyone’s creativity! Let’s share in the gingerbread magic together!
More recipes you’ll love…
(This post contains affiliate links! Good news! I only recommend products I love!)
PrintThe Best Gingerbread House Recipe
A gingerbread house made from scratch is the perfect way to create Holiday traditions with your family! It’s fun and festive and will make your house smell like Christmas! Be sure to use my free template at thatbreadlady.com.
- Prep Time: 3 hours
- Cook Time: 30 minutes
- Total Time: 3 hours 30 minutes
- Yield: 1 gingerbread house or 26 ounces of dough 1x
Ingredients
Gingerbread dough
- 2 & 3/4 cups (320g) all-purpose flour
- 1/2 teaspoon salt
- 1 Tablespoon baking powder
- 1 teaspoon ground cinnamon
- 1 teaspoon ground ginger
- 1/4 teaspoon ground cloves
- 2/3 cup (225g) unsulphured molasses
- 1/2 cup (100g) vegetable oil, plus 1/3 cup (33g) for the baking sheet
- 1/3 cup (70g) brown sugar, packed (golden or dark)
- 1 large egg, room temperature
Royal Icing
- 2 Tablespoons Meringue Powder
- 6 Tablespoons water
- 2 & 2/3 cups (300g) powdered sugar, unsifted
Instructions
- In a large bowl, combine the flour, salt, baking powder, cinnamon, ginger and cloves, Stir it to combine and set aside.
- In the bowl of a stand mixer, combine the molasses, 1/2 cup (100g) of vegetable oil, brown sugar and egg. Mix on medium speed with the paddle attachment until fully incorporated, about one minute.
- Turn the speed to low and gradually add in the flour mixture. Stop and scrape the sides of the mixing bowl as needed. Mix until fully incorporated, about 1-2 minutes – avoid over mixing.
- Turn dough out of the bowl onto a piece of plastic wrap. Wrap the dough and place in the refrigerator to chill for at least 3 hours before rolling out. (You can store the dough in the refrigerator for up to 5 days).
- When ready to roll out the dough, preheat oven to 300°F. Pour 1/3 cup (33g) vegetable oil onto the surface of a 12×17 rimmed baking sheet, coating the entire surface.
- Remove the plastic wrap from the chilled dough. Place the dough onto the oiled baking sheet and turn to coat all sides. Using either a rolling pin or straight sided glass, roll the gingerbread dough inside the pan, spreading it out to cover the entire surface evenly. Do not pour off any oil that settles on top of the dough.
- Bake on the middle rack for 25-30 minutes, until the edges are golden brown and pulling away from the sides of the pan.
- Place the pan on a wire cooling rack. While it is still warm, arrange the template pieces over the gingerbread and cut out the shapes with a sharp knife. Carefully remove the pieces and place onto a wire rack to cool completely.
- While the gingerbread is cooling, make the royal icing. After measuring out the powdered sugar, sift it into a large bowl and set aside. Place the meringue powder and water in the bowl of a stand mixer. With the wire whisk attachment, whip on high speed until the mixture starts to foam, about 3 minutes. Turn the speed to low and slowly add the powdered sugar. Stop and scrape the sides of the bowl as needed. Mix until the icing is smooth and glossy. Cover the bowl with plastic wrap or a slightly dampened kitchen towel until ready to use. When ready to use, get a disposable pastry bag, cut off the tip and insert piping tip. Fill the bag with the royal icing.
- When you are ready to assemble your house, use a 12-inch round disposable cake board as your base. Start with the front and left sides of the house. Pipe icing onto the bottom and adjoining edges to affix the pieces to the board and each other. Put the side piece on the outside edge of the front piece. Hold them in place for 1-2 minutes while the icing sets. Next, attach the back piece by piping frosting in the same manner. Hold in place for 1-2 minutes. Use a tall glass or can if you need help propping up the sides of the house. Then, attach the last side of the house. Hold in place for 1-2 minutes. Allow the base four pieces to set for 15 minutes before adding the roof. Once the roof is set in place, add the chimney and door. Let the gingerbread house set for at least 5 hours before decorating – letting it set for 24 hours before is ideal.
Notes
- This recipe is meant specifically for gingerbread houses. It’s a little on the dry side and not ideal if you’re wanting to make gingerbread cookies. Check out my recipe for Gingerbread Cookies for a yummy, soft and chewy cookie!
- If your gingerbread pieces have completely cooled and seem too soft, you can put them back on the baking sheet and bake them an additional 5 or so minutes to stiffen them up a bit.
- This recipe can be easily doubled in a stand mixer that is at least 5 quart capacity.


[…] just published my GINGERBREAD HOUSE RECIPE here on thatbreadlady.com! In this post, I’m sharing a step by step guide & FREE TEMPLATE […]