Best Garlic Knots Recipe + video
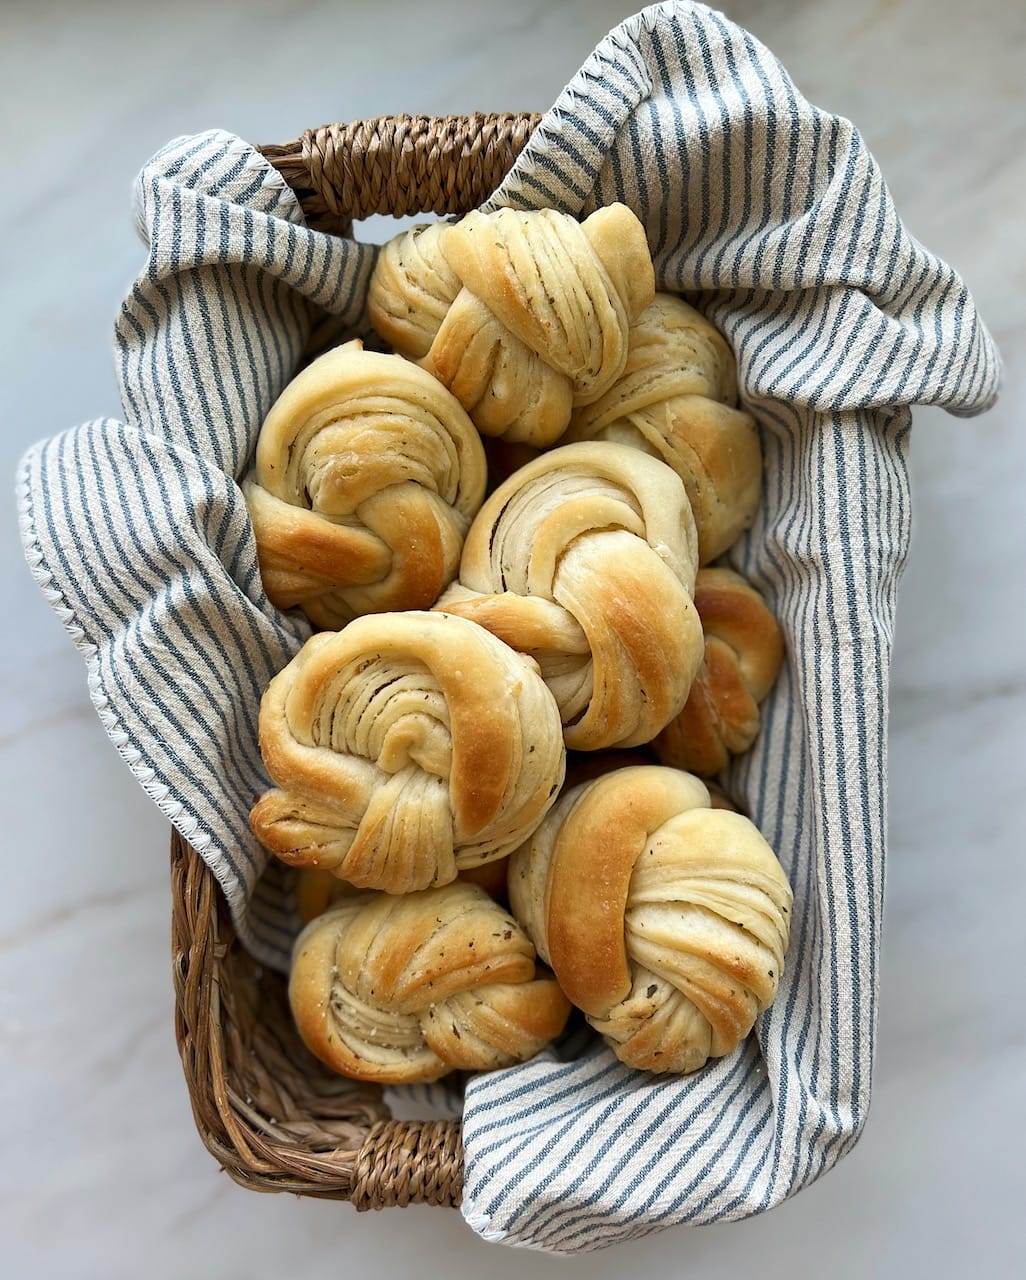
We’re taking garlic knots to the next level. Using the Tangzhong method to make them super soft and fluffy, and folding the dough with a savory garlic butter, these dinner rolls bake up with delicious buttery layers. These show-stopping garlic knots are beautiful and taste amazing! Be sure to watch my helpful video, showing you how to laminate and tie the garlic knot rolls!

What are garlic knots
Garlic knots are made of a soft bread dough, like roll dough or sometimes pizza dough. The dough is cut into strips, tied into knots, and allowed to rise before being baked. Typically you’ll brush on some melted garlic butter just before and/or after they come out of the oven, but for this recipe, we’re taking it a step above. By folding layers of garlic butter into the dough (also called “lamination”), you’ll create these gorgeous, golden layers of bread when they’re baked.
These garlic knots look like they came from a professional bakery or restaurant, but they’re really so easy to make!
How to use instant yeast for bread recipes
This recipe uses instant yeast. If you are new to working with yeast, check out my post about Active Dry Yeast vs. Instant Yeast. This short read will help explain the difference between the two.
You’ll love the convenience of instant yeast – you can add it directly to your recipe without having to “proof” it first. However, if you are unsure your yeast is good, I would suggest proofing it before adding to your recipe.
You can also see the Garlic Knot Recipe notes for guidance in using sourdough starter instead of instant yeast in this recipe.

Learn more about making bread from scratch
I have many pre-recorded bread making videos HERE. They are so helpful if you are a visual learner and want to improve your bread making skills. Included in my class library is this Garlic Knot recipe! If you’re not quite yet a confident bread baker, you’ll love seeing how recipes come together from start to finish.
Even better, join my Baking Academy and get access to ALL of my previous classes, plus a new one each month!
What is Tangzhong and why should I use it?
You’ll notice that this recipe uses the Tangzhong method. If you’ve made my Best Homemade White Sandwich Bread, then you know the amazing results this can give you in your homemade breads!
Tangzhong is an Asian baking technique which has origins from Japan’s yukon (or Yudane). It’s the simple method of cooking a portion of the flour and liquid from the recipe to create a thick mixture or slurry. After cooled, it is added to the recipe.

Why use Tangzhong in yeast doughs? This method pre-gelatinizes the starches in the flour, meaning it can absorb more water. In fact, flour will absorb twice as much hot water or milk as it does the cool/lukewarm water or milk you’d usually use in yeast dough.
Since heating the starch with water creates structure, it’s able to hold onto that extra liquid throughout the kneading, baking, and cooling processes. Which means a few things:
- The dough is less sticky and easier to work with.
- Your bread will rise higher – more retained water creates more steam when baking. Which, in turn, yields a loaf that will rise more when baked.
- Since your bread is retaining more water, it will be more moist and stay fresher longer!
You’ll really love the results you get from using the Tangzhong method in this bread! You’ll be amazed at how it stays so fresh and soft for several days! I use Tangzhong in other recipes like my Best Homemade White Sandwich Bread and my Strawberry Cream Cheese Rolls.
How to make Garlic Knots
You will love this roll recipe! Garlic knots are such a yummy, savory roll to serve alongside any meal! They’re filled with a mixture of butter, minced garlic, parmesan and parsley.
Even better, you’ll love how easy it is to make these extra pretty by folding butter into the dough (we also call that lamination).
Here’s how:
- Make the tangzhong mixture first. Allow it to cool to a lukewarm temperature before adding to the recipe. (Adding it when it’s too hot will risk killing your yeast.)
- In a stand mixer, with the dough hook attachment, combine all of the dough ingredients, but only use 1 cup of flour initially. Mix on low until smooth.
- Gradually add the rest of the flour and mix until smooth and all ingredients are incorporated. Cover and let rest 20 minutes.
- Knead dough until it is slightly tacky and passes the window pane test.
- Transfer the dough to a large, greased bowl. Cover and let rise until doubled in size. This is called Bulk Fermentation. This is also a great time to get your garlic butter ready.

Next, it’s time to laminate the dough. You’ll roll the dough out to a rectangle, spread a portion of the garlic butter on top and fold it like a letter.
Fold the right third in towards the center, then fold the left side over that. Roll the dough out again, spread more garlic butter over the top and complete another letter fold. At this point, the gluten needs to relax. Cover the dough and let it rest 10 minutes before the final roll out and shaping.
Watch the video below to see how this is done:
How to tie garlic knots
Once your dough is fully laminated and you’ve rolled it out to an 8×12-inch rectangle, trim all four sides to expose the butter layers.
Then:
- Cut 12 equal strips of dough.
- Holding one strip, gently stretch it and tie it in a knot.
- Tuck the ends underneath the bottom of the knot and place the garlic knots on a baking sheet lined with parchment paper or sprayed with nonstick spray.
- Cover the rolls with plastic wrap or a sheet pan lid and let them rise until puffy.


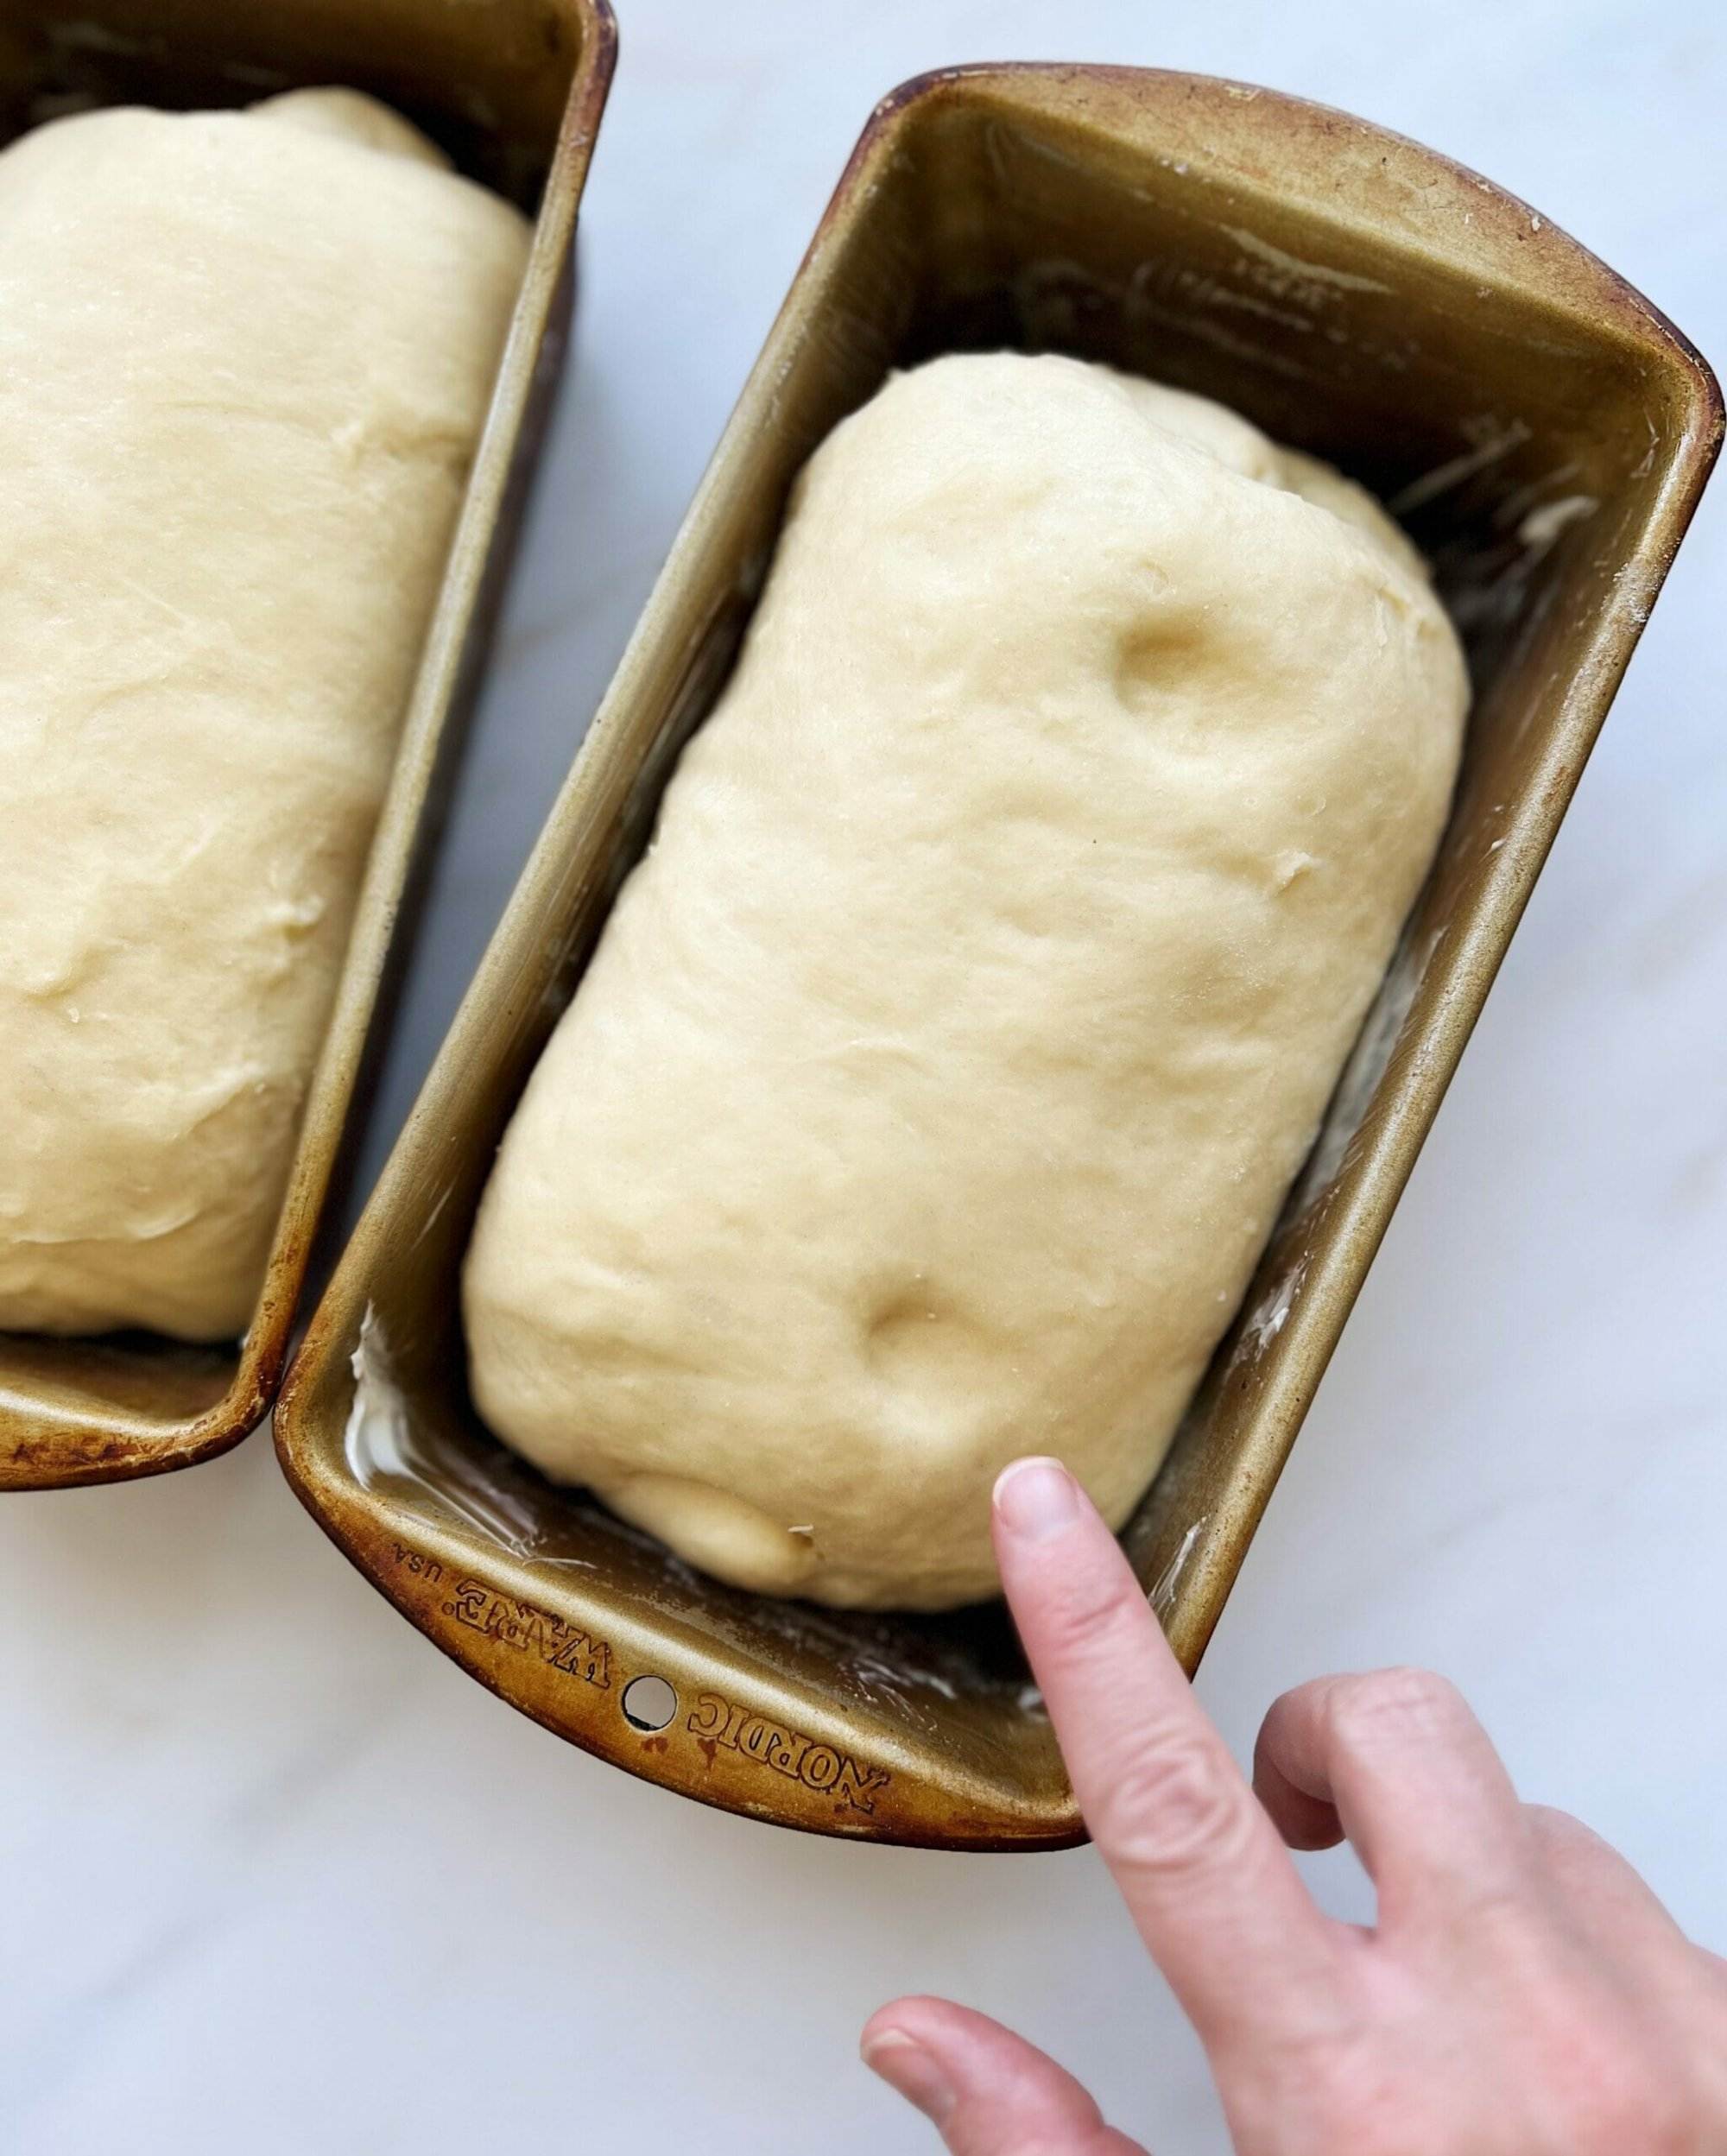
Use the u0022poke testu0022. This works for just about any type of yeasted bread.
When your bread has risen about 30% and you think it might be ready to bake, gently poke the side of the dough with your fingertip or knuckle. You’ll get one of three results:
1- The dough will spring back immediately, not leaving an indentation. This means it needs more time to rise. The yeast is still working and has not produced an adequate amount of gases in the dough to give it a proper rise and structure. An under proofed loaf will most like split when baked and be very dense.
2- There will be an indentation that never springs back. The dough feels weak and very airy. The outer skin of the dough will be very thin and there might be big bubbles on the surface.This means it has over proofed. The yeast has been active for too long, over feeding on the dough. The gases released by the yeast have started to break down. Bake your bread right away. Over proofed bread may sag in the center after it comes out of the oven and the bread might be very crumbly. But I prefer over proofed bread to under proofed bread.
3 – There will be an indentation that slowly springs back. The dough feels soft and light but not too airy. This is the perfect point at which to bake your bread. The yeast has produced an adequate amount of activity to allow the bread to spring in the oven and holds its structure.
How to bake garlic knots
The final rise time will be shorter than Bulk Fermentation, so it’s important to begin preheating the oven while the garlic knots are rising. That way, your oven will be ready when your rolls are, and you won’t risk over proofing the garlic knots while waiting on the oven.
- Preheat the oven to 350°F.
- Bake the garlic knots on the middle rack of the oven for 16-18 minutes, until golden brown.
- After removing the garlic knots from the oven, brush them with melted butter. If you love a bit of saltiness, sprinkle on some Maldon sea salt too – it’s so yummy and really enhances those savory flavors!
- Serve and enjoy these garlic knots warm!

Can I make these garlic knots ahead of time?
You can make the dough and refrigerate it for up to 24 hours before shaping and baking. There’s no need to let it rise first. The dough will rise in the refrigerator, just at a slower rate.
Allow the dough to warm up for about 15 minutes before rolling out to laminate.
Other recipes you’ll love
The Best Homemade White Sandwich Bread
Healthy Zucchini Muffins with Chocolate Chips
Share and follow along!
I love to see how you are enjoying my recipes! Please leave a comment below and let me know how it turned out for you! Follow me on Instagram @thatbreadlady, Facebook and YouTube for more baking tips and videos! Be sure to tag me #thatbreadlady when you try one of my recipes. I’d love to see your baking successes!
(This post contains affiliate links. I receive a commission on purchases made from affiliate links, at no cost to you.)

Best Garlic Knots Recipe
Ingredients
Tangzhong Mixture:
- 5 Tablespoons water
- 5 Tablespoons milk 2% or whole
- 3 Tablespoons plus 1 teaspoon bread flour
Dough:
- Tangzhong mixture from step 1
- ¾ cup milk 2% or whole, warmed to 90°F/32°C
- 2 large eggs room temperature
- 8 Tablespoons unsalted butter softened
- ¼ cup sugar
- 3 Tablespoons powdered milk
- 1 ¾ teaspoons fine sea salt
- 1 Tablespoon instant yeast *see notes for sourdough option
- 4 ¼ cups bread flour
Garlic Butter Spread:
- 8 Tablespoons unsalted butter
- 4 cloves minced garlic
- 1 Tablespoon dried parsley
- 2 Tablespoons Kraft grated parmesan cheese
- ½ – 1 Tablespoon kosher salt to taste
For brushing on the baked rolls:
- 4 Tablespoons unsalted butter melted
- Maldon sea salt flakes optional
Instructions
- Make the Tangzhong: Combine all of the tangzhong ingredients in a small saucepan and whisk until no lumps remain. Turn heat on low and whisk constantly as mixture begins to thicken. Once a thick paste develops, remove pan from heat and transfer the tangzhong mixture into a heat safe bowl to cool. Set aside. Once it has cooled to a lukewarm temperature (around 90°F), you can add it to the recipe.
- Make the dough: In the bowl of a stand mixer, add the Tangzhong mixture, milk, eggs, 8 Tablespoons soft butter, sugar, powdered milk, salt, yeast and one cup of the bread flour. With the dough hook attachment, mix on low speed until the mixture becomes smooth, about two minutes.
- With the mixer speed on low, gradually add the remaining flour, about 1/4 cup at a time, mixing to combine after each addition. Once all of the flour has been added and there are no lumps in the dough, stop mixer and cover bowl with a kitchen towel. Let dough rest for 20 minutes. During this time, the flour will become more hydrated.
- After the 20 minute rest time, remove the towel. The dough should feel more hydrated, but will still be sticky. Knead in mixer on low speed for 8-11 minutes. Towards the end of the knead time, stop the mixer and lightly tap on the dough with your finger tip (“touch test”). If the dough still feels quite sticky, add 1-3 more tablespoons flour and fully incorporate into the dough before testing with your fingertip again. When lightly tapping on the dough, your finger should come away mostly clean, the dough should feel soft and slightly tacky. Add more 1-2 more tablespoons if needed – avoid adding too much flour.
- Continue to knead for an additional 1-2 minutes or until the dough comes together in one large, cohesive mass. The dough should be close to passing the “window pane test” – you should be able to take a piece of the dough, gently stretch it several inches without it tearing, and have it be slightly translucent.
- Bulk Fermentation: Place dough in a large bowl sprayed with nonstick spray. Turn dough so that all of it is coated in the oil. Cover bowl and let dough rise until doubled in size, about 60-90 minutes.
- Prepare Garlic Butter Spread:Combine all ingredients for the Garlic Butter Spread in a small bowl. Set aside.
- Lamination: Deflate dough and turn onto a floured work surface. Divide dough into two equal pieces, each half will yield one dozen rolls. Working with one piece of dough, roll it out to a rectangle, about 8×12 inches. Spread 1/4 of the garlic butter on the dough, leaving a 1-inch border around all four sides.
- Fold One: On the short side of the dough (the 8-inch side), fold one-third of the dough over towards the center. Be sure the corners and sides are all straight and lined up. Take the other third of the dough and fold it over the first fold, like folding up a letter. Again, make sure the corners and sides are straight and line up. Gently press the dough and seams to seal the edges with the dough.
- Fold Two: Flour the dough and countertop if needed. Turn the dough a quarter of a turn and roll dough into a 8×12-inch rectangle again. Spread another 1/4 of the garlic butter onto the dough, leaving a 1-inch border. Repeat steps from Fold One. Cover folded up dough with a kitchen towel or plastic wrap and let rest for 10 minutes before the final roll out. (save the remaining garlic butter for the second piece of dough)
- Final Roll Out: Roll out dough one more time to a 8×12-inch rectangle. Be careful not to tear the dough. Flour and flip it as needed. The dough should be soft and pliable and you should be able to lift up on the corners and straighten them out. Using a pizza cutter, trim a tiny portion of the dough from each side to expose the butter layers. Cut 12 strips of dough, one inch wide and 8 inches long.
- Shaping the Rolls: Take one strip of dough and gently stretch it a bit. Take each end and tie a knot with the dough, folding the ends underneath the roll. Repeat with the remaining 11 strips of dough. Place each roll on a baking sheet lined with parchment paper, about 2 inches apart.
- Repeat steps 8-12 with the second piece of dough.
- Final Rise: Cover the rolls and let rise until puffy, about 45 minutes. They should pass the "poke test" before baking – gently poke the side of a roll with your fingertip. If it leaves an indent that slowly springs back, it's ready to bake. If it does not leave an indent, it needs more time to bake. If it leaves an indent that never springs back and seems to deflate the dough, it has risen too long (but you can still bake them! Just check them earlier next time.). While the rolls are rising, preheat oven to 350°F – it typically takes about 30 minutes for an oven to fully preheat.
- Bake: Bake rolls on center rack of oven for 16-18 minutes or until lightly golden brown. Immediately brush with melted butter. Sprinkle sea salt flakes if desired.
- Serve and enjoy hot out of the oven! Store any leftover rolls in an airtight container for up to 5 days.
Notes
- *For sourdough option, replace the 1 Tablespoon of instant yeast with 1 cup starter (240g). Adjust the flour and milk in the dough recipe to compensate for how much flour and water you are adding with your starter. Keep in mind that rise times will be longer, about 3-5 hours depending on how warm your kitchen is. You can also place the dough in the refrigerator for bulk fermentation over night.
- Make ahead option: After placing your dough in the bowl for Bulk Fermentation, you can put the dough in the refrigerator for up to 24 hours and shape & bake later. Allow your chilled dough to warm up for about 15 minutes, after taking it out of the refrigerator, before rolling it out and shaping.
- You can make the tangzhong ahead of time and store it in the refrigerator for up to 3 days. To use for your recipe, let it come to room temperature before adding.
- *Be sure to watch the video on this post to see how to laminate the dough and tie the garlic knots.


If I wanted to make cinnamon rolls into knots like these, would I do the same process with the butter cinnamon sugar filling?
Thank you for your great recipes. I’ll be making your cinnamon rolls soon.
Lea, that sounds like a yummy experiment. You could definitely give it a try. Let me know how it turns out.