Made like cinnamon rolls but filled with lemon curd and juicy blueberries, these Lemon Blueberry Sweet Rolls are the perfect Springtime treat!

What is a lemon blueberry sweet roll?
This recipe is bursting with lemon and blueberry flavor! It’s made with an easy to make, Master Roll Dough, filled with fresh blueberries and my Homemade Lemon Curd. Top it with a cream cheese lemon frosting and you’ve got the ultimate Springtime treat!
And if you love all things lemon and blueberry, you’ve GOT TO try my Lemon Blueberry Olive Oil Loaf with Ricotta! It’s so rich and delicious! A quick and easy lemon/blueberry treat to throw together!
How to bake with yeast
Working with yeast dough can be intimidating at first, but the more you do it, the more comfortable you will get! Yeast is a living organism that just needs the right conditions to thrive. It feeds off of sugar and starches. When it feeds, it releases carbon dioxide gas in the form of air bubbles in the dough. This process is also known as “fermentation”. This is what gives bread dough its volume and airy texture.
There are several different kinds of yeast available to bakers. Sourdough Starter is a natural yeast and while very rewarding, requires much care and attention. Fresh yeast can be very effective, but the shelf life is much shorter than a commercial yeast. Commercial yeast is a convenient alternative to both, as you can easily store it for long periods of time and add it directly into your recipes. Both Instant Yeast and Active Dry Yeast are commercial yeasts, and most likely what is easily available to you at the store. In this recipe, I suggest using Instant Yeast.
For more information about baking with yeast, you can read my article about Active Dry Yeast vs. Instant Yeast. When using instant yeast, you can add it directly to your recipe without having to “proof” it first. However, if you’re unsure that your yeast is good, proofing it first will give you a bit of extra insurance – there’s nothing more frustrating than making a bread recipe and discovering that your yeast was not good.

Ingredients in the yeasted dough
For this recipe, we’re using my Master Roll Dough. It’s such a versatile dough. I use it for so many other recipes like Crescent Dinner Rolls and Homemade Cinnamon Rolls. There are some unique ingredients in this recipe that makes it so delicious! (If you’re looking for these ingredients, click on the ingredient name in bold – it will take you to an Amazon link you can purchase from)
- Bread flour: Most bread recipes will use bread flour. It has a higher protein content (11-13%) than an all-purpose flour. Higher protein flours also mean a higher gluten flour – yielding a bread with a strong crumb structure.
- Powdered milk: In baked goods it provides a creamier flavor and helps yield a more golden brown color when baked. Look for powdered milk that is fine in texture. If you are looking for a non dairy option, try using a milk powder substitute like coconut, soy or rice powder.
- Instant Yeast: It can be added directly to your recipe without having to proof first. It’s a strong, fast acting yeast that will allow these sweet rolls to rise super fluffy. I like to use BellaRise instant yeast or SAF instant yeast
- Eggs: Eggs in bread help to create a fluffy, big rise. They are perfect for these rolls, since it’s meant to be soft and fluffy.
- Potato Flakes: Potato flakes in bread make the crumb more moist and tender. They also extend the shelf life of homemade bread.
- Butter Flavor Shortening: Vegetable shortening has a high melt point, allowing it to create more steam in the dough when baked. This produces a lighter, airy texture bread. The butter flavor gives it a more rich, butter flavor. If you can’t find the Butter Flavor Shortening, use plain shortening – it will still turn out amazing! If you prefer to not use shortening, replace it with equal parts additional butter.

How to make sweet rolls dough
This roll dough is one of my favorites to work with. It is so easy to work with. After letting it rise once, the texture will become soft, pillowy and elastic.
You will need to use some type of a stand mixer to make this dough. There are two mixers I’ve used that I really love for bread dough. The Bosch Universal Plus mixer (click to purchase) is one I have used for years! It has a high mixing capacity and high performing motor – making it an excellent option for mixing denser doughs like bread. It also allows you to mix larger quantities. Another mixer I realy love, (and I’ve actually been using this more than my Bosch lately), is the Ankarsrum (click here to purchase). It also has a high mixing capacity and smooth motor. I love that there is no center column to work around, the motor is smooth and quiet, and there is a timer with an automatic shutoff. *I will usually double this recipe if using my Bosch mixer. In the Ankarsrum, you can mix large or small batches. It will also hold a double batch of this recipe.
If you don’t have a high capacity mixer, the recipe I’m providing you with will fit nicely in a Kitchen Aid type stand mixer. Whichever mixer you use, be sure to use your dough hook attachment.
- Measure out all of your ingredients ahead of time. I always do this when making a recipe – it helps to prevent me from making any mistakes in measurements or leaving out ingredients. It also makes the mixing process go much smoother. I always suggest weighing out your ingredients with a food scale – you will get much more accurate results!
- In a large bowl, combine the warm water, powdered milk, potato flakes, sugar, salt, yeast. Whisk them together – this helps to break up the powdered milk and potato flakes and gets all of those ingredients incorporated before adding the heavier ingredients. Pour the yeast mixture into the bowl of a stand mixer.
- Add the eggs, room temperature butter and shortening. Add 3 cups of the flour (about half) and mix on low, just until all of the ingredients are combined and smooth.
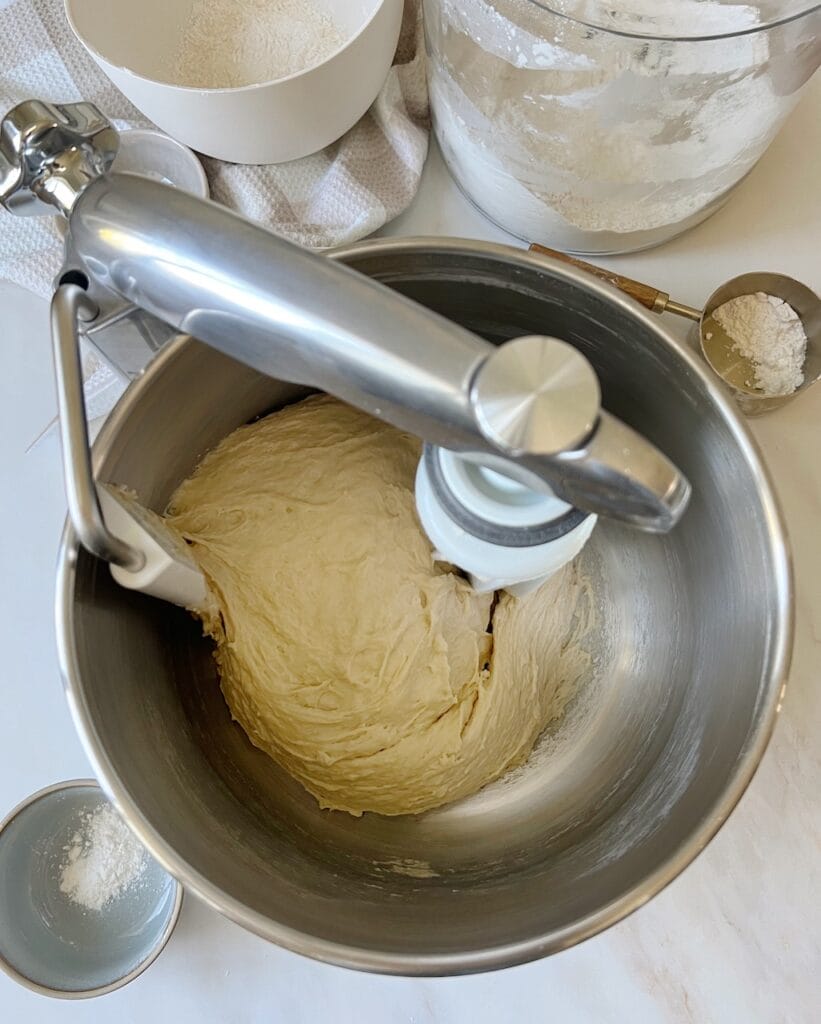
- While the mixer is on low, gradually add two cups of the remaining flour, 1/2 cup at a time, mixing well after each addition. This is where getting to know your dough comes into play. You’re looking for the dough to clean the sides of the bowl as it’s mixing. It should be concentrated around your dough hook. Once you get it to this point, stop the mixer and lightly tap on the dough with your finger. If it feels soft, but not wet and sticky & is cleaning the sides of the bowl, it’s ready to knead. Return to mixing it on low and allow your mixer to knead it for 5 minutes.
My number one tip for mixing this dough
Avoid the urge to add more flour. This dough is very soft and easy to work with – it’s very forgiving! You may see a little bit of dough sticking to the sides of the bowl when it’s kneading – don’t panic! Go by how it feels. You want to use just enough flour so that it doesn’t feel wet or excessively sticky. Too much flour in your dough will give you dry, dense rolls. You can always add a bit more flour after it has kneaded if it’s too sticky to work with.

How to make Lemon Blueberry Sweet Rolls
The filling in these sweet rolls is so decadent and honestly one of my most favorite fillings I’ve ever put inside a roll!
- Make the Homemade Lemon Curd ahead of time and chill it. Yes, you can buy lemon curd, but this homemade version makes such a big difference in flavor! Plus, it’s just so yummy to have on hand.
- Mix the sweet roll dough. Place it in a large greased bowl and cover. Let it rise for about 60-90 minutes, or until it doubles in size.
- Divide the dough into two equal pieces, about 28 ounces each. Roll the dough out into a rectangle, about 10×18 inches in size. *Pro tip: If your dough won’t easily roll out and keeps shrinking back up as you roll, cover it and let it rest for 10 minutes. The gluten just needs some time to relax. After 10 minutes, come back to it and it should be much easier to roll out!
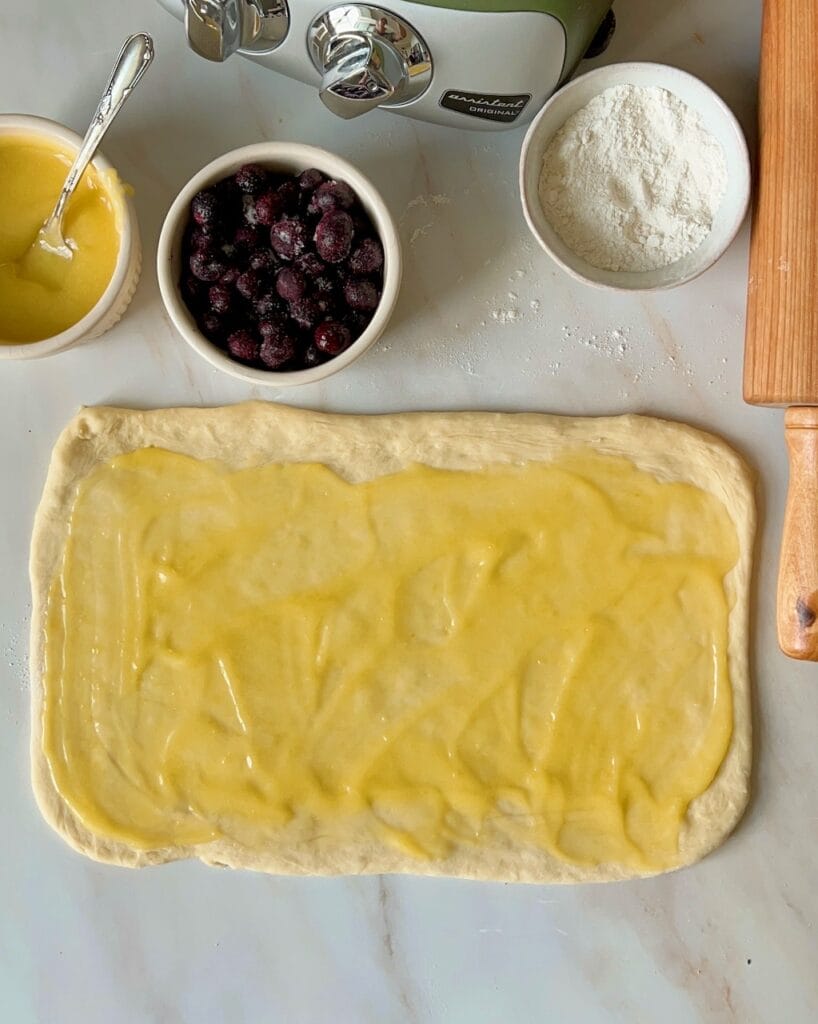
- Spread about 1/3 cup of lemon curd onto the dough, leaving a 1-inch border at the edge of the long side furthest away from you.
- Sprinkle about 1 cup of the blueberries over the lemon curd.
- Roll up the dough, starting with the long side, closest to you. Gently lift up and tighten the dough as you go. This will ensure the roll will be tight and that you’ll have lots of flavorful swirls. This will also help keep the dough from sticking to your work surface as you go.
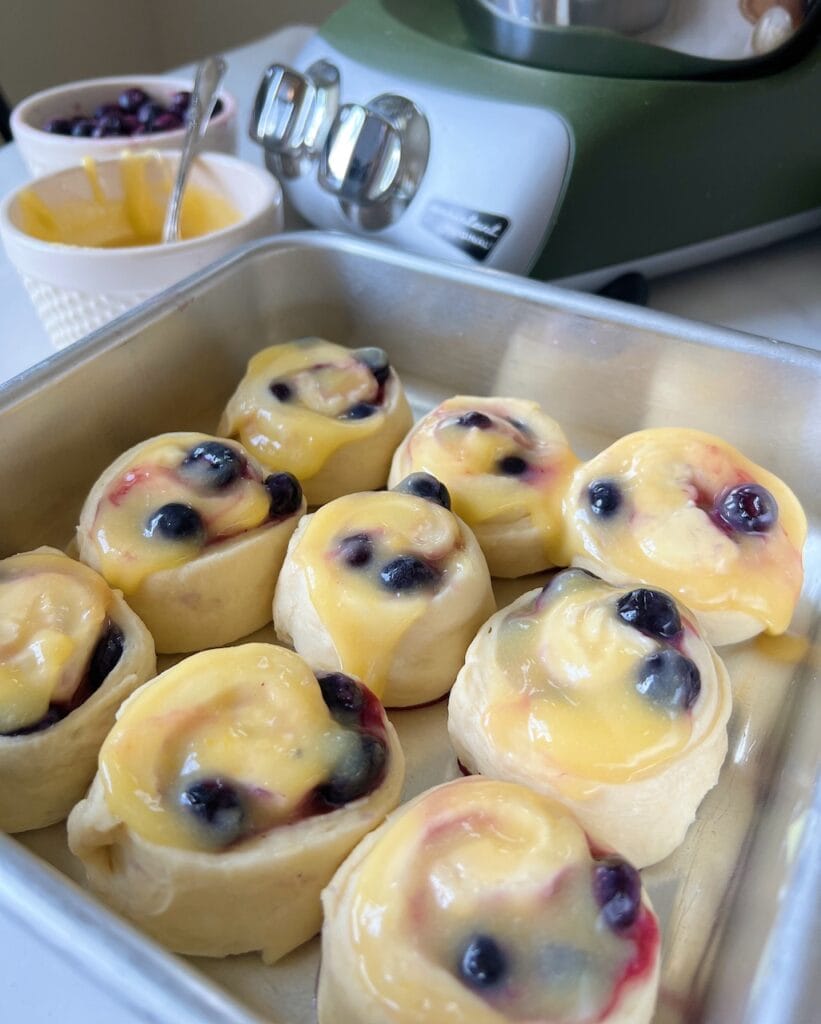
- Cut 9 equal sized rolls, about 2 inches wide. Place them in a greased, rimmed baking sheet about 2 inches apart. Repeat with the second piece of dough. To bake all 18 rolls, you could fit them comfortably on a half sheet size (13×18-inches). Arrange them in 5 rows lengthwise and 4 rolls wide (you’ll have two empty spots if you make 18 rolls).
- Cover the lemon blueberry sweet rolls with plastic wrap. Or I like to use these baking sheet domed lids! Let them rise one last time until they increase in volume about 50% or pass the “poke test”. This final rise should only take about 30-45 minutes, depending on how warm your kitchen is. This is a great time to preheat your oven, as an oven will typically take about 30 minutes to fully preheat.
- Just before they go into the oven, spread on another dollop of lemon curd on top. It will add one last boost of lemony flavor, and will create a rich, golden crust on top of the rolls!
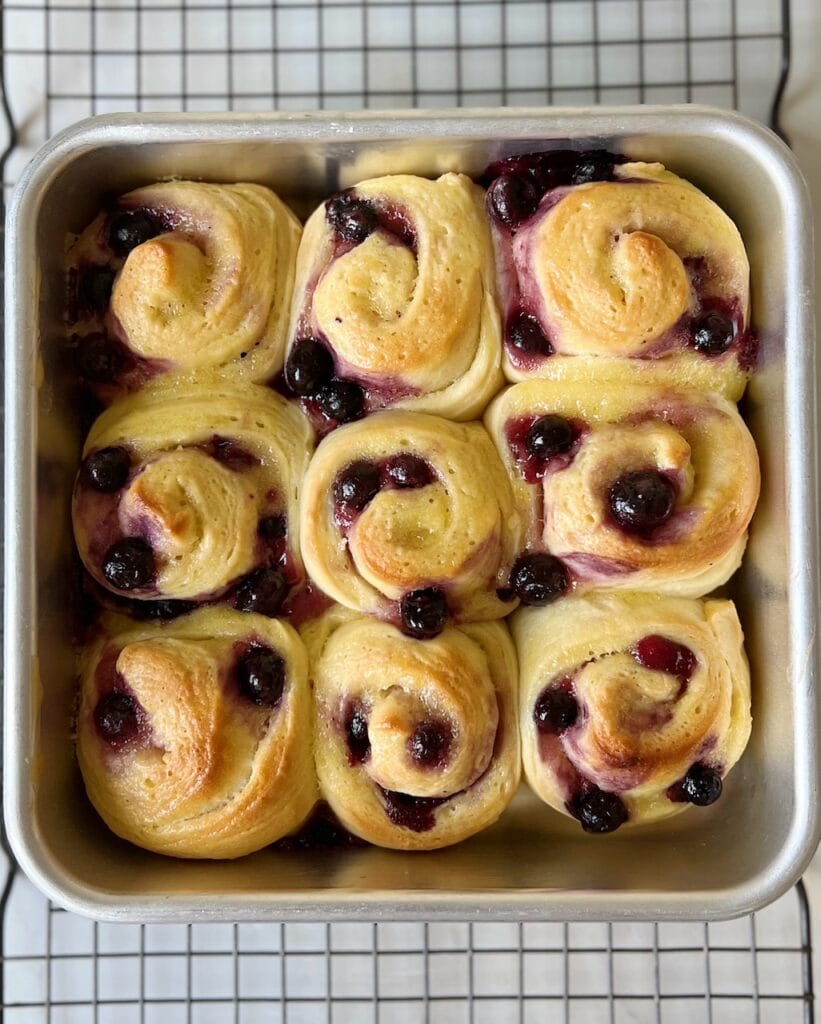
- Bake for 20-26 minutes, or until the edges are lightly golden. Make your icing ahead of time or while they are baking.
- Frost as soon as they come out of the oven and serve warm!


Icing the Lemon Blueberry Sweet Rolls
There are two delicious options you can use for topping these sweet rolls, depending on what you like! Either option is great, but be sure to frost the lemon blueberry sweet rolls just after they come out of the oven. The icing will melt and settle inside all of the nook and crannies of the sweet rolls!
- Lemon Glaze: This easy-to-make icing is great if you’re not a cream cheese fan or if you’re in a hurry. Simply whisk together powdered sugar, milk and lemon zest until you have a thick consistency, just runny enough to drizzle over the warm sweet rolls.
- Lemon Cream Cheese Frosting: This is a very delicious, rich option! If you like a more substantial frosting on your sweet rolls, this is the road you should take! Be sure your cream cheese is softened before mixing. Use an electric mixer to combine it with the cream cheese, butter, powdered sugar, lemon zest to make it smooth and creamy.

Make ahead options
There are a couple of ways you can break up the baking process so that you can have make ahead lemon blueberry sweet rolls.
- Freeze rolls to bake for later: After rolling up and placing the rolls on a cookie sheet, put the entire pan in the freezer and allow the rolls to freeze for 24 hours. Once frozen, remove the sheet pan from the freeze, and you can pop them off and place them in a ziplock bag to store in the freezer for later use. When baking frozen rolls, remove them from the freezer bag and place on a baking sheet. Allow them to rise and bake as usual. Rising frozen rolls could take 3-5 hours, depending on how warm your kitchen is. Then bake as directed in the recipe.
- Make the dough the night before and roll up in the morning: Make the dough the night before and refrigerate: This can be a better option than rolling them up the night before IF your overnight sweet rolls tend to over proof. After you finish rolling them up, they should rise within an hour and be ready to bake and frost!
Storing
If these Lemon Blueberry Sweet Rolls don’t get eaten up the same day, store them in an airtight container for up to two days. It’s important to note, when the icing is covered for storage, it can start to soften up and absorb into the rolls. You may want to have some extra icing on hand if you want to enjoy them a day or two later.
Leave a comment, Follow and Share
Leave a comment below if you have any questions about this recipe, or just let me know how much you enjoyed it! This really helps me out and helps others making this recipe!
Be sure to follow me on Instagram for more insights and videos about my recipes and bread making techniques.
And share your baking creations with me, by tagging me @thatbreadlady! I love to see how you are enjoying my recipes and share them with my Instagram friends!
(This post contains affiliate links, which means I make a small commission on products purchased from these links. Good news – I only recommend products that I love!)
Lemon Blueberry Sweet Rolls
Ingredients
Dough Ingredients:
- 2 cups warm water (about 105°F)
- ¼ cup nonfat powdered milk
- ½ cup boxed potato flakes
- ½ cup granulated sugar
- 1 Tablespoon plus 1 teaspoon instant yeast*
- 1 ½ teaspoons salt
- ¼ cup unsalted butter softened to room temperature
- ½ cup butter flavored shortening
- 2 large eggs
- 5-6 cups bread flour
Filling:
- 1 ½ cups prepared lemon curd chilled (one batch of my Homemade Lemon Curd recipe)*see notes
- 1 ½ cups blueberries, fresh or frozen tossed with 1/4 cup (50g) granulated sugar
Lemon Glaze option:
- 1 ½ cups powdered sugar
- 1-2 Tablespoons milk as needed for thick consistency
- 1 teaspoon lemon zest
Lemon Cream Cheese Frosting option:
- 4 ounces cream cheese room temperature
- ¼ cup unsalted butter 4 Tablespoons, room temperature
- 1 cup powdered sugar
- the zest of one lemon
Instructions
Prepare the Lemon Curd:
- Prepare the lemon curd at least 6 hours ahead of time. It will need time to set and chill before filling the sweet rolls.
Prepare the dough:
- In the bowl of a stand mixer, combine the warm water, powdered milk, potato flakes, sugar, yeast and salt. Mix well with a wire whisk. Secure the dough hook attachment to your mixer.
- Add the butter, butter flavored shortening and eggs. Add 3 cups of the bread flour. Mix on low speed for about 30 seconds until ingredients are incorporated. Stop the mixer and scrape down sides of bowl with a spatula.
- Turn mixer on low and add 2 more cups of the bread flour, 1/2 cup at a time. After adding the 2 cups of flour, let dough continue to mix for about 1 minute. Stop and scrape the sides of the bowl as needed. If dough is not mostly cleaning sides of the bowl, add more flour 1/4 cup at a time until it cleans the sides of the bowl. Stop the mixer and check the dough by gently tapping your fingertip on it. If the dough does not stick to your finger, it is ready to knead. If the dough feels excessively wet or sticky, add 1-2 more tablespoons of flour and mix until fully incorporated. Stop mixer again and lightly tap on the dough. When dough feels soft but not sticky, it is ready to knead. *When in doubt, it’s always best to go lighter on the flour. You can always add more flour, but you can’t take flour away. Too much flour in your dough will give you dry, dense rolls.
- Knead on low speed for 5-7 minutes. The dough should be smooth and cohesive.
- Remove dough from mixer and place in a greased bowl. Cover and let rise until doubled in size, about 60-90 minutes.
- Divide dough into two 28-30-ounce portions. If you don’t have a scale, you can eyeball it. Round each portion to an oval shaped piece of dough by pulling and tucking it under. This will make it easier to roll out into a rectangle.
It’s time to roll:
- Flour your work surface and roll the first piece of dough out to a rectangular shape, about 10 inches by 18 inches.
- Spread a layer of the lemon curd on the dough (about 1/3 cup), leaving an inch border on the top side of the rectangle. Sprinkle 3/4 cup of the sugared blueberries on top, continuing to leave the inch border at the top edge. Leaving this border will help in sealing the dough shut when rolled up.
- Start with the long side, closest to you and working from left to right rolling up the dough. You can tug and pull as you go which will tighten the roll and get more blueberries incorporated into the swirls.
- Once it’s all rolled up, pinch the seam shut. You should have a log-shaped dough, filled with lemon curd and blueberries.
- Using a piece of dental floss, make a light indentation in the dough where your cuts will be. Each of these roll outs will give you 9 large rolls. This will be your guide to know where to cut and to help make them all the same size.
- Slide the floss under one end of the dough, bring the ends of the floss up, cross them over and cut through the dough to make a 2-inch-wide sweet roll. Continue to cut to get 9 equal sized sweet rolls.
- Place the rolls on a greased half-size baking sheet (13×18 inches) about 2 inches apart.
- Repeat the rolling and filling steps with the second piece of dough. Place rolls on baking sheet. Cover and allow to rise until increased in size about 50% or until it passes the poke test. (see notes)
- Prepare desired icing option and set aside.
Bake:
- Preheat oven to 350°F (177°C) for 20-26 minutes or until edges are golden brown. Remove from oven and place pan on cooling rack. Ice the lemon blueberry sweet rolls with desired icing option immediately. Serve warm and enjoy!
To prepare the Lemon Glaze:
- In a medium bowl, add the powdered sugar. Slowly add the milk, stirring with a wire whisk. Add more milk or powdered sugar to get a thick consistency. Once you have the desired consistency, add the lemon zest and stir in.
- Spread lemon glaze on warm rolls, just out of the oven. Store any leftover glaze in an airtight container in the refrigerator for up to 5 days.
To prepare the Lemon Cream Cheese Frosting:
- Combine all the ingredients with an electric mixer on medium speed. Whip for about 2 minutes or until smooth and creamy. Spread frosting over lemon blueberry rolls while still warm, just out of the oven. Store any leftover frosting in an airtight container in the refrigerator for up to one week.
Notes
- *This recipe is especially delicious with homemade lemon curd. My recipe will make enough for this recipe, plus a little bit extra to enjoy! Enter this link in your browser to print off my recipe: https://thatbreadlady.com/lemon-curd/
- Use the Poke Test to know when your sweet rolls are ready to bake. Gently poke the side of the sweet roll with your fingertip or knuckle. If it leaves an indent that slowly springs back, it’s ready to bake. If no indent remains, it needs more time to rise.
- Make ahead options:
- Freeze rolls to bake for later: After rolling up and placing the rolls on a cookie sheet, put the entire pan in the freezer and allow the rolls to freeze for 24 hours. Once frozen, remove the sheet pan from the freeze, and you can pop them off and place them in a ziplock bag to store in the freezer for later use. When baking frozen rolls, remove them from the freezer bag and place on a baking sheet. Allow them to rise and bake as usual. Rising frozen rolls could take 3-5 hours, depending on how warm your kitchen is. Then bake as directed in the recipe.
- Make the dough the night before and roll up in the morning: Make the dough the night before and refrigerate: This can be a better option than rolling them up the night before IF your overnight sweet rolls tend to over proof. After you finish rolling them up, they should rise within an hour and be ready to bake and frost!

