Cheddar Jalapeno Stuffed Bread
You’ll love this fluffy, braided bread stuffed with loads of chopped bacon, shredded cheddar cheese and bits of spicy jalapeno. The sweetness from the bread is perfectly balanced with the spicy and savory fillings.
Serve it alongside your favorite comfort food, slice it up for a grilled sandwich, or tear it off a bite at a time. Any way you slice it, you’ll love this bread!

What you’ll love about this bread
I always love to mix things up a bit and this bread is the brainchild of a night when I was really craving something sweet, spicy and filling. Cheddar Jalapeno Bread has been a favorite for many and it was so much fun coming up with my own version!
You’ll love how this slightly sweet bread compliments the spicy, rich and savory fillings! Bacon is optional in this recipe, but if you can, I highly suggest adding it in there!
To maximize the filling incorporation, I opted to make this a braided loaf, each strand stuffed with jalapeno, cheddar and bacon! The result is an amazing fluffy bread, swirled with delicious filings and baked to a golden, braided perfection!
I have no doubt, you’ll LOVE it too!!
Steps to make Cheddar Jalapeno Stuffed Bread
- Mix all of the ingredients for the dough in a stand mixer.
- First Rise (Bulk Ferment) for 90 minutes, or until it doubles in size.
- While the dough is rising, get your filling all ready.
- Roll the dough into a rectangle. Fill, cut, roll up, and braid the dough.
- Final Rise for 45-60 minutes. Let the dough get nice and puffy. Towards the end of the final rise, preheat the oven.
- Bake for 30-35 minutes.
- Enjoy!!
The short answer is…yes, but you can adjust the amount of heat by tweaking a couple of things. If you are using fresh jalapenos, remove the center and seeds and only chop up the outer portion of the jalapeno. It gets its most intense heat from the seeds – by removing these, you’ll reduce the spiciness. Another option would be to use jarred jalapenos with a u0022tameu0022 amount of heat – these tend to be less spicy than fresh jalapenos. You can also opt to use less jalapenos than suggested in the recipe.
Most of all, you’ll love how this slightly sweet dough, and the rich cheese, balances out the spiciness of the jalapenos. All the flavors work together to make the most deliciously spiced savory bread!
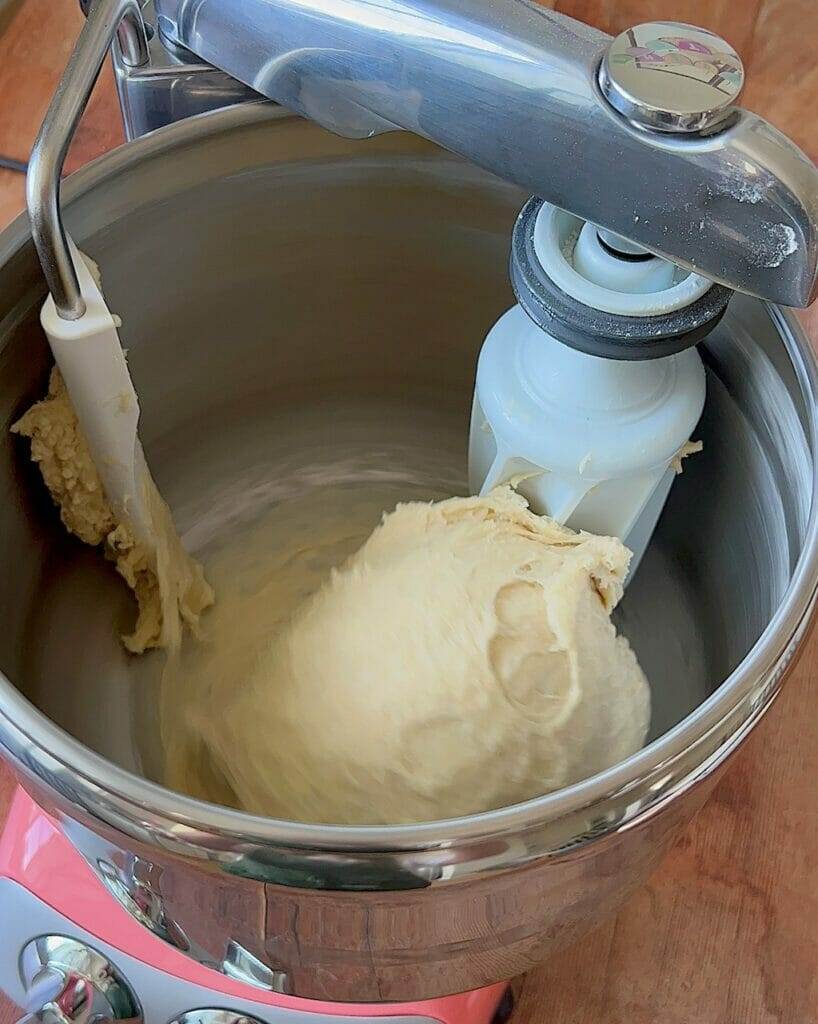
How to make yeasted bread dough
If you’re new to bread making, check out my article on working with yeast HERE. You’ll love how easy it is to put this bread dough together. Using a stand mixer makes it quite easy to mix in just under 15 minutes.
My most important tip for bread making is to weigh your ingredients. Weighing with a food scale will give you much more accurate and reliable results. A cup isn’t always a cup, but a gram is always a gram.
- To the bowl of a stand mixer, add the water, oil, eggs, sugar, yeast, salt and about half of the flour. Using the dough hook attachment, mix on low speed until combined and smooth, about 1-2 minutes.
- While on low speed, gradually add the remaining half of flour, about 1/4 cup at a time. Allow each addition of flour to fully combine before adding more. Once all 4 & 1/2 cups (540g) of flour has been incorporated, stop the mixer, and lightly tap the dough with your finger. If it feels excessively wet and sticky, add an additional 1-2 Tablespoons of flour and mix until incorporated. Stop the mixer and check again. Add up to another 1/4 cup (30g) flour as needed. The dough should feel soft and slightly tacky (slightly sticking to fingers), but not wet.
- Knead the dough on low speed for 6-8 minutes, until smooth and cohesive.
Whenever making bread dough, knowing how your dough should look and feel will be the best indicators of how your recipe is progressing.
My Baking Academy is an amazing resource if you’re someone looking for extra help with your bread making – it’s full of pre-recorded videos to show you how to make amazingly beautiful breads from start to finish! Space usually fills up quickly, but you can find out more about it HERE.

Bulk Fermentation
Place the dough in a large, oiled bowl, cover and let it rise until it doubles in size. This is the first rise, also known as “bulk fermentation”. During this time, the dough will become softer, airy and easier to handle. It’s an important part of the dough development that you don’t want to rush.
Place your dough in a warm place in your kitchen. Depending on how warm your kitchen is, this could take 90 minutes to two hours. I like to use clear, lidded containers for bulk fermentation – they allow you you to see the progression of your dough.
How to save time making bread
You can adjust your baking timeline by breaking up the steps of this recipe and making the dough ahead of time.
- Option 1: After kneading the dough, place it in your bulk ferment container. Put in the refrigerator for up to 24 hours. This will slow down the fermentation process, giving you some extra time to use up this dough. When you remove the dough from the refrigerator, allow it to sit about 15 minutes to soften up. Then roll, fill and shape as directed in the recipe.
- Option 2: You can also freeze the dough to use later. Place it in a freezer zip top bag and freeze for up to 4 weeks. When you’re ready to use your dough, remove it from the freezer the night before and let it thaw overnight in the refrigerator.
Shaping the jalapeno cheddar stuffed bread
In developing this recipe, I wanted there to be a maximum amount of filling in each bite. I came up with this idea to make a braided loaf, with each of the braids filled with cheese, jalapenos and bacon. The results were incredible! Not only is there a generous amount of filling in each slice, the braided bread bakes up so beautiful!
Just follow a few simple steps to make your Jalapeno Cheddar Stuffed Bread:
- Roll the dough out to a rectangle, about 16×20-inches.
- Spread the fillings out in three rows.
- Use a pizza cutter to divide the dough in between each row of filling.
- Roll up each strip of dough, pinching the seam shut.
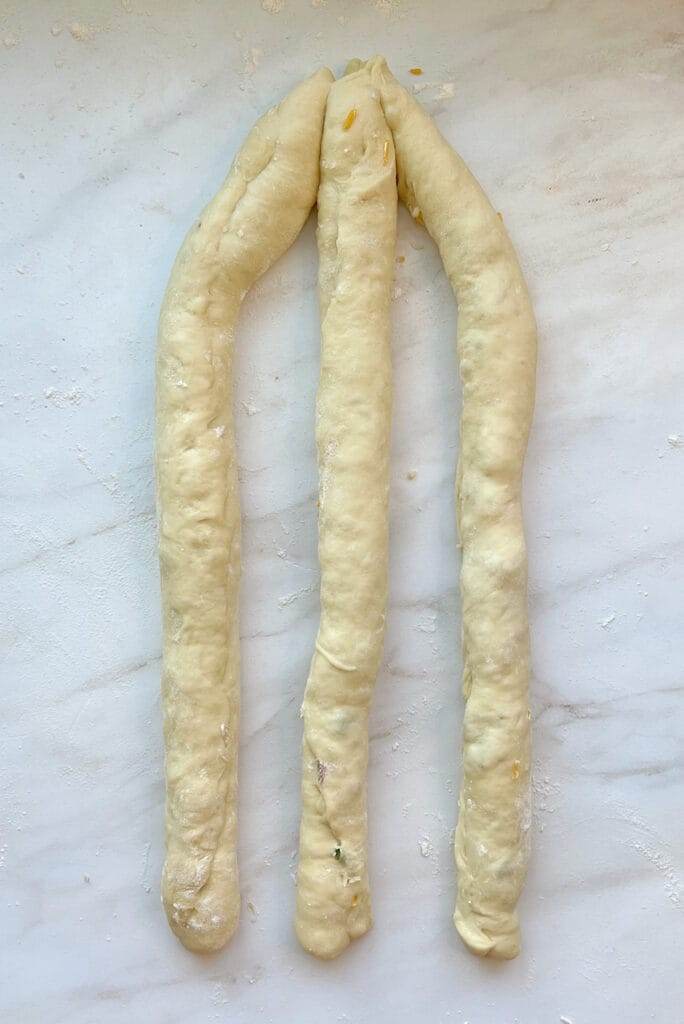
- Pinch the three ropes together at one end.
- Braid the bread and pinch the loaf together at each end to seal the three strands together.
- Place the loaf diagonally onto your baking sheet to give it enough room to rise and expand.




Knowing when your bread is ready to bake can be difficult for a beginning baker. Using the Poke Test will help you to be able to gauge whether your bread is ready to bake. When your bread has risen about 30% and you think it might be ready to bake, gently poke the side of the dough with your fingertip or knuckle. You’ll get one of three results:
1- The dough will spring back immediately, not leaving an indentation. This means it needs more time to rise. The yeast is still working and has not produced an adequate amount of gases in the dough to give it a proper rise and structure. An under proofed loaf will most like split when baked and be very dense.
2- There will be an indentation that never springs back. The dough feels weak and very airy. The outer skin of the dough will be very thin and there might be big bubbles on the surface.This means it has over proofed. The yeast has been active for too long, over feeding on the dough. The gases released by the yeast have started to break down. Bake your bread right away. Over proofed bread may sag in the center after it comes out of the oven and the bread might be very crumbly. But I prefer over proofed bread to under proofed bread.
3 – There will be an indentation that slowly springs back. The dough feels soft and light but not too airy. This is the perfect point at which to bake your bread. The yeast has produced an adequate amount of activity to allow the bread to spring in the oven and holds its structure.
Go to my Instagram video HERE to see the Poke Test in action.


How to bake your bread
Once the loaf has risen enough and passed the all-important poke test, brush it with egg wash to produce a golden, shiny crust. Bake at 350°F for 28-33 minutes until it’s nice and golden.
Let your loaf cool on the pan for at least 10 minutes before slicing into it. This will allow it to continue to bake and firm up, internally.
Slice and enjoy! This is such an amazingly delicious savory, sweet and spicy bread! You’ll love every bite!
Other recipes you’ll love
- Disneyland Bacon Mac and Cheese Cones
- Garlic Pull Apart Bread
- The Best Homemade White Sandwich Bread
- Homemade Cinnamon Rolls
Share and follow along!
I love to see how you are enjoying my recipes! Please leave a comment below and let me know how it turned out for you! Follow me on Instagram @thatbreadlady, Facebook and YouTube for more baking tips and videos! Be sure to tag me #thatbreadlady when you try one of my recipes. I’d love to see your baking successes!
(This post contains affiliate links. I receive a commission on purchases made from affiliate links, at no cost to you.)

Jalapeno Cheddar Stuffed Bread
Ingredients
- 1 cup warm water around 90°F/32°C
- ⅓ cup neutral oil (like vegetable or canola oil)
- 2 large eggs room temperature
- ¼ cup granulated sugar*
- 2 ¼ teaspoons instant yeast**
- 1 ½ teaspoons fine sea salt
- 4 ½ all-purpose flour plus up to 30 g more as needed
Filling
- 1 cup shredded cheddar cheese
- 1 cup chopped jalapenos
- 1 cup bacon cooked and chopped (about 5 slices of bacon)
Egg wash:
- 1 large egg plus about 1 Tablespoon water, whisked together
Instructions
Mix
- To the bowl of a stand mixer, add the water, oil, eggs, sugar, yeast, salt and about half of the flour. Attach dough hook to mixer. Mix on low speed until combined and smooth, about 1-2 minutes.
- While on low speed, gradually add the remaining half of flour, about 1/4 cup at a time. Allow each addition of flour to fully combine before adding more. Once all 4 & 1/2 cups (540g) of flour has been incorporated, stop mixer, and lightly tap the dough with finger. If it feels excessively wet and sticky, add an additional 1-2 Tablespoons of flour and mix until incorporated. Stop mixer and check again. Add up to another 1/4 cup (30g) flour as needed. Dough should feel soft and slightly tacky (slightly sticking to fingers), but not wet.
- Knead dough on low speed for 6-8 minutes, until smooth and cohesive.
Bulk Fermentation
- Place dough into a large, greased bowl. Cover and let rise in warm spot in the kitchen for about 90 minutes, or until the dough has doubled in size.
Shape
- Deflate dough and place on lightly floured work surface. Roll out to a rectangle about 16×20-inches in size.
- Layer the cheese, jalapenos and bacon in three rows along the length of the dough. Each row should have a two-inch border. With a pizza cutter, cut the dough between each row of filling. You’ll make two cuts, dividing the dough into three strips.
- Carefully roll up each strip of dough lengthwise. Pinch the seams of the dough shut to keep it from opening. You’ll end up with three long ropes of filled dough.
- Pinch the three ropes of dough together on one end. Braid the dough. Begin by taking the right piece and bring it to the center, crossing it over the center piece. Then take the left piece and bring it to the center, crossing it over the center piece. Repeat until entire loaf is braided. Pinch the dough together at each end to keep the braid from unraveling.
- Place diagonally on a baking sheet lined with parchment paper. Lightly cover with plastic wrap and let rise 45-60 minutes. Towards the end of the rise time, preheat the oven to 350°F/175°C.
- Remove the plastic wrap and brush the surface of the loaf with egg wash.
Bake
- Bake for 28-33 minutes or until golden brown on top.
- Remove pan from oven and place on a wire cooling rack. Let cool at least 10 minutes before serving.
Notes
- *You can swap out the granulated sugar for equal amount of honey
- **Sourdough option: You can swap out the instant yeast for 1/2 cup (140g) of active starter. Be sure to reduce the amount of water and flour by the amount you are adding with your starter. Also remember that rise times will most likely be at least doubled when using sourdough option.
- Windowpane Test: After kneading, take a piece of dough and stretch it. It should stretch several inches without tearing and be slightly translucent. If it tears easily, knead it an additional 2 minutes and check again.
- Poke Test: When trying to decide if dough has risen enough for final proof, gently press on the side of the loaf with your fingertip. It should leave an indent that slowly springs back. That indicates the dough has risen enough and is ready to bake. If it does not leave an indent, it needs more time to rise. If it leaves and indent that never springs back it has risen too long.
- This makes a very large loaf. You can opt to divide the dough in half and bake two smaller loaves. If so, bake one loaf at a time, reducing the bake time by 5-7 minutes.


I really want to make this with my sourdough… but new to subbing! Do I reduce flour and water by 140g each or 70g each? Thanks!
Happy to clear that up! If you are using a 100% hydration starter (equal parts flour and water), then yes, you will decrease the recipe by 70g flour and 70g water.
Thank you!!
Could I use all whole wheat flour or part whole wheat flour if I add wheat gluten? Would that work?
Yes, you could swap out the white for wheat flour. I would definitely add in about 1/4 cup vital wheat gluten. You will notice that the bread will be denser than when using white flour. Let me know how it turns out.
The bread turned out great! The friend I made it for wants me to teach her how to make this loaf! It really is a huge loaf of bread but four people are a third of it at one dinner! Thank you so much I’m starting to feel like a real bread maker;).