Disneyland Bacon Mac and Cheese Cones
If you’ve ever strolled through Cars Land at Disney California Adventure, you’ve probably caught a whiff of something truly irresistible—Disneyland bacon mac and cheese cones, topped with bacon, from the Cozy Cone Motel! These delicious, hand-held delights are the ultimate comfort food: creamy, baked bacon mac and cheese served in a cone made of golden, yummy homemade bread. If you can’t make it to Disneyland anytime soon, don’t worry! You can recreate this magic at home with this easy recipe.

(This post contains affiliate links. I may earn commissions from purchases.)
Why You’ll Love This Recipe
- Disney Magic at Home – Bring a taste of the parks right to your kitchen!
- Hand-Held Comfort Food – The perfect blend of baked macaroni and cheese with bacon wrapped in warm, fluffy pizza dough.
- Crowd-Pleasing Dish – Just like my Garlic Rosemary Pull Apart Bread, this is great for parties, game days, or fun family dinners.
- Customizable – Swap cheeses, add spices, or throw in extra toppings to make it your own.
Recipe Overview
- Make cone molds with paper and aluminum foil to shape the dough.
- Make two batches of my Quick and Easy Pizza Dough. (I also love this dough for another yummy party snack, my Pizza Rollups.)
- Bake the cones and let them cool.
- Make the baked macaroni and cheese with bacon casserole.
- Scoop the hot mac and cheese into the bread cones. Serve and enjoy!
Equipment
When making the Bread Cones: A stand mixer will work best, but if you don’t have one, you can mix and knead the dough by hand.
For the Macaroni and Cheese: Most likely you have all the equipment you need – a small and large saucepan, a pot for boiling pasta, and a 3-quart (9×13-inch) casserole dish.
Cone Baskets: If you’re serving these baked mac and cheese cones at a party and need a cute and practical way to have them pre-assembled, you might want to get these cone baskets. You can also use them for other things like French Fries, Soft Pretzel Bites, or Doughnut Holes.
What Bread Dough to use for the Cones
You can use a store bought pizza or pastry dough to make your bread cone, but I love using my Quick and Easy Pizza Dough recipe. It bakes up sturdy enough to hold a cone shape and all that mac and cheese! But if you want a softer dough, my Parker House Rolls Recipe would be incredible too! I prefer to use bread made from scratch – I know exactly what ingredients are going into it, unlike the store bought dough that has a huge list of ingredients I can’t even pronounce.
This recipe is so easy to throw together. Mix the ingredients, let the dough rest for 20 minutes. It will puff up slightly. Then roll out, shape the cones, and bake. No need for a second rise! You can go to my Quick and Easy Pizza Dough post to see more step-by-step instructions on how to mix the dough.
This recipe calls for two batches of my pizza dough. This will make 8 large bread cones. If you only want 4 bread cones, make one batch of dough. But you’ll have lots of extra mac and cheese for seconds and thirds!

Make the Cone Molds
While the dough is resting, you can assemble your cone molds. We’re making 4 of them. Gather 4 pieces of paper (heavy paper works best), a roll of aluminum foil, and a stapler.
Starting at the bottom right corner, roll the paper into a cone shape.


Then staple it along the edge to secure it.
In a similar way, roll up the paper cone in aluminum foil, completely covering it. This will keep the dough from sticking to the paper mold, as well as keep the paper from burning in the oven.


And now you have the perfect mold to shape your bread cones! Once your dough is finished resting, it’s time move on to the next step…
How to Shape the Bread Cones
Roll one piece of the dough to a 12×18-inch rectangle. Cut 12, 1-inch strips lengthwise.

Carefully wrap one strip of dough around a cone, beginning at the pointy end. Once you have wrapped one strip of dough, begin wrapping another piece of dough where the first one left off, pinching the ends together to create a seamless appearance. Add one more strip of dough, using 3 per cone.

Place on a baking sheet lined with parchment paper. Repeat this process until all 4 cones have been wrapped with dough. Brush dough with olive oil. This will give the bread a nice golden crust when it bakes.


Bake at 450°F for 8-10 minutes, turning each bread cone every 2-3 minutes. This will help them to get evenly browned. If you need to add additional bake time to make sure they’re golden brown, that’s okay. Each oven bakes differently.
Allow the bread cones to cool for about 10 minutes before removing the molds. Then you can repeat the same process with the second ball of dough, yielding 8 total bread cones. Of course, if you only want 4 bread cones, only make one batch of the dough – but you’ll have lots of extra mac and cheese for seconds and thirds!
Speaking of mac and cheese, while your bread cones are cooling, you can go ahead and get your macaroni and cheese going…
Ingredients for Baked Mac and Cheese with Bacon

- Macaroni or Cavatappi – whichever kind of pasta you prefer!
- Once cooked, add some of the bacon drippings to the pasta to help keep it from sticking and give it extra yummy bacon flavor!
- You’ll make a thick sauce with the butter and flour first, then adding warm milk to create a base for the mac and cheese.
- Cheeses – We’re using Gruyere for it’s yummy flavor and because it melts really well. We’re also using sharp cheddar, because…it’s iconic for mac and cheese and tastes delicious!
- The salt, pepper and nutmeg add flavor to the mac and cheese and enhance the flavors from the cheeses.
- The chopped bacon makes it the ultimate savory dish!
How to make this baked Bacon Mac and Cheese Recipe
Cook the Bacon
Cook the bacon until it’s crispy. Drain it on a paper towel. Once it’s cooled, chop it up to add to the mac and cheese later. Make sure you reserve the bacon drippings!
Make the Macaroni
Cook the pasta according to the directions on the package. Cook it al dente – overcooking it will lead to a mushy macaroni and cheese. Once cooked and drained, add 2 Tablespoons of the bacon drippings and toss it around. This will keep the noodles from sticking and add extra yummy bacon flavor to the mac and cheese!

Make the cheese sauce
Warm the milk in a small saucepan and set it aside. In a larger saucepan, whisk together some of the butter and all of the flour. Once its smooth, add the warm milk and cook for another 1-2 minutes. Remove from the heat. Add the cheeses, salt and pepper and nutmeg and mix together until smooth, creamy and cheesy!

Put it all together
Add the cheese mixture to the cooked macaroni and stir together until incorporated. Then gently fold in the bacon. Fill a 3-quart casserole dish with the mac and cheese. Look at that cheesy, bacon goodness!

Top with breadcrumbs
Melt 2 Tablespoons of butter and combine it with the breadcrumbs. Sprinkle on top of the mac and cheese. This adds some extra buttery crunch to the top of the mac and cheese, and it’s such a yummy final addition!

Bake
Bake at 375°F for 30 to 35 minutes. The cheese should be bubbling and the top of the macaroni and cheese will be lightly golden.

This baked macaroni and cheese with bacon is SO good all on it’s own! Seriously! You’ll have a hard time not grabbing a fork and eating it straight from the casserole dish! It’s golden and a little crunchy on the top! On the bottom, the cheese and butter creates a fried cheese crust that it absolutely irresistible!!
But, hold your horses! We’ve still got those delicious bread cones to fill! After the bubbly mac and cheese has cooled for at least 10 minutes, scoop a good amount into each bread cone.
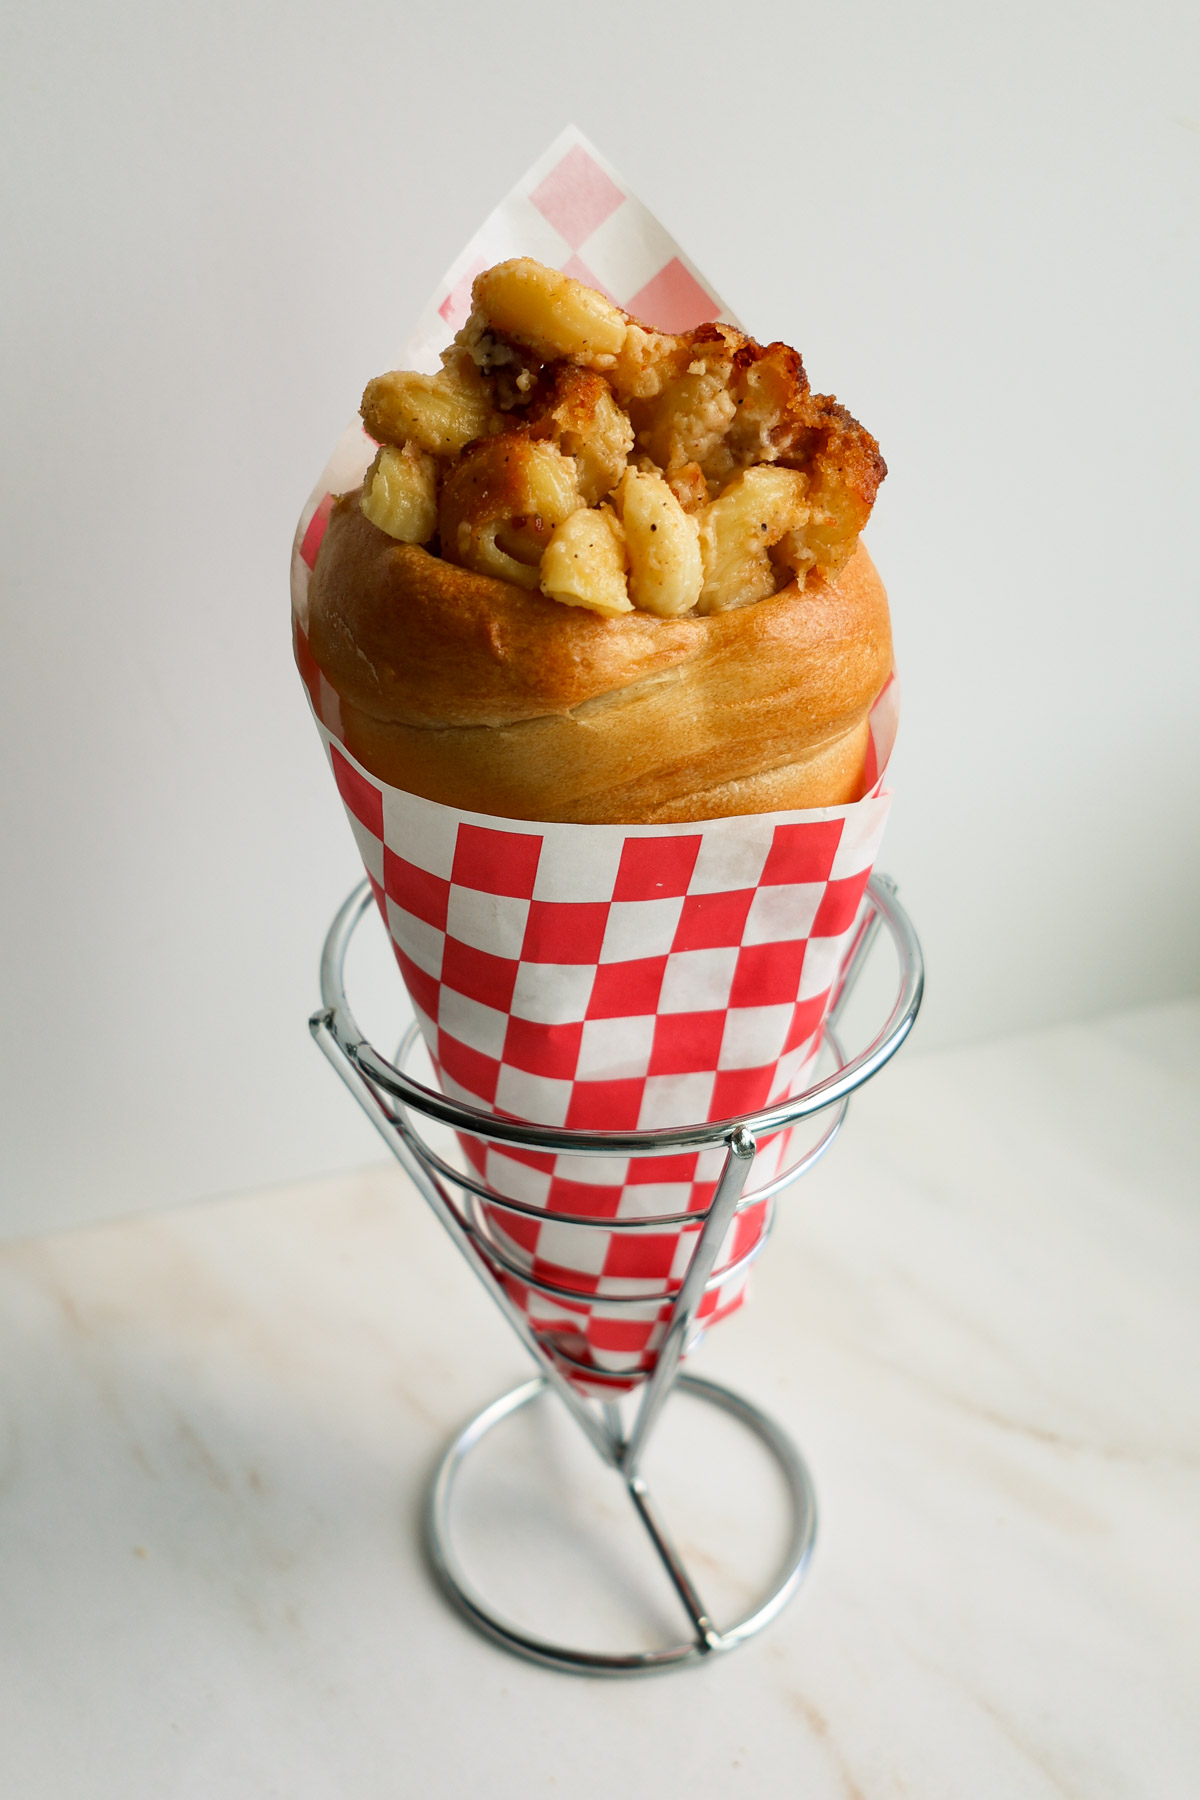
Serve them warm – it’s the ultimate comfort food and perfect for a big crowd!
Your entire crew will love these baked Disneyland Mac and Cheese Cones with bacon! Heck, it will save you a ton of money! No need to book a trip…you can enjoy this yummy Disney copycat treat, inspired by the Cozy Cone Motel, in your very own kitchen! Obviously the cones make this such a fun party food, but this bacon mac and cheese recipe is one you can definitely make anytime for a quick and easy meal! Trust me! You’ll enjoy every single bite!
Make Ahead Options
Even though this is a fairly easy recipe to make, there are several steps. If you’d like to break up the timeline and get prepared ahead of time, I have a couple of suggestions for you.
- Make the bread dough ahead of time. You can mix it and refrigerate it for up to 24 hours. Once you’re ready to shape the bread cones, remove the dough and let it rest at room temperature for about 15 minutes before dividing and shaping. Whether you’re using my Quick and Easy Pizza Dough or Parker House Rolls Recipe, keep in mind your dough will continue to rise, even in the refrigerator. The colder temperature simply slows down the process.
- Bake the bread cones ahead of time. Cool them and store in a ziplock bag or airtight container at room temperature for up to two days. Or you can freeze them for up to two months. To defrost, take them out of the freezer the night before and let them thaw at room temperature.
More fun recipes you’ll love
- Cheddar Jalapeno Stuffed Bread
- Soft Pretzels
- Apple Pie French Toast Sticks
- S’mores Cookies
- Cinnamon Roll Focaccia
Disneyland Bacon Mac and Cheese Cones
Equipment
- stand mixer optional
- saucepan
- pasta pot
- baking sheet
- 3-quart casserole dish (9×13-inches)
Ingredients
- 2 batches my Quick and Easy Pizza Dough
- 6 slices bacon
- 2 Tablespoons bacon drippings
- 1 pound elbow macaroni or cavatappi
- 2 Tablespoons kosher salt
- 4 cups milk 2% or whole
- 8 Tablespoons unsalted butter divided
- ½ cup all-purpose flour
- 8 ounces Gruyere cheese grated
- 8 ounces sharp cheddar cheese grated
- 1 Tablespoon fine sea salt
- ½ teaspoon freshly ground black pepper
- ½ teaspoon ground nutmeg
- 1 cup breadcrumbs
Instructions
Make the Bread Cones
- Mix one batch of my Quick and Easy Pizza Dough and let it rest, covered, for 20 minutes.
- Preheat oven to 450°F.
- While the dough is resting, make 4 cone forms for the dough with paper and aluminum foil. Roll an 8.5×11-inch piece of paper into a cone shape. Cover with aluminum foil to keep it from burning in the oven (see pictures in post for instructions). Set aside.
- Divide the dough into two equal pieces. Each piece of dough will make 4 large bread cones.
- On a floured work surface, roll out one piece of dough to a 12×18-inch rectangle. Cut 12, 1-inch strips, lengthwise.
- Carefully wrap one strip of dough around a cone, beginning at the pointy end. Slightly overlap each the dough when wrapping it around the cone to ensure there are no gaps. Once you have wrapped one strip of dough, begin wrapping another piece of dough where the first one left off, pinching the ends together to create a seamless appearance. Add one more strip of dough, using 3 per cone. Place on a baking sheet lined with parchment paper. Repeat this process until all 4 cones have been wrapped with dough. Brush dough with olive oil.
- Bake for 8-11 minutes, turning the cones every 2-3 minutes to brown all sides.
- Allow to cool for 5 minutes and then carefully remove the cone forms and continue to cool the bread cones on a wire rack (see post for make ahead options).
- Repeat steps 5 through 8 with the second piece of dough.
Make the Mac and Cheese
- Preheat oven to 375°F.
- Cook the bacon until crispy. Place on a paper towel to drain and cool. Reserve the bacon drippings and set aside. Once cooled, chop the bacon and set aside.
- In a large pot, bring 4 quarts of water to a boil. Once boiling, add 2 Tablespoons kosher salt to the water. Add pasta and cook until al dente, according to package instructions.
- Remove from heat. Drain pasta and return to pot. Toss pasta with 2 Tablespoons of the bacon drippings. Cover and set aside.
- In a small saucepan, heat the milk. Do not bring it to a boil. Remove from heat and set aside.
- In a large saucepan, melt 6 Tablespoons of the butter on medium low heat. Add the flour and cook for 2 minutes, whisking constantly. Add the hot milk and whisk together. Cook an additional 1-2 minutes, whisking until smooth.
- Remove from heat and add the Gruyere and cheddar cheeses, the fine sea salt, pepper, and nutmeg. Stir until combined. Pour the cheese sauce over the cooked macaroni and gently stir to combine. Fold in the chopped bacon.
- Fill a greased 3-quart casserole dish with the mac and cheese.
- In a small bowl, melt the remaining 2 Tablespoons of butter. Combine with the breadcrumbs. Sprinkle over the top of the mac and cheese.
Bake
- Place casserole dish on the center rack in the oven. Bake for 30-35 minutes, until the sauce is bubbly and the top is slightly golden. (Cover with foil if the top is browning too quickly.) Remove from oven and allow to cool for 10 minutes before serving.
Assemble the Mac and Cheese Bread Cones
- Scoop the mac and cheese into each bread cone, compacting it so it fills the entire cone. Serve while warm and enjoy!
Notes
- If using active dry yeast, add the yeast to the water first and let it bloom for 10-15 minutes. If yeast does not bubble up, it needs to be replaced. If it does bubble up, you can proceed with the rest of the recipe. See my article Active Dry Yeast vs. Instant Yeast for more about baking with yeast.
- You can use store bought pizza dough instead of making homemade dough, BUT the homemade pizza dough is SO easy to make! One batch of the homemade recipe makes about 18 ounces of dough. This makes 4 cones. I suggest either doubling or making two batches of the Quick and Easy Pizza dough for 8 cones, as shown for this recipe. Most store bought doughs are around 14 ounces, so you’ll need to buy two packages. If using store-bought dough, your cones will be slightly smaller than the homemade ones.
- Once completely cooled, keep bread cones in an airtight container until ready to use. This will keep them from drying out.