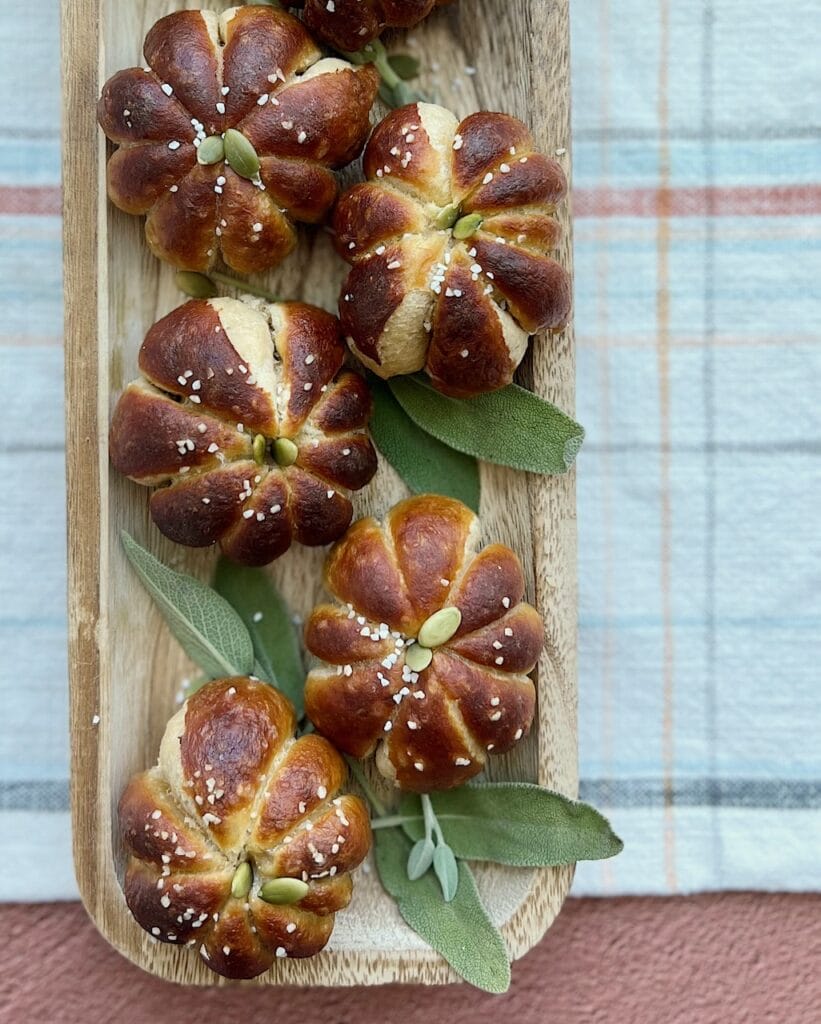
These buttery, pull apart, pretzel rolls are so soft and delicious. Use baker’s twine to create a cute pumpkin shaped dinner roll – it’s the perfect addition for any Fall meal!
What you’ll love about these rolls
Of course, the number one reason you’ll love these rolls…they’re made of rich, buttery, soft pretzel dough! But if you need more than that, here’s a couple more reasons:
- These pumpkin shaped rolls are so cute for a special Fall dinner table! They are fun all season long, from Halloween to Thanksgiving! Serve these warm alongside your favorite soups or on your Holiday table! They’re a show stopper!
- The pumpkin shape makes these rolls perfect for pull-apart enjoyment! The wedges tear away easily and are ideal for dipping in soups and chilis!
Mixing the dough
This dough come together so easily in a stand mixer, but you could definitely mix it by hand (it will just require a good arm workout!)
- Using a stand mixer with the dough hook attachment, add the warm water, instant yeast, brown sugar, melted butter, salt and 5 cups of the flour. Mix on low speed, about one minute, until the ingredients are incorporated and a smooth dough forms.
- Stop the mixer and lightly tap on the dough with your finger – if it feels wet and sticky, add a bit more flour and fully combine it before testing the dough again.
- As soon as the dough feels soft and slightly tacky without being sticky, it’s time to stop adding flour. If you’re mixing it in a stand mixer, knead on low speed for 3-4 minutes, until the dough becomes more cohesive and pulls away from the sides of the bowl.
- Place the dough in a large greased bowl and turn it so that all sides are coated in the oil. Cover it with plastic or a clean kitchen towel. Let it rise for 60-90 minutes, or until it doubles in size. This rise will help strengthen the dough, increase its “fluffiness” and texture and make it easier to handle when shaping.

Shaping
Once the first rise is over, turn the dough out onto a floured work surface. Divide the dough into 12 equal sized pieces.
Shaping the dough is an important part of getting beautiful results on both the outside and the inside of the roll. Round each piece of dough into a ball by pulling the dough over and pinching it underneath. While cupping the dough ball with your hands, rotate the dough in a circular motion until the outer surface of the dough ball tightens and you feel the interior of the dough come together to form a solid ball of dough with no air pockets.
I use this technique whenever shaping round rolls. It really makes a big difference! See my post for Skillet Dinner Rolls where I have a video that shows how to use this technique.

Using Baker’s Twine
Using baker’s twine will allow you to make these festive pumpkin shaped dinner rolls. Be sure to use a twine that is meant for cooking (don’t use a rough, jute twine). I like to use this twine found HERE.
- Cut 12, 30-inch pieces of baker’s twine.
- Soak the pieces of twine in olive oil, making sure you coat all of the twine. This will make removing the twine from the baked rolls much easier.
How to make pumpkin shaped rolls
Once you have the dough balls all shaped and rounded out, it’s time to create some pumpkins! Take a piece of twine from the bowl of olive oil, run it between your fingers to remove any excess oil.
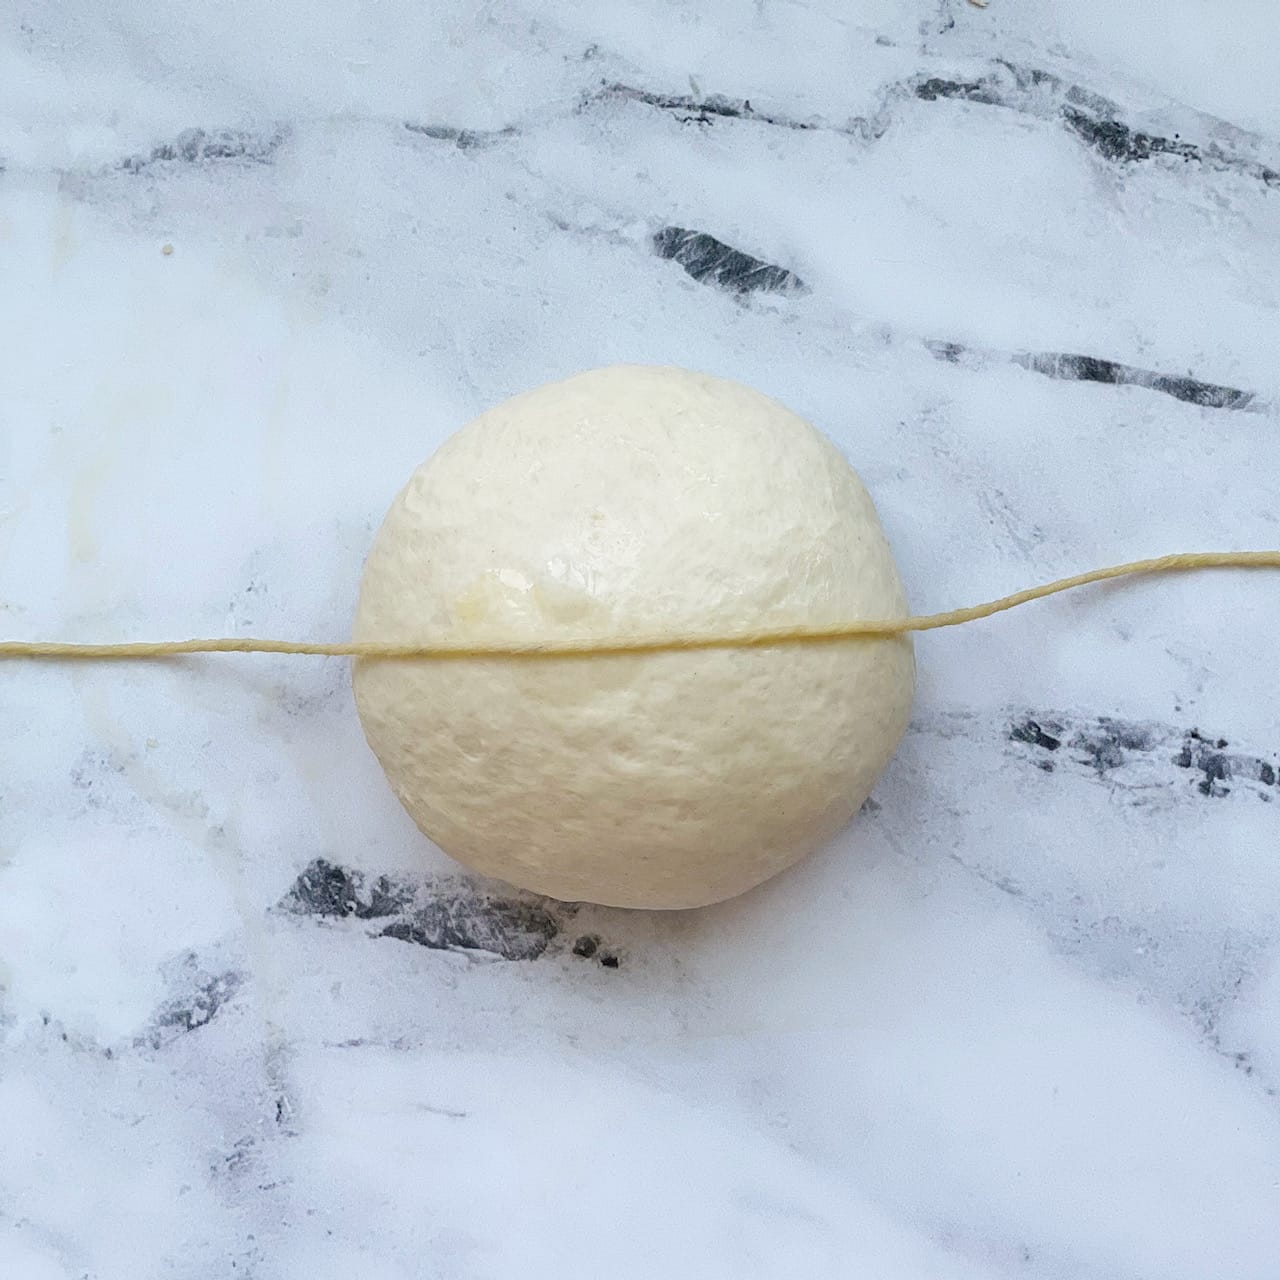
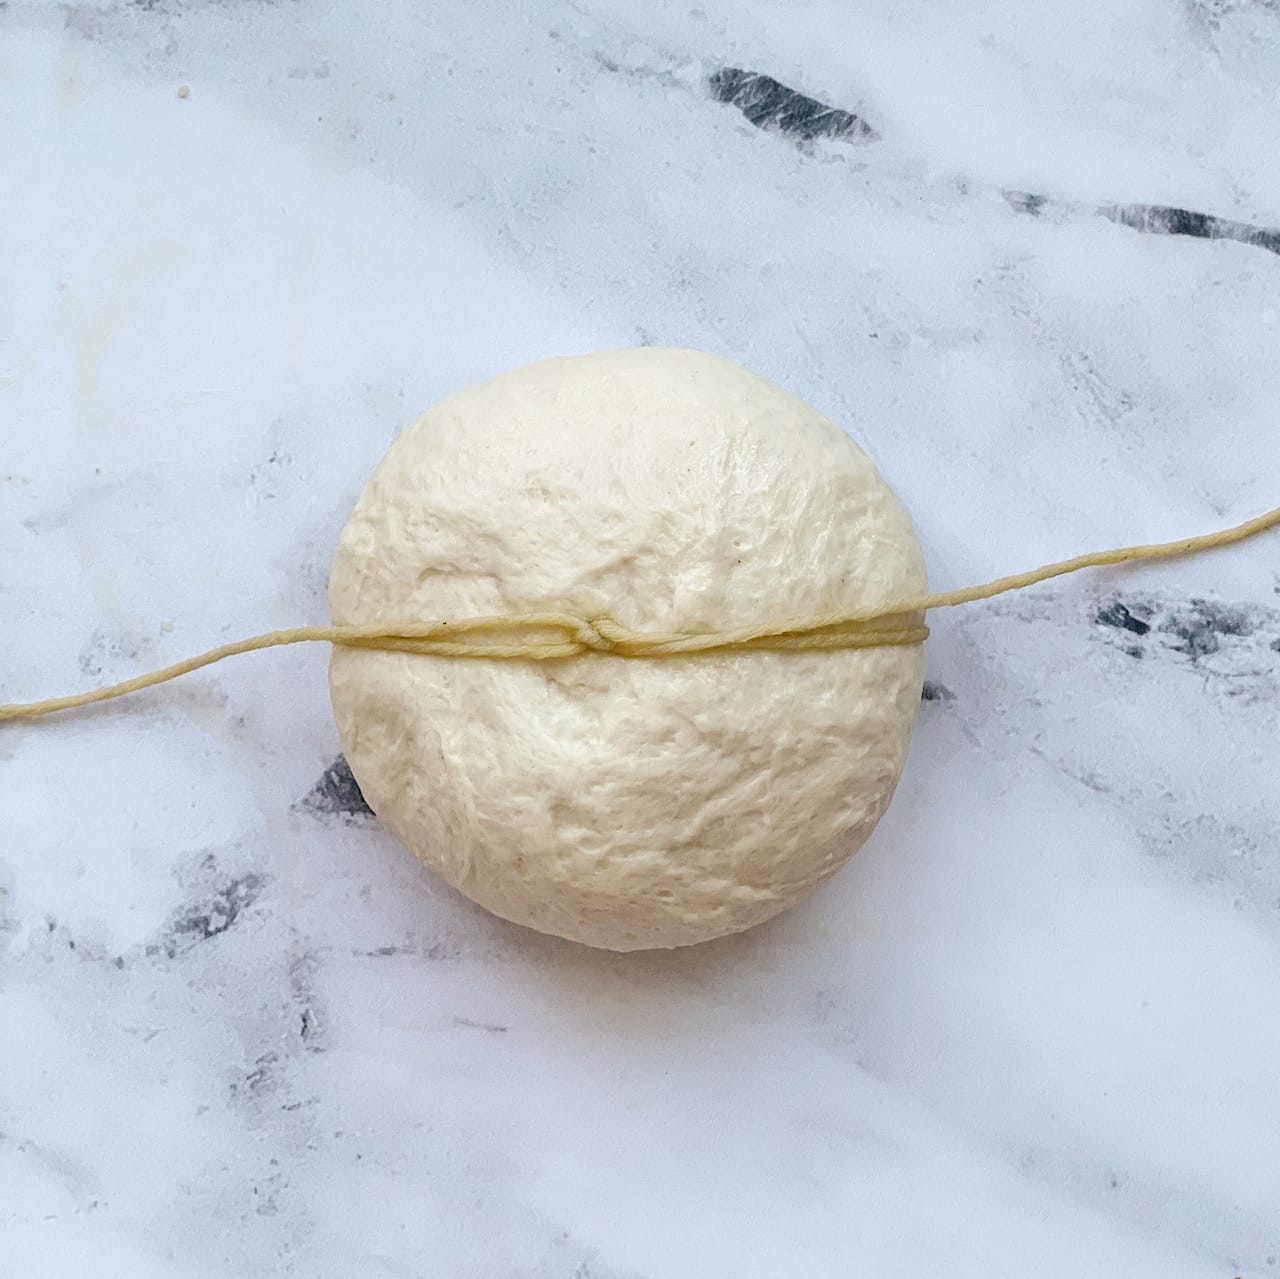
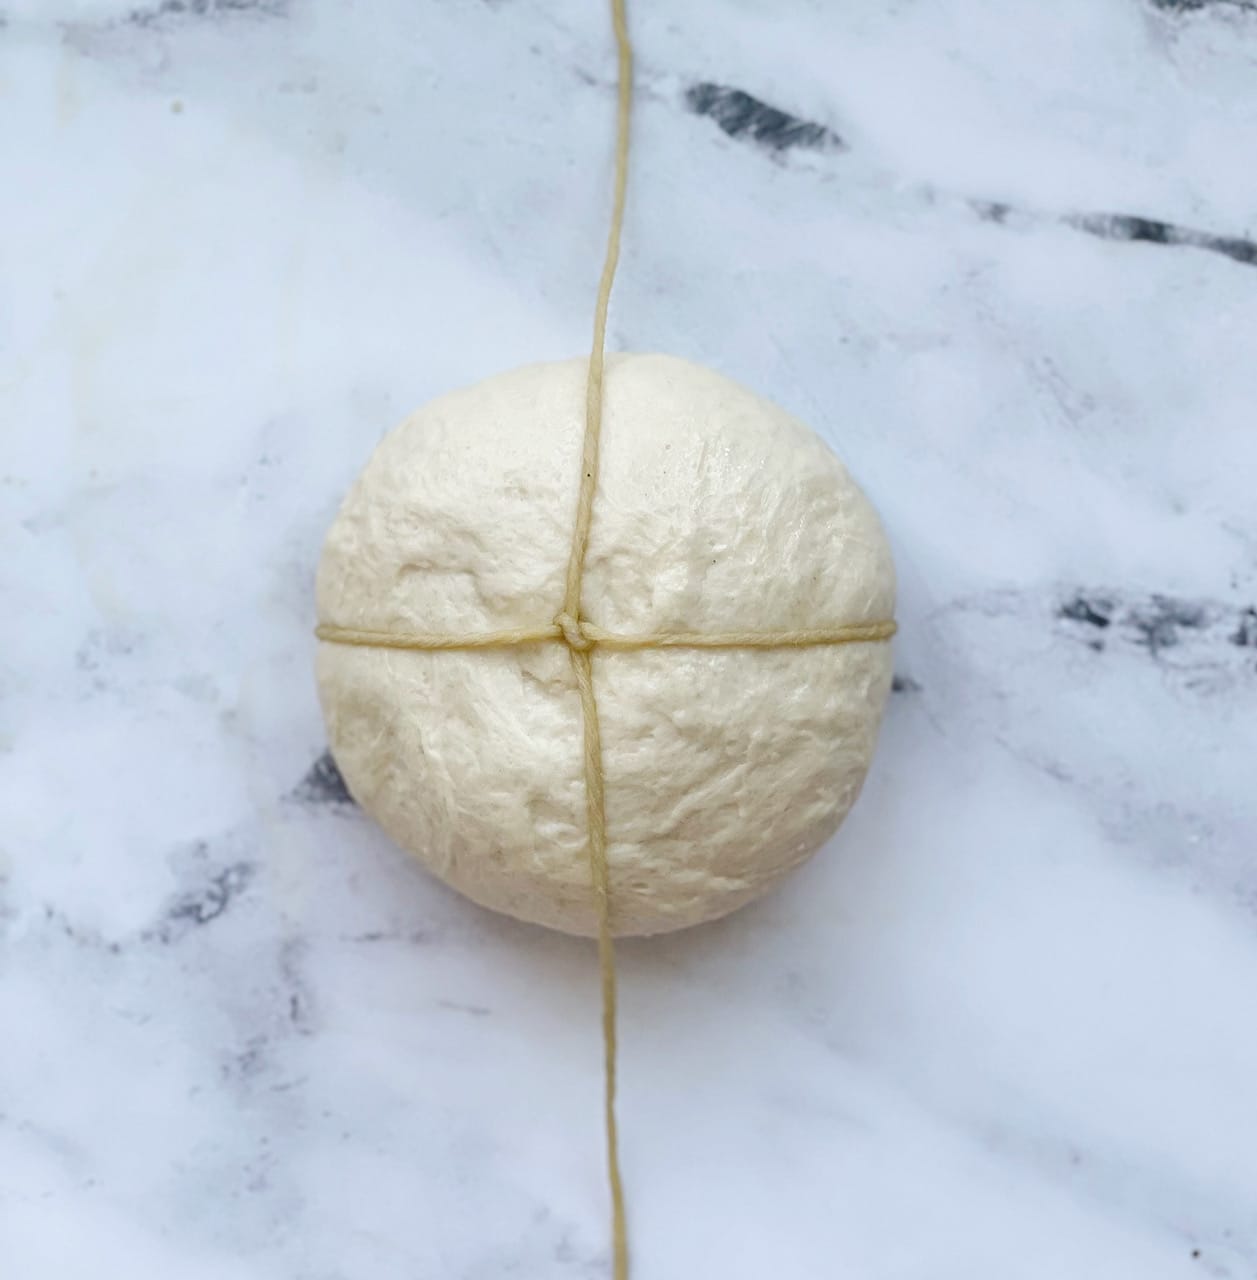
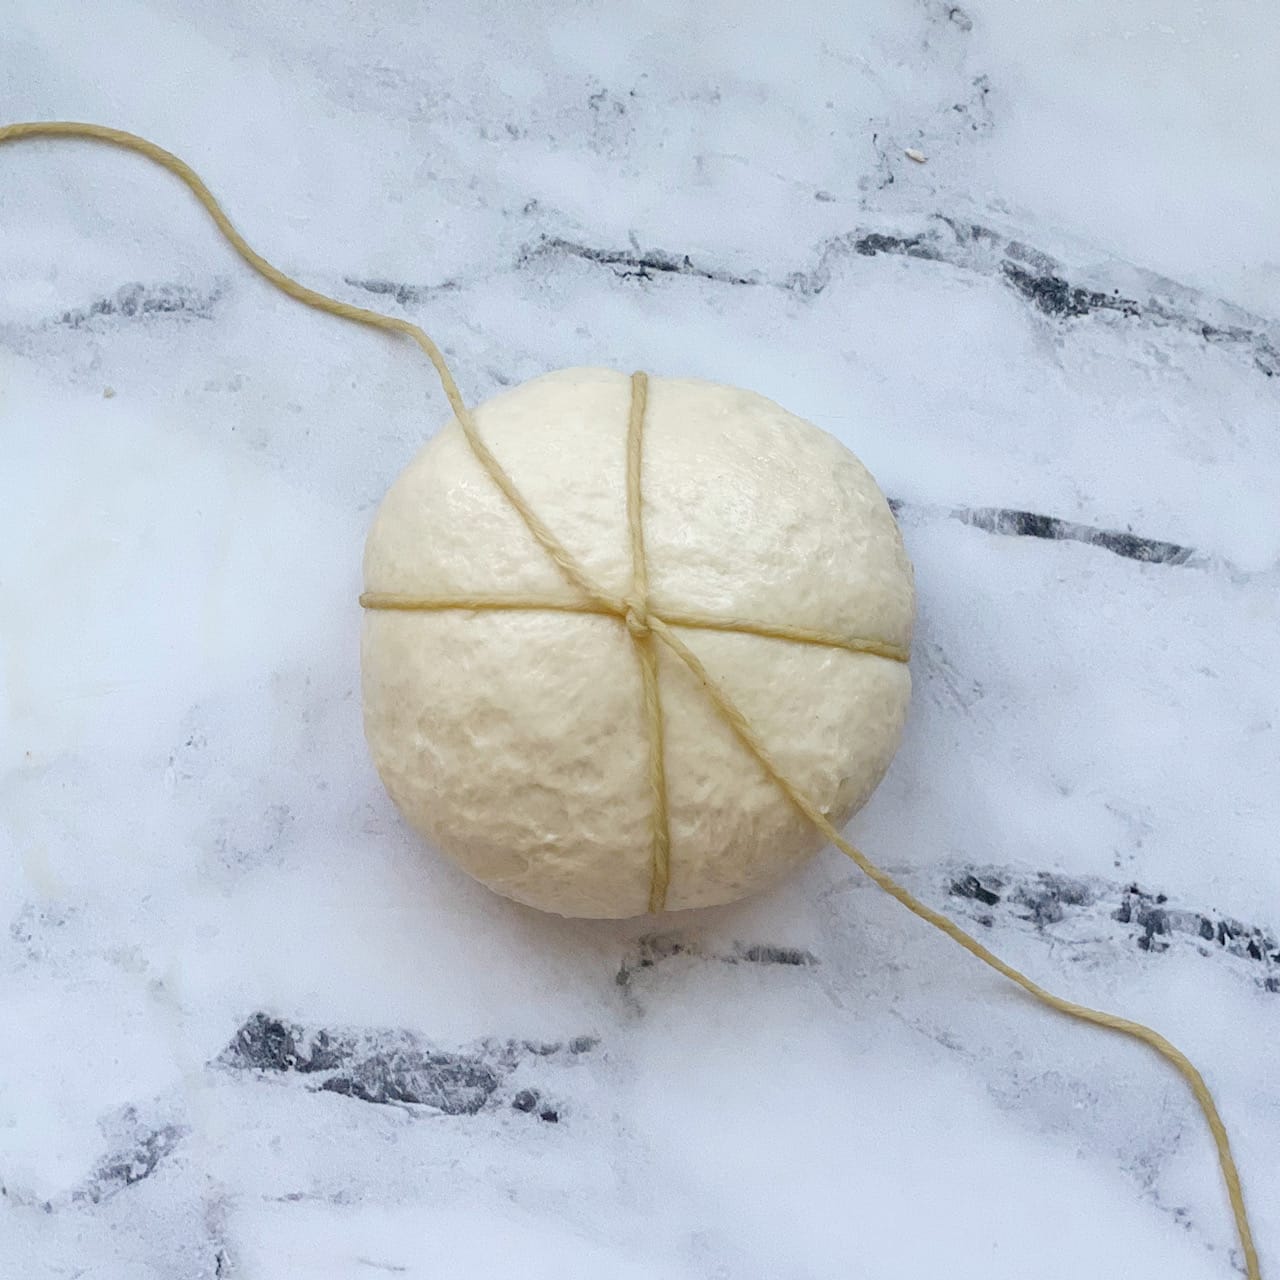
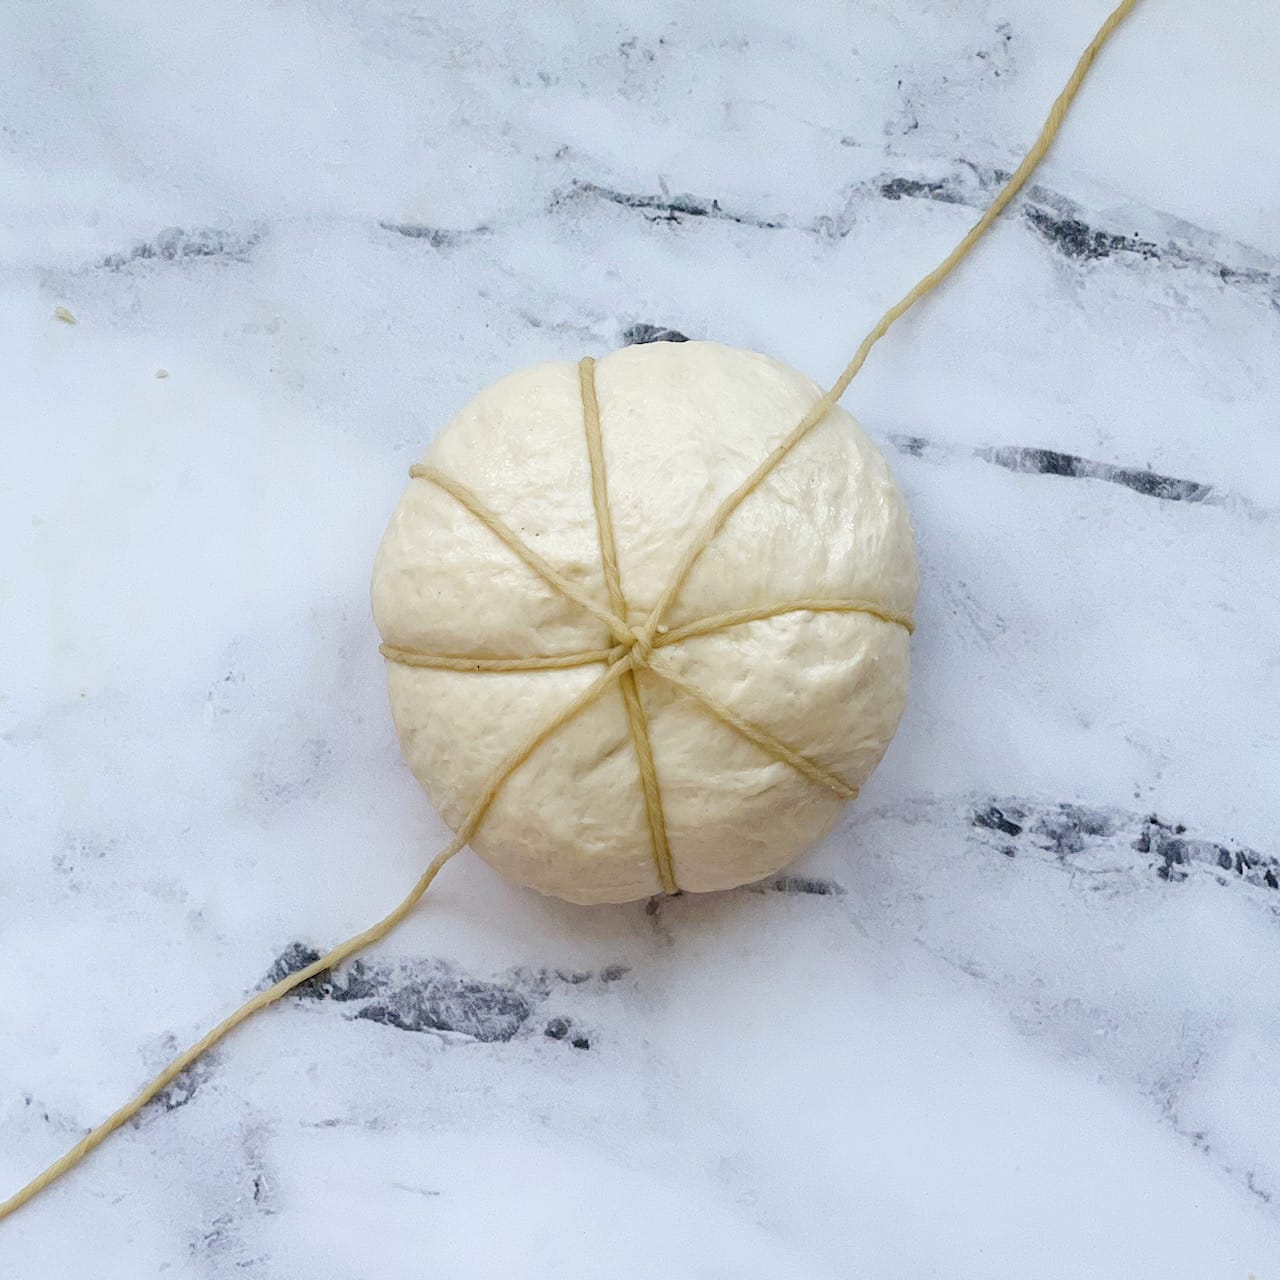
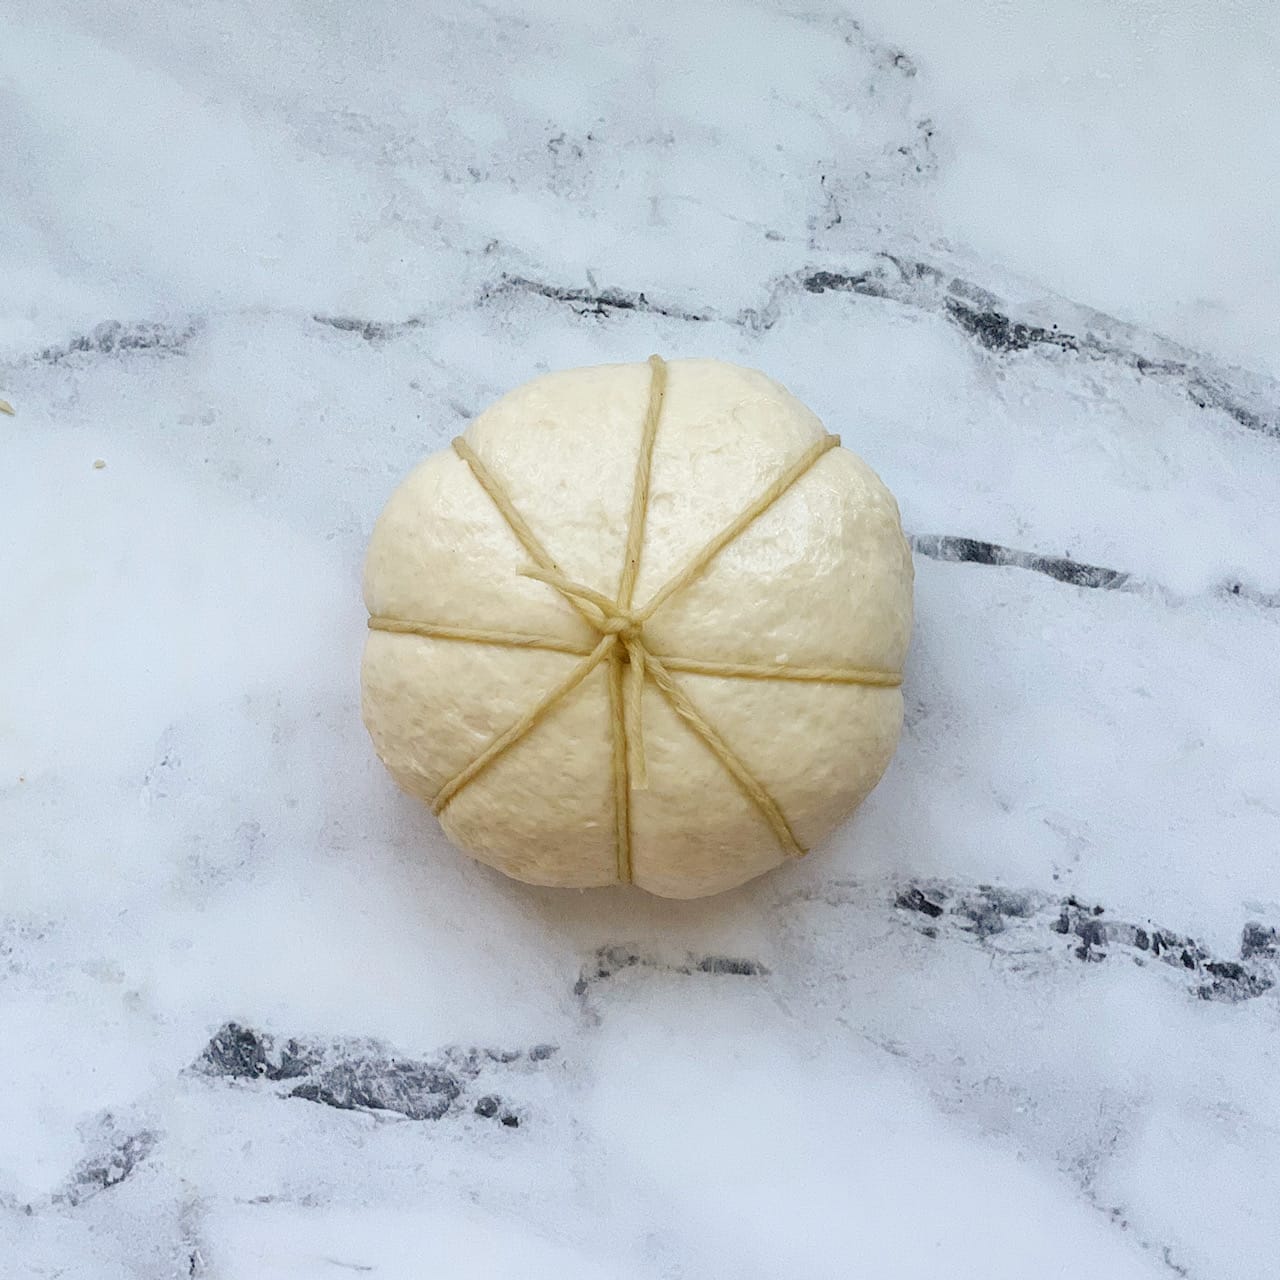
Find the middle of the piece of twine and place it over the center of the dough ball horizontally. Flip the dough over and bring the ends of the twine together. Tie a double knot in the center of the dough ball, making sure not to pull the twine too tightly around the dough. Take the ends of the string and arrange them vertically (in the opposite direction of the twine you just double knotted). Flip the dough back over, bring the ends up and tie another double knot in the center, loosely wrapping the twine around the dough. Arrange the ends of the twine diagonally, flip the dough over and bring the ends together. Tie a double knot. Arrange the ends of the twin diagonally in the opposite direction. Flip the dough over and bring the ends together, tying a double knot again in the center. Cut off the excess string. You should now have a dough ball that is wrapped with twine, creating eight sections.
Prepare your baking sheets
Before you place your rolls on the pan, line it with a silicone baking mat and spray it with nonstick spray. In general, the silicone mats will keep the rolls from sticking and browning too quickly on the bottoms. But since we’re boiling the rolls in a baking soda bath before baking, adding the nonstick spray is key to keeping the wet rolls from sticking to the pan.
If you don’t have a silicone baking mat, use parchment paper. You’ll also want to spray that with nonstick spray as well.

How to bake soft pretzels
Before baking the rolls, you’ll need to boil them quickly in a baking soda bath. The baking soda bath will help the pretzel rolls to brown quickly in the oven and create a chewy outer crust. It’s what creates that distinctive soft pretzel flavor that we love!
- Create the baking soda bath by combining baking soda and water and whisk together in a saucepan over medium to high heat until the baking soda dissolves and the water comes to a boil. Reduce the heat to a simmer.
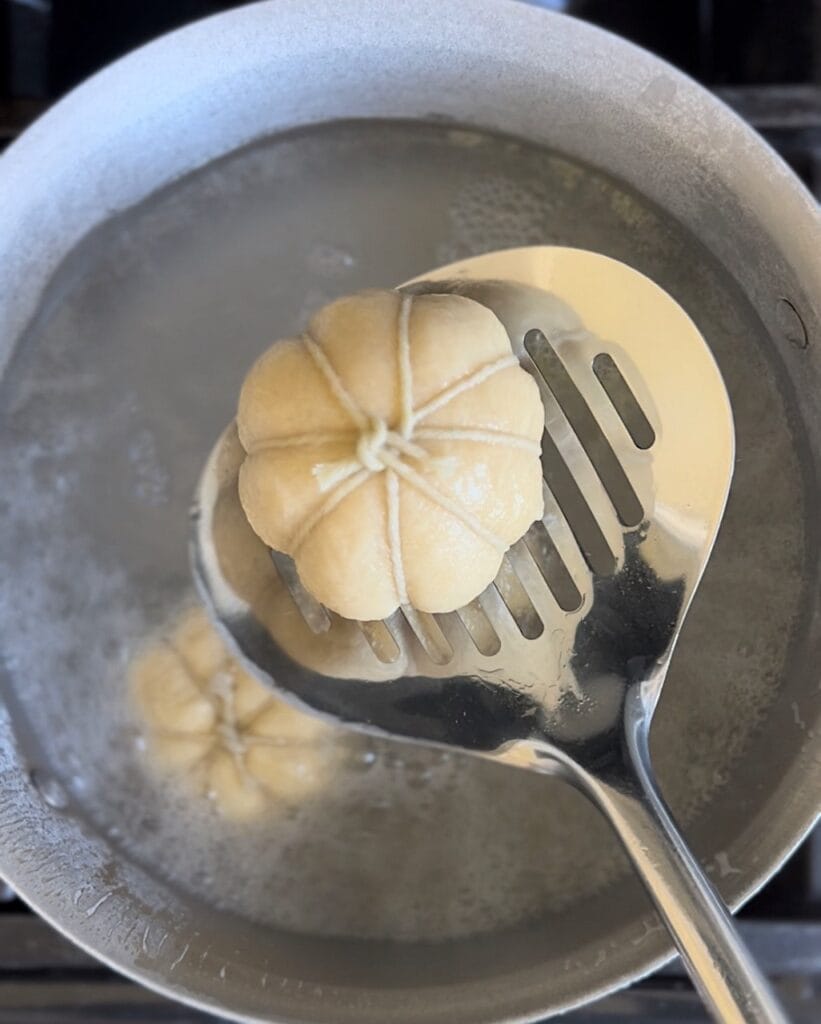
- Place 2-3 of the pretzel buns, at a time, in the water and cook them for only 30 seconds on each side.
- Remove them from the water and place them on the prepared baking sheet. You’ll notice that the rolls expand a bit during this process (another reason you don’t want to wrap them too tightly with the twine).
- Sprinkle with pretzel salt and bake immediately until they are a deep golden brown.
- Right after removing them from the oven, brush the pretzel rolls with melted butter – this creates a rich, buttery flavor and adds a beautiful shine to the rolls!


My tip for baking pumpkin shaped pretzel rolls
Be sure to let the rolls cool for 15 minutes before removing the twine and enjoying. Similar to a loaf of bread, the rolls are still baking internally right out of the oven. Giving them some time to rest and cool, will give you a perfectly baked pretzel roll – inside and out.
Enjoy these adorable and delicious rolls! They are such a fun way to celebrate the wonderful and yummy things we love about Fall!
More recipes you’ll love
If you like these pumpkin shaped pretzel rolls, you’ll love trying these recipes too!
Leave a comment, Follow and Share
Leave a comment below if you have any questions about this recipe, or just let me know how much you enjoyed it! This really helps me out and helps others making this recipe!
Be sure to follow me on Instagram for more insights and videos about my recipes and bread making techniques.
And share your baking creations with me, by tagging me @thatbreadlady! I love to see how you are enjoying my recipes and share them with my Instagram friends!
(This post contains affiliate links, which means I make a small commission on products purchased from these links. Good news – I only recommend products that I love!)
Pumpkin Shaped Pretzel Rolls
Ingredients
Dough:
- 2 cups warm water, 105°F
- 1 Tablespoon plus 1 teaspoon instant yeast
- ½ cup brown sugar, packed
- 1 ½ teaspoons fine sea salt
- 8 Tablespoons unsalted butter melted and divided
- 5-7 cups all purpose flour
- *optional: pretzel salt
Baking Soda Bath
- 5 cups water
- ⅓ cup baking soda
For shaping
- 12 pieces of baker’s twine 30 inches long
- ½ cup olive oil
For Topping
- Top each roll with something resembling a pumpkin stem. Sliced pecan halves or pumpkin seeds work great.
Instructions
- Make the dough: Secure the dough hook attachment to your stand mixer. To the bowl, add the water, yeast, brown sugar, salt, 4 Tablespoons of the melted butter and 5 cups (600g) of the flour. Mix for about 1 minute, until the ingredients are fully incorporated. The dough should pull together into one mass. Stop the mixer and lightly tap on the dough with your finger. If it feels wet and sticky, add 2-3 Tablespoons of flour to the dough and fully incorporate. Feel the dough again and mix in additional flour if needed. The dough should be soft and pliable without sticking excessively to your hands. Once you’ve reached the right consistency, knead the dough for 3-5 minutes, until the dough is smooth, elastic, and is pulling away from the sides of the bowl.
- First rise: Place dough in a large, oiled bowl. Cover and let rise until doubled in size (about 60-90 minutes).
- Prepare the baker’s twine by cutting 12 pieces, each about 30-inches long. Place them in a small bowl with 1/4 cup olive oil, soaking the twine. Set aside.
- Prepare two baking sheets by lining them with a silicone baking mat or parchment paper. Spray nonstick spray on top of your liner. Set aside.
- Divide & Shape the dough: Once dough has risen to double in size, punch it down and turn out onto a floured work surface. Divide the dough into 12 equal pieces. Round each piece of dough by tucking the sides under and pinching the dough together on the bottom. Place the dough ball on your works surface and while cupping the dough ball with one hand, rotate the dough in a circular motion until the outer surface of the dough ball tightens and you feel the interior of the dough come together to form a solid ball of dough with no air pockets. (See my shaping video in my post for Skillet Dinner Rolls for a demonstration of this technique.)
- Once all 12 of the rolls are smoothed out to round balls, it’s time to wrap them with the baker’s twine. Remove one piece of string from the bowl of olive oil, pinching off any excess while sliding it between your thumb and finger tip.
- Wrap the dough: Find the middle of the piece of twine and place it over the center of the dough ball horizontally. Flip the dough over and bring the ends of the twine together. Tie a double knot in the center of the dough ball, making sure not to pull the twine too tightly around the dough. Take the ends of the string and arrange them vertically (in the opposite direction as the twine you just double knotted). Flip the dough back over, bring the ends up and tie another double knot in the center, loosely wrapping the twine around the dough. Arrange the ends of the twine diagonally, flip the dough over and bring the ends together. Tie a double knot. Arrange the ends of the twin diagonally in the opposite direction. Flip the dough over and bring the ends together, tying a double knot again in the center. Cut off the excess string. You should now have a dough ball that is wrapped with twine, creating eight sections.
- Place the twine-wrapped dough ball on the prepared baking sheet. Repeat step with remaining dough balls. Lightly cover the wrapped dough balls with a clean kitchen towel and let them slightly puff up while your oven preheats and you prepare the baking soda bath (be careful not to let them rise too much during this time, or the twine will bake too far into the roll, causing it to be a bit deformed).
- Preheat oven to 425°F.
- Baking Soda Bath: Combine 5 cups water and 1/3 cup baking soda in a medium saucepan. Bring to a boil while whisking frequently until the baking soda is dissolved. Reduce heat to a simmer. Carefully place 2 to 3 rolls in the water. Simmer for 30 seconds, flip with a metal straining spoon and simmer the other side for an additional 30 seconds. Remove with slotted spoon, draining any excess water over the pan, and place back onto prepared baking sheet. Repeat with remaining dough balls. If desired, sprinkle pretzel salt over the tops of the rolls while still wet.
- Bake for 9-12 minutes, or until deeply golden.
- Right out of the oven, brush the tops of each roll with a small amount of melted butter. Let cool for 15 minutes before clipping off the twine and removing from the roll. Insert a sliced pecan half or a couple of pumpkin seeds to the top center of each roll to resemble a pumpkin stem.
- Serve warm, but make sure you give it at least 15 minutes to cool slightly (the bread is continuing to bake internally when it comes out of the oven).
- Enjoy these festive rolls alongside your favorite Fall soup, chili or meal.
Notes
- You can make the dough ahead of time and refrigerate it until ready to bake. I suggest not refrigerating the dough longer than 24 hours, as this will affect the flavor of the finished roll.
- Be careful not to let the wrapped rolls rise too much – this will cause the twine to bake into the roll, resulting in a misshapen pumpkin.

